Pages

About Me + Copyright + Disclaimer + Privacy Policy

My Favorite Creations

Categories

Favorites

Monday, November 30, 2020

Bear Hugs Mini Circle Card (Jane's Doodles DT)


Hi everyone! :o)

Today I want to share with you this Bear Hugs Mini Circle CardIt was my spotlight project for Jane's Doodles on Tuesday, November 3rd, 2020. I didn't manage to share it here on my blog earlier, so I'm sharing it today. :o)


To make this card I was inspired with a card I made for our last Jane's Doodles Release Blog Hop (here).

For my card I used stamps from two GORGEOUS Jane's Doodles stamp sets'Pumpkin Patch' and 'Bear Hugs'. ♥


How I made my card....

First I created a background panel. I randomly stamped acorns and pumpkins on a Kraft paper in watermark stamping technique using VersaMark Watermark Ink. Then I die cut a wonky stitched circle from the Kraft paper.

Then I made a card base. I cut two circles from a white cardstock paper and glued them together on the top.

I glued the panel on the circle card base.

Next up was an image. I stamped an adorable bear on a watercolor paper and colored him in watercolor technique with Distress Inks. After drying, I fussy cut the bear and traced edges with a black marker.

I stamped another bear on a white cardstock paper, colored him with a grey marker and fussy cut him, leaving white thin border around the bear. Then I glued the watercolored bear over the grey one.

I die cut a speech bubble form a white cardstock paper and stamped a sentiment on it.

I love dimension on my cards. I glued 3-D foam squares (2 different thickness) on the back of the bear and the speech bubble and glued them on the card.

As a finishing touch I drew white highlights on the bear using a white gel pen, embellished the card with two brown enamel dots and my card was finished. :o)

I love how my card turned out. :o)


Card measurements: d = 83 mm (3 1/4")

List of supplies:


Amazing fact about Bears:
"Bears care deeply about family members. They will risk their lives and even fight to the death in order to save a cub or sibling from danger."


Thank you for stopping by and your kind feedback. Enjoy and smile! :o)


Milka

Sunday, November 29, 2020

Hey Pumpkin Mini Circle Card (Jane's Doodles DT October Spotlight)


Hi everyone! :o)

Today I want to share with you this Hey Pumpkin Mini Circle CardIt was my spotlight project for Jane's Doodles on Tuesday, October 13th, 2020. I didn't manage to share it here on my blog earlier, so I'm sharing it today. :o)


To make this card I was inspired with a card I made for our last Jane's Doodles Release Blog Hop (here).

For my card I used stamps from a GORGEOUS 'Pumpkin Patch' stamp set. ♥


How I made my card....

First I created a background panel. I stamped randomly pumpkins and a sign on a Kraft paper in watermark stamping technique using VersaMark Watermark Ink. Then I die cut a wonky stitched circle from the paper and stamped a sentiment in black on it.

Then I made a card base. I cut two circles from a white cardstock paper and glued them together on the top.

Next up were images. I stamped an adorable hedgehog, pumpkins and the sign on a watercolor paper and colored them in watercolor technique with Distress Inks. After drying, I fussy cut images and traced their edges with a black marker.

Then I stamped same images again on the Kraft panel, creating a scene. I colored images with a grey marker and glued watercolored images over the grey ones. It's paper pieced scene. :o)

I glued the panel on the circle card base.

As a finishing touch I drew white highlights on images using a white gel pen and my card was finished. :o)


Card measurements: d = 83 mm (3 1/4")

List of supplies:
  • Jane's Doodles 'Pumpkin Patch' stamp set
  • white cardstock paper
  • watercolor paper
  • Crafter's Companion Neenah Desert Storm Kraft Coloring Card
  • Tsukineko VersaMark Watermark Stamp Pad
  • Ranger's Archival Ink (Jet Black)
  • Tim Holtz Distress Inks:
    • Spiced Marmalade
    • Carved Pumpkin
    • Twisted Citron
    • Lucky Clover
    • Ground Espresso
  • Stabilo Fibre Tip Pen (Marker), Black 68/46
  • Stabilo Fibre Tip Pen (Marker), Light Grey 68/94
  • Uniball Signo White pigment ink pen
  • UHU liquid glue
  • Fiskars High Precision Personal Paper Trimmer
  • bone folder
  • Sizzix Big Shot
  • My Favorite Things, Die-namics Wonky Stitched Circle STAX
  • EK Success circle cutter
  • Xcut SelfHealing Cutting Mat A4
  • round acrylic block
  • Marabu fine rounded paint brush no. 3/0
  • scissors
  • paper towels
  • water


Thank you for stopping by and your kind feedback. Enjoy and smile! :o)


Milka

Saturday, November 28, 2020

Love You more than Pumpkin Pie Card

Hi everyone! :o)

Today I want to share with you CAS (clean and simple), one layer, Love You more than Pumpkin Pie Card. :o)


To make this card I used stamps from a BEAUTIFUL Jane's Doodles 'Pumpkin Spice' stamp set.


How I made my card...

I stamped a pumpkin pie slice and a sentiment directly on a white top folded card base.

Then I created masks from a post-it paper. I masked the pumpkin pie slice parts and ink blended unmasked parts with Distress Inks. For a crust I used a Tea Dye Distress Ink and for a filling, a Carved Pumpkin Distress Ink.

After ink blending, I removed masks and coated a whiped cream with a white pearl maker and left it dry for an hour.

After drying, I drew white highlights with a white gel pen and my card was finished. :o)


Card measurements: 89 mm x 120 mm (3 1/2" x 4 3/4")

List of supplies:
  • Jane's Doodles 'Pumpkin Spice' stamp set
  • white cardstock paper
  • Ranger Archival Ink (Jet Black)
  • Tim Holtz Distress Inks:
    • Tea Dye
    • Carved Pumpkin
    • Salty Ocean
  • pearl maker (pastel white)
  • Uniball Signo White Pigment Ink Pen
  • Fiskars High Precision Personal Paper Trimmer
  • bone folder
  • round acrylic block
  • Ranger Mini Ink Blending Tools
  • crafting needle
  • scissors
  • post-it paper (for masking)


Thank you for stopping by and your kind feedback. Enjoy and smile! :o)


Milka

Friday, November 27, 2020

Jane's Doodles Black Friday Sale


Happy Friday!! :o)

Jane has a Black Friday Sale and is offering amazing discounts.

There are stamp sets that are already marked down. All sets that are regular price will be marked down 40% at the checkout.

No code needed. The discount is calculated at the checkout. The sale ends on Sunday, November 29th, 2020.

For more information, jump over to Jane's Doodles Blog.


Enjoy and smile! :o)


Milka

Friday, November 20, 2020

TOP 4 and Winner (I Love Math Challenge #17)


Hi everyone! :o)

Thank you all for joining I Love Math Challenge #17!

We had 7 GORGEOUS entries!! ♥ Željka, Valentina, Kaja, Neha and I enjoyed very much visiting your blogs and seeing your Nine + Nature Cards. Amazing take on every single creation. :o) We had a hard task to pick our TOP 4 favorites, as in each our challenge.You can find all entries on main challenge post here.


Here are our TOP 4 favorites 
in order of entering the challenge:
Please visit tomorrow. I'll update our thoughts on each winning entry.


1. Cardogram #1
Željka: 
Valentina: 
Kaja: 
Neha: 
Me: 


2. Rosali B. - Dolphins Card #3
(card preview not possible as it can't be shared from Flickr; we couldn't leave you comments, as we don't have Flickr accounts)
Željka: 
Valentina: 
Kaja: 
Neha: 
Me: 


3. Autumn Blessings (Raga Senthil) #6
Željka: 
Valentina: 
Kaja: 
Neha: 
Me: 


4. Rosali B. - Fall Friends #7
(card preview not possible as it can't be shared from Flickr; we couldn't leave you comments, as we don't have Flickr accounts)
Željka: 
Valentina: 
Kaja: 
Neha: 
Me: 


Congratulations Ladies!! GORGEOUS cards!!! :o)

Here is a TOP 4 badge for you. Feel free to download it and proudly display it on your blogs. Please read Privacy Notice below (thank you!).


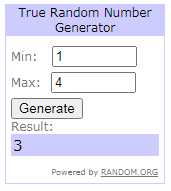
The winner of one Jane's Doodles stamp set of winner's choice from the TOP 4 Favorites, 
chosen by Random.org is

Congratulations!!! :o)


Please contact me in a week to claim your prize (email: milkagubo81 (at) gmail (dot) com). You have to send me confirmation e-mail from the e-mail address that you provided entering the challenge. If I don't hear back from you in a week (by November 27th, 2020, 11:59 PM, CEST), another TOP 4 Favorite will be randomly picked. I will give my best to reply to your e-mail within 72 hours. If you don't get a response from me in 72 hours, please resend your e-mail.


PRIVACY NOTICE
  • This post will not be deleted from my blog.
  • If your work was selected and featured as TOP 4 or winner in this post and you decide you want your data to be deleted, please contact me and I'll erase your data from this and challenge posts on this blog. Also, please reconsider keeping the badge that has been won in the challenge on your personal blog.
  • Challenge post will not be deleted from my blog, neither Inlinkz entries.
  • If you want to delete your entry from the I Love Math Challenge #17 or any other past challenge (all challenges are labeled I Love Math Challenge and all links provided on a challenge page), you should do it by yourself as the Inlinkz provides that option to anyone. If any technical difficulty occurs you should contact me and I'll delete your link through my Inlinkz account or contact Inlinkz by yourself.
  • No data is used in any other way than to run the I Love Math Challenge.
  • For more details, read full Data Protection and Privacy Policy Statement.


Thank you all for wonderful support and participation. I hope you'll join our next challenge, starting December 7th, 2020, 10 PM CET (UTC +1).

Thank you for stopping by. Enjoy and smile! :o)


Milka

Tuesday, November 17, 2020

Reindeer Card (CASology Week #378 mid-inspiration)


Hi everyone! :o)


Last Tuesday, November 10th, 2020, a new challenge started at CASology
This fortnight's cue word is Stag. :o)


Due to some unexpected situation, I didn't manage to prepare my blog post on time, so I'm bringing it today as mid-inspirationThere's still plenty of time to join the challenge, which ends on Monday, November 23rd, 2020, 9 AM, CDT (UTC -5).

We also have a sponsor for this challenge: STAMPlorations. Find all details about the prize over at CASology blog.


And here is my take on the challenge: CAS (clean and simple), Reindeer Card. :o)


Design defined: 
Ink blending & splattering on a background with stacked die-cuts works well on a CAS card.


How I made the card...

To make my card I was inspired with a card design from last year (here).

I ink blended Distress Inks directly on a white cardstock paper panel. When I was satisfied with the color, I splattered the panel with a water, dabbed the surface with a paper towel and left the card to dry on air.

Then I mixed a white tempera color with a bit of water, splattered the panel and again left it dry on air.

I wanted to create some dimension on my card, but I didn't want to use 3-D foams to do that. Instead, I used white carstock paper scraps and cut two rectangles, a bit smaller than the panel. Then I glued two rectangles together, glued them on the back of the panel and glued all together on a white side folded card base. I cut another white panel and glued it inside of the card, just to make my card sturdier.

Then I die cut three reindeer in the white cardstock paper and glued them together (stacked them). I glued stacked reindeer on the card and my card was finished. :o)

I really like this color combination and card design. :o)


Card measurements: 140 mm x 102 mm (5 1/2" x 4")

List of supplies:
  • Wiler Creativity Cutting Dies, reindeer die cut (gift from a dear friend Alice of Scrap & C... THANK YOU ALICE!!! )
  • Sizzix Big Shot
  • white cardstock paper
  • Tim Holtz Distress Inks:
    • Broken China
    • Peacock Feathers
  • UHU liquid glue
  • Fiskars High Precision Personal Paper Trimmer
  • bone folder
  • Ranger Mini Ink Blending Tools
  • Koh-i-noor tempera color, white
  • Marabu fine rounded paint brush no. #0
  • Marabu fine rounded paint brush no. 3/0
  • water
  • paper towels


hope you'll like my today's card and get inspired. For more inspiration, check out GORGEOUS cards my Design Teammates and our Guest Designer created. Do join us in this challenge, we are looking forward to see your CAS creations. :o)


Sue Symens
Chrissie (Guest Designer)


Thank you for stopping by and your kind feedback. Enjoy and smile! :o)


Milka

Friday, November 13, 2020

Jane's Doodles Flash Weekend Sale


Happy Friday!!

Jane restocked some stamp sets and added a sweet brand new stamp set in to the store, so she has a Flash Weekend Sale. :o)

Jane is offering 30% off on all regular priced stamp sets (this means that the discount doesn't count on sets that are already on sale). No code needed.

This sale lasts only this weekend.


Enjoy and smile! :o)


Milka

Friday, November 6, 2020

Space Mini Circle Card (bastel-traum challenge #94)

Happy Friday! :o)


On October 15th, 2020, a new challenge started at bastel-traum and our theme for the challenge #94 is Background. :o)


I'm a bit late sharing my post here on my blog, but there is still 9 days left to join in the fun. 

The challenge started on October 15th, 2020, at 9 AM, CEST (UTC +2) and ends on November 15th, 2020, at 8:55 AM, CET (UTC +1). Find all the details about the challenge, rules and prizes in a challenge post (here).


And here is my take on the challenge: Space Mini Circle Card. :o)


To make this card I was inspired with a card I made for this year's World Space Week Blog Hop (here).

For my card I used a spaceship stamp from Altenew 'Space Travel' stamp set.


How I made my card...

I colored a background in watercolor technique using Distress Inks Salty Ocean, Blueprint Sketch and Black Soot. I used a thick watercolor paper for it. When I was satisfied with the color, I left the panel to dry on air.

After drying, I die cut a wonky stitched circle from the panel. I stamped the spaceship in black on the panel and colored it with a black marker.

I mixed a white tempera color with a bit of water and splattered the panel with it. I left the panel to dry on air.

After drying, I ink blended edges with the Distress Ink Black Soot to achieve more dramatic look.

Next up was the spaceship. I stamped the spaceship on a thin watercolor paper and colored it in watercolor technique using Distress Inks. After drying, I fussy cut the spaceship, traced edges with the black marker and glued it over the spaceship that I stamped on the panel.

I made a card base from two circles that I cut from a black cardstock paper. I glued circles together on the top and glued the panel on the card base.

As a finishing touch, I drew couple white dots (stars) here and there on the panel using a white pigment ink pen and my card was finished. :o)


Card measurements: d = 83 mm (3 1/4")

List of supplies:
  • Altenew 'Space Travel' stamp set (spaceship)
  • black cardstock paper
  • Canson XL Mixed Media Paper, 300 g
  • Ranger Archival Ink (Jet Black)
  • Tsukineko VersaMark Watermark Stamp Pad
  • WOW! Embossing Powderer (Opaque Bright White, Regular, WL01R)
  • Tim's Holtz Distress Inks:
    • Salty Ocean 
    • Blueprint Sketch
    • Hickory Smoke
    • Black Soot
  • Koh-i-noor tempera color (white)
  • Stabilo Fibre Tip Pen (Marker), Black 68/46
  • Uniball Signo White Pigment Ink pen
  • UHU liquid glue
  • round acrylic block
  • Fiskars High Precision Personal Paper Trimmer
  • bone folder
  • scissors
  • Sizzix Big Shot
  • Stabilo Fibre Tip Pen (Marker), Black 68/46
  • Ranger Heat It Tool
  • Ranger Mini Ink Blending Tool
  • Optima rounded fine paint brush no. #4
  • Marabu rounded fine paint brush no. 3/0
  • paper towels
  • water
  • powder bag

I love how my card turned out. :o)


hope you'll like my card for this challenge and get inspired. For more inspiration, check out GORGEOUS cards my super talented Design Teammates created for the challenge. Do join us in this challenge, we are looking forward to see your creations. :o)


Thank you for stopping by and your kind feedback. Enjoy and smile! :o)


Milka

Sunday, November 1, 2020

Jane's Doodles Freebie - Sweater Weather


Hi everyone! :o)


Jane is sharing a SUPER CUTE 'Sweater Weather' digital image for free on Jane's Doodles blog

It's free digital image for personal use only. Be kind and respect Jane's artwork. Give her proper credits and share only the link to the image with others, not the image. You know how that works. :o)


That would be all from me for today. Thank you for stopping by. :o) Enjoy and smile! :o)


Milka