Showing posts with label Banner. Show all posts

Friday, June 30, 2017

Panda Birthday Girl Card II (KBD Aloha Friday Challenge #98)

http://kittybeedesigns.blogspot.com/

Happy Friday! :o)


Today a new Aloha Friday Challenge starts at Kitty Bee Designs.

The challenge for this fortnight is #98 - Girly Cards.

We have two sponsors for this challenge: Fred She Said Designs and Sweet Escape Digis, so there will be double prizes! :o)


And here's my take on the challenge: Panda Birthday Girl Card II.


I made this card for my landlords' daughter who's 9th birthday is today. She loved last year's card I gave her (find card here), so I decided to go with panda this year too. I went with same color scheme (pink+black+white), CAS design, different panda image and different layout. For the layout I decided to CASE my own card (find card here).

I used super cute 'Panda Love' from 2013 January Panda Releases. These Pandas are melting my heart. Love them all!! :o)

I printed the Panda on a white cardstock paper, stamped circles around Panda's eyes and colored them with black pen, as well as Panda's muzzle. Super fast and simple coloring. I fussy cut Panda and traced edges with black marker.

I stamped a bow on a piece of designer paper, fussy cut it, traced edges with black marker and glued it on Panda's head.

Then I colored chipboard speech bubble with Black Soot Distress Ink and edges with black marker. I left it dry on air couple of hours. After drying, I heat embossed in white number 9 on the chipboard.

I cut out two banners, one from designer paper and other from black cardstock paper.

Lastly, I assembled all pieces together. I glued some foam on banners and Panda and glued them on a white top folded card base. I glued the chipboard speech bubble directly on the card base. As a finishing touch, I embellished the card with pink enamel dots. :o)

Dimensions: 95 mm x 127 mm (3 3/4" x 5")

List of supplies:

I hope you'll like my card for the challenge and get inspired. For more inspiration, stop by the Kitty Bee Designs blog and check out lovely projects my Design Team mates created. And don't forget to join us in this challenge. We are looking forward to see your projects. :o)


I'm linking my card to following challenges:
Note: bold text and challenge badge (if any) are direct links to the current challenge and blog badge (if any) is a direct link to blog or challenge home page.

1) In The Pink, Challenge 122 - Special occasion
This is my 1st entry to this challenge.
Special occasion: 9th birthday of my landlords' daughter.

2) Seize the Birthday, Anything Goes
This is my 2nd entry to this challenge.

3) Simon Says Wednesday Challenge, Anything Goes
This is my 4th entry to this challenge.


Thank you for stopping by and your kind feedback. Enjoy and smile! :o)


Milka

Wednesday, November 2, 2016

Succulent Card Set (Jane's Doodles DT Spotlight)


Hi everyone! :o)

Today was my turn to be on the spotlight over at Jane's Doodles and I made this CAS (clean and simple), Succulent Card Set.


To make these cards, I used two Jane's Doodles stamp sets, 'Cactus' and 'Butterflies'.

First I made all succulents. I stamped succulents and pots on a watercolor paper, colored them in watercolor technique using Distress Inks, fussy cut them out and colored edges with black marker.

Then I stamped planted succulents on a white cardstock paper. I went with masking, although it was so not needed for what I was doing with my images... Well, practice is always good, right. :o) I fussy cut all images, leaving white border around them.

Here is a photo of all pieces...


When I had all pieces done, I glued them together and got that nice dimension that paper piecing gives. :o)

Next up were sentiment banners. I cut three stripes from a black cardstock paper, heat embossed sentiments in white, tied embroidery thread around banners (this is inspired by work of Yoonsun Hur) and my banners were finished.

Then I cut card bases and panels. I splattered panels with black Distress Ink and dried them with Heat It Craft Tool. I could leave them dry on air, but on the white cardstock paper I use, any water based medium or medium mixed with water gives better results when dried faster. In splattering case, drying faster gives prettier splatters.
Tip: Experiment and write down your results. Cut the paper you use on small pieces. 2" x 2" should be enough. Try different mediums, different techniques... on each paper piece. Write down a recipe. You can bind these together and make your unique paper/technique swatch. :o) It might get handy in the future. :o)

With all parts finished, I assembled cards together. I love dimension, so I glued foam on each part of the card. I used different thickness foams. Lastly, I glued another white panel inside each card to make back of cards thicker and more stable, because fronts are quite heavy and cards can't stand.

Here are photos of each card...


Cards dimensions: 101 mm x 133 mm (4" x 5 1/4")


List of supplies:
  • Jane's Doodles 'Cactus' stamp set
  • Jane's Doodles 'Butterflies' stamp set
  • white cardstock paper
  • watercolor paper
  • black cardstock paper
  • 100% cotton crochet embroidery thread (TULIPAN no. 15, white)
  • Ranger's Archival Ink (Jet Black)
  • Tsukineko VersaMark Watermark Stamp Pad
  • WOW! Embossing Powder (Opaque Bright White, Regular, WL01R)
  • Tim Holtz's Distress Inks
    • Mustard Seed
    • Twisted Citron
    • Cracked Pistachio
    • Lucky Clover
    • Vintage Photo
    • Walnut Stain
    • Ground Espresso
  • double sided strong adhesive tape
  • UHU liquid glue
  • 3-D foams squares, 5 mm x 5 mm x 2 mm
  • foam tape, 1 mm thick
  • foam sheet, 1 mm thick
  • acrylic block (102 mm x 102 mm)
  • Fiskars High Precission Personal Paper Trimmer
  • Sigma Rotary Paper Trimmer
  • Marabu fine rounded paint brush no. #0
  • Ranger Heat It Craft Tool
  • powder bag
  • water
  • paper towels


I am entering my card set to following challenges:
Note: bold text and challenge badge (if any) are direct links to the current challenge and blog badge (if any) is a direct link to blog or challenge home page.


1) Cards und More Shop Blog, Challenge no. 5 - Anything Goes
This is my 8th entry to this challenge.

2) Crafty Sentiments Designs, Anything Goes Challenge - Nov 1st
This is my 1st entry to this challenge.

3) Kraftin' Kimmie Stamps, Wonderful Wednesday Challenge, Anything Goes
This is my 1st entry to this challenge.


Thank you for visiting and your kind feedback. Enjoy and smile! :o)


Milka

Saturday, October 29, 2016

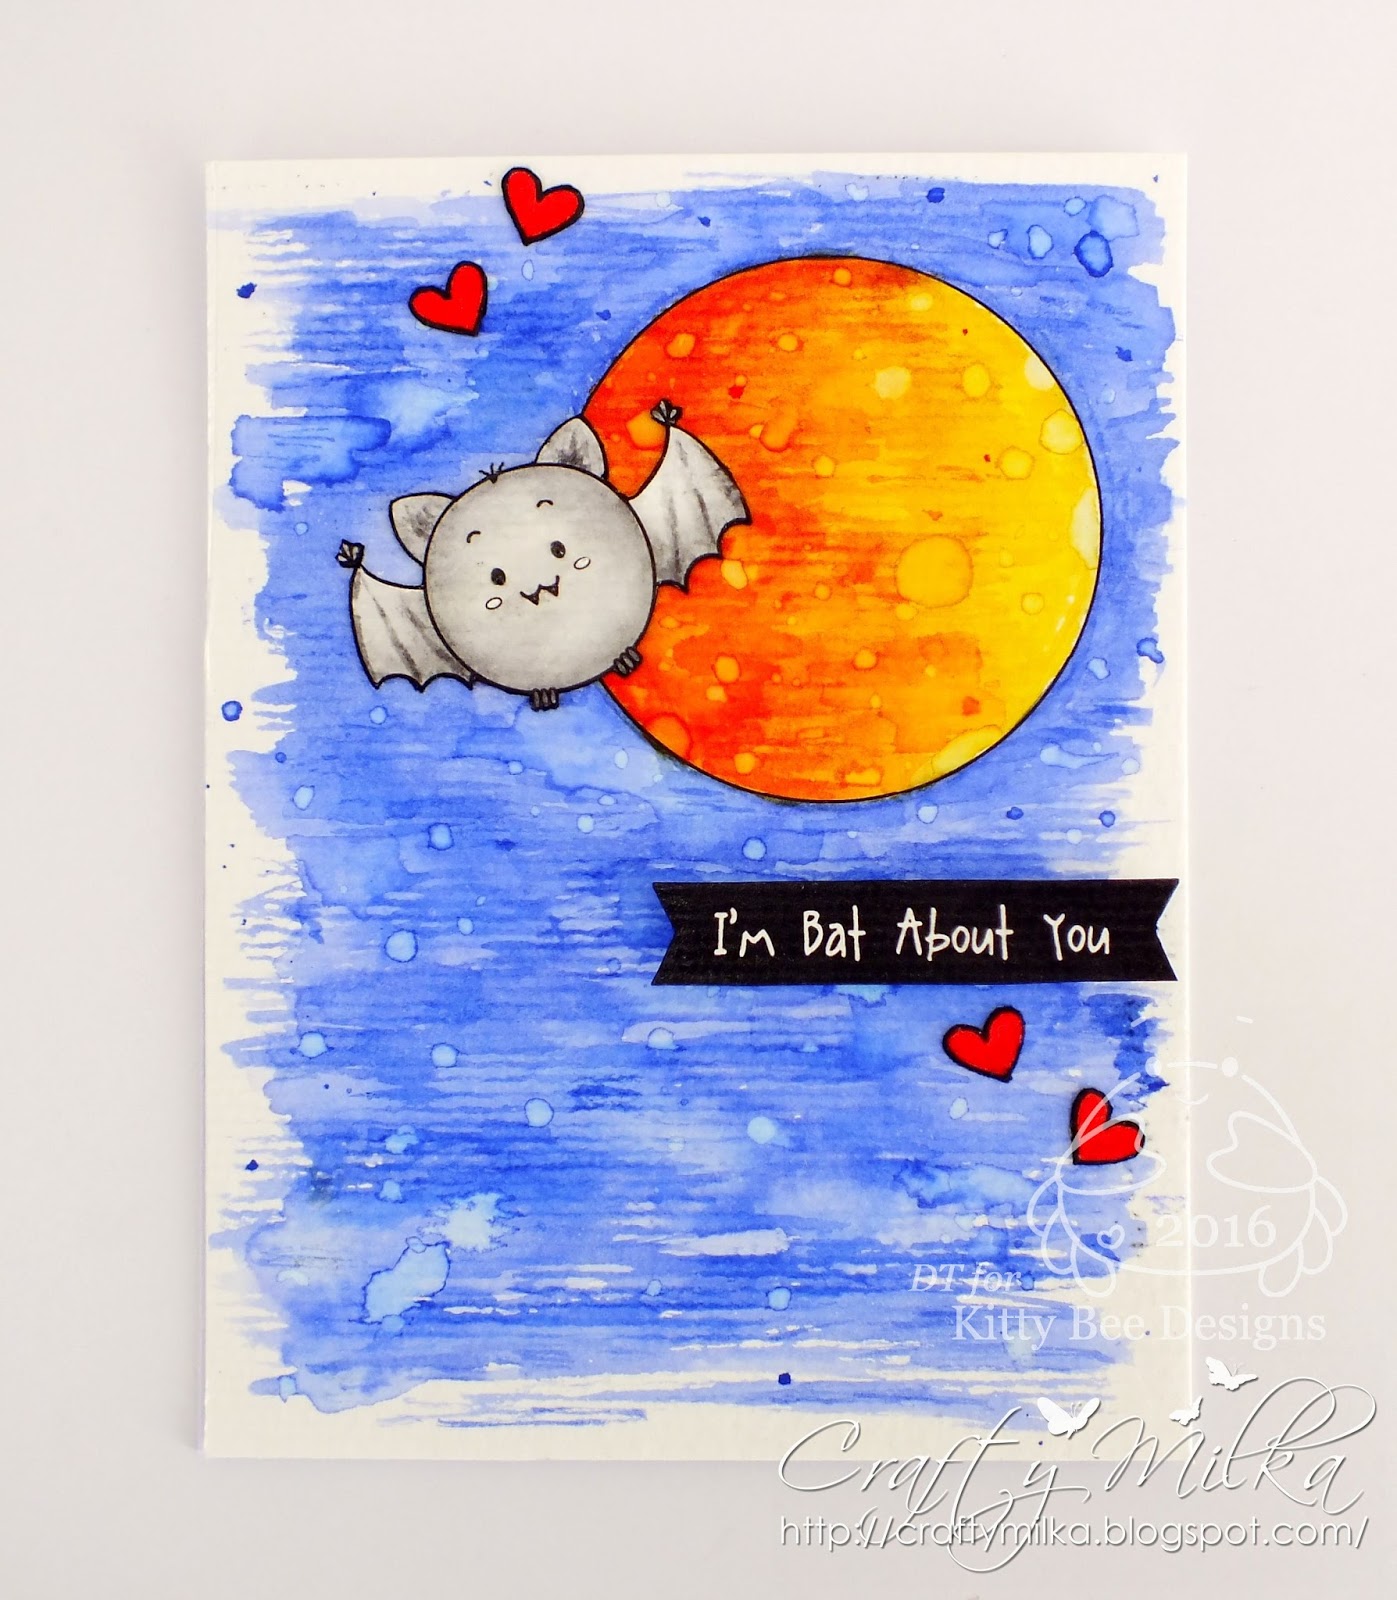
Bat About You Card (Kitty Bee Designs Spotlight)

http://kittybeedesigns.blogspot.com/

Hi everyone! :o)

Today is my turn to be on the spotlight over at Kitty Bee Designs and I made this Bat About You Card.


I made this card for my honey, for our aniversary. We start dating on Halloween night 10 years ago. :o)

To make this card I was inspired with several cards:


I used an adorable 'Mr. Bitty' image. He is so cute and fun!! :o)

I made a layout on my computer (MS Word - Insert - Picture - Insert - Shape - Oval) and printed it out on a thick watercolor paper panel and stamped some hearts on the panel. I printed one more bat and stamped hearts on a watercolor paper scrap, because I wanted dimension on my card and I went with paper piecing. 

I also wrote a sentiment on my computer (MS Word - Insert - Text Box; text box color: black, font color: white) and printed it out on the watercolor paper scrap.


I used same watercolor paper for all elements, because I like it's texture and I wanted all elemnts to have same texture. This watercolor paper is my favorite paper ever!! I got couple of sheets from my friend while I was staying in Ivanić-Grad last week. As soon as I find out what that paper is (company name and type), I'm getting bunch of it. :o)

As always when I print images, I left everything dry for an hour before coloring. This prevents ink smering when watercoloring. I also try to avoid lines while coloring to prevent ink smearing.

I colored everything in watercolor technique using Distress Inks. First I colored a blue background and after drying, the Moon. I splattered whole panel with water and dried it. I colored bat and hearts with black marker, because it looks nicer and gives extra shade to paper pieced images.

Then I colored bat and hearts stamped on paper scraps also in watercolor technique using Distress Inks. I fussy cut them out, colored edges with black marker and glued them over the black images on the panel.

At the end I put all elements together. I glued the panel on a top folded white card base, cut out the baner shape for my sentiment, colored edges with black marker, glued 3-D foams on the back of the banner and placed it on the card. A bit of gloss resin on Mr. Bitty's eyes to create glossy accents and my card was finished. :o)


Dimensions: 99 mm x 131 mm (3 15/16" x 5 3/16")

List of supplies:
  • Kitty Bee Designs 'Mr. Bitty' digital stamp
  • 'A Little Pot' free font from Kevin&Amanda
  • Jane's Doodles 'Double Trouble' stamp set (hearts)
  • white cardstock paper (card base)
  • thick watercolor paper (panel, sentiment, images) Canson XL Mixed Media Paper, 300 g
  • printer
  • Ranger Archival Ink (Jet Black)
  • Tim Holtz's Distress Inks:
    • Mustard Seed
    • Spiced Marmalade
    • Candied Apple
    • Blueprint Sketch
    • Hickory Smoke
    • Black Soot
  • Staedtler Lumocolor permanent black pen S (superfine) 0.4 mm
  • Staedtler Lumocolor permanent black pen F (fine) 0.6 mm
  • Stabilo Pen (Marker), Black 68/46
  • Unibal Signo White
  • UHU liquid glue
  • double sided strong adhesive tape
  • Gloss Resin Super Clear
  • 3-D foam squares (5 mm x 5 mm x 2 mm)
  • scissors
  • acrylic block (102 mm x 102 mm)
  • Sigma Rotary Paper Trimmer
  • Fiskars High Precission Personal Paper Trimmer
  • Marabu fine rounded paint brush no. #2
  • Marabu fine rounded paint brush no. #0
  • Marabu fine rounded paint brush no. 3/0
  • Marabu fine rounded paint brush no. 5/0
  • Ranger Heat It Craft Tool
  • crafting needle
  • water
  • paper towels

I hope you enjoyed my KBD spotlight card for this month. Check out more cute images at the Kitty Bee Designs Etsy Store, Kitty Bee Designs Blog and Kitty Bee Designs FB. :o)


I'm entering my card to following challenges:
Note: bold text and challenge badge (if any) are direct links to the current challenge and blog badge (if any) is a direct link to blog or challenge home page.

1) Addicted to Stamps and More,Challenge #217 - Make Your Mark
This is my 1st entry to this challenge.


2) Cards und More Shop Blog, Challenge no. 5 - Anything Goes
This is my 7th entry to this challenge.

3) Crafty Creations Challenges, Watercolor
This is my 1st entry to this challenge.

4) Craft Your Passion Challenges, Challenge #335 - Always Anything Goes
This is my 1st entry to this challenge.

5) Kraftin' Kimmie Stamps, Wonderful Wednesday Challenge, Anything Goes
This is my 1st entry to this challenge.

This is my 1st entry to this challenge.


Thank you for stopping by and your kind feedback. Enjoy and smile! :o)


Milka

Saturday, July 30, 2016

Panda Cutie Card (Kitty Bee Designs Spotlight)

http://kittybeedesigns.blogspot.com/

Hi everyone! :o)

Today is my turn to be on the spotlight over at Kitty Bee Designs and I made this Panda Cutie Card.


I used super cute 'Panda Cutie' from 2013 January Panda Releases. These Pandas are melting my heart. Love them all!! :o)

I printed the Panda on a white cardstock paper, stamped circles around Panda's eyes and colored them with black pen, as well as Panda's muzzle. Super fast and simple coloring. I fussy cut Panda and traced edges with black marker.

Then I colored chipboard speech bubble with Black Soot Distress Inks and edges with black marker. I left it dry on air couple of hours. Sometimes I use heat tool to dry chipboard faster.

For my card layout I used sketch and current challenge theme 'Use any kind of a banner', from Task for Two Tuesday Challenge, super fun challenge blog from Germany, owned by two very talented Ladies, Birka and Wiebke. Thank you girls for all the fun stuff you share on your blogs! :o)

And here's the sketch... I rotated it and put a sentiment on the top. :o)

*** Nutze Banner ***
- use any kind of a banner -

I cut out two banners, one from designer paper and other from textured black cardstock paper. I so much like this textured cardstock paper I bought over two years ago. I thought I have none, but found some scraps in my stash while I was organizing the mess. Happiness overload!! :o) (Note to myself: keep your paper scraps organized.)

Lastly, I assembled all pieces together. I glued banners and chipboard speech bubble directly on a top folded white card base, glued 3-D foams on the back of the Panda and placed it on the card. Two enamel dots as a finishing touch and this cutie is ready to make someone happy. :o)

Dimensions: 95 mm x 127 mm (3 3/4" x 5")

List of supplies:

I hope you enjoyed my today's spotlight card. Check out more cute images at the 
Kitty Bee Designs Etsy Store, Kitty Bee Designs Blog and Kitty Bee Designs FB. :o)


I am entering my card to following challenges:
Note: bold text and challenge badge (if any) are direct links to the current challenge and blog badge (if any) is a direct link to blog or challenge home page.

1) Addicted to Stamps and More, Challenge #204 - CAS
This is my 3rd entry to this challenge.

2) Simon Says Stamp Wednesday Challenge Blog, Anything Goes
This is my 3rd entry to this challenge.

3) Task for Two Tuesday, Challenge #56 Bannerama Ding Dong! (use any kind of a banner)

4) The Daily Marker, 5th 30 Day Coloring Challenge
This is my 3rd entry to this challenge.


Thank you for stopping by and your kind feedback. Enjoy and smile! :o)


Milka
Related Posts Plugin for WordPress, Blogger...