Showing posts with label Colored Pencils Dust. Show all posts

Friday, May 18, 2018

Tiger Lilies Card (Jane's Doodles DT Spotlight)


Hi everyone! :o)

On Tuesday, May 15th, was my turn to be on the spotlight over at Jane's Doodles and I made this Tiger Lilies Card. :o)


This card is a CASE of a card I made for my mom and shared it two weeks ago (find it here). I went with same design, layout and used same stamps, but went with different color scheme and used different techniques and mediums for coloring. :o)

Mom of a lovely young lady, for whom I created this card, loves orange color. I immediately knew I should go with Tiger Lilies. Gorgeous flower! :o)


How I made the card...

For my card I used stamps from two GORGEOUS Jane's Doodles stamp sets: Lily and Mother's Day.


With some masking, I stamped lilies directly on a white top folded card base.

I colored lilies with various coloring mediums. First I blended Distress Ink. I used negative part of masks to protect white background and ink blended lilies. I splattered lilies with water, dried them and repeated the process one more time.

I removed masks, added extra shades on lilies and colored green parts with colored pencils and fine liners. Dimension was missing, so I colored shades using grey colored pencil.

Then I heat embossed in black word ‘Mama’, which is Croatian for mom.


Lastly, I drew brown dots on lilies using fine liner and added some white highlights with white gel pen and the card was finished. :o)


Card dimensions: 95 mm x  133 mm (3 3/4" x 5 1/4")

List of supplies:
  • Jane's Doodles 'Lily' stamp set
  • Jane's Doodles 'Mother's Day' stamp set
  • white cardstock paper
  • white paper (for masks)
  • Ranger Archival Ink (Jet Black)
  • WOW! Embossing Powder (Primary Ebony, Regular, WH00R)
  • Tim's Holtz Distress Inks:
    • Mustard Seed
    • Spiced Marmalade
    • Hickory Smoke
  • TOZ Artist Color colored pencils
    • orange
    • light green
    • dark green
  • Stabilo Fine Liners, fine 0.4:
    • orange 88/54
    • green 88/36
    • light brown 88/89
    • dark brown 88/45
    • grey 88/94
  • Stabilo colored pencil, grey 979/726
  • Staedtler Noris Club colored pencil, grey 144
  • Uniball Signo White Pigment Ink
  • eraser
  • Fiskars High Precission Personal Paper Trimmer
  • bone folder
  • Ranger Heat It Tool
  • Ranger Mini Ink Blending Tool
  • acrylic block (102 mm x 102 mm)
  • Marabu fine rounded paint brush no. #0
  • scissors
  • water
  • paper towels
  • powder bag
  • dry cloth


I'm linking my card to following challenges:
Note: bold text and challenge badge (if any) are direct links to the current challenge and blog badge (if any) is a direct link to blog or challenge home page.

1) Craft Stamper Magazine, Take It Make It Challenge, May Anything Goes
This is my 1st entry to this challenge.

2) Happy Little Stampers, CAS Challenge, May 2018: One Layer
This is my 1st entry to this challenge.

3) Simon Says Stamp Work it Wednesday, April 2018: Mama, Mom, Mother...
This is my 2nd entry to this challenge.


At the end of this post...


This Sunday, May 20th, is a World Bee Day. I'm hosting an annual To Bee or Not To Bee Blog Hop. Join me and amazing artists around the World to celebrate 1st World Bee Day and to support bees and bees' protection.

Thank you for stopping by and your kind feedback. Enjoy and smile! :o)


Milka

Sunday, March 15, 2015

Peeking Bunny Card

Hi everyone :-D  

I hope you are enjoying your weekend. I am. :-D

I want to share with you a card I made today. It´s Peeking Bunny Card.


For my card layout I used a sketch100 with a twist from I {heart} sketches by Imke Ludvig. I changed circle to rectangular shape. Twist was to make CAS (clean and simple) card, which I did, because I am in a CAS mood these days. :-D
http://fromtheheartstamps.com/community/2015/03/09/i-heart-card-sketches-with-a-twist-no-100/

Card dimensions are 98 mm x 143 mm (3 7/8" x 5 5/8").

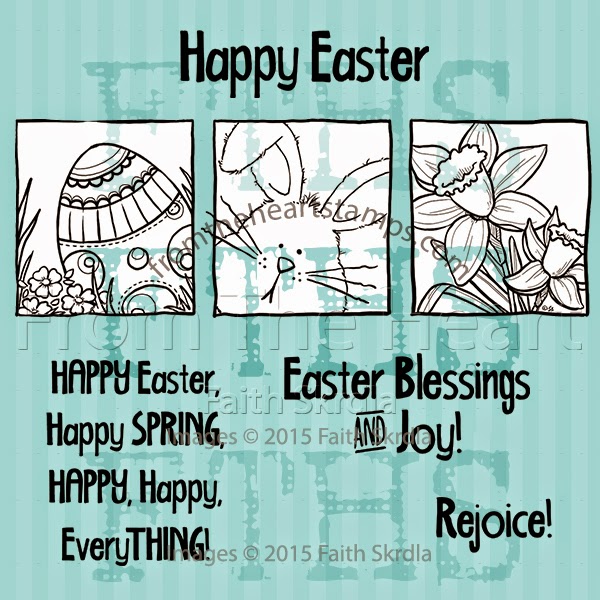
I used one of the 3 image blocks from From the Heart Stamp 'Easter Trio' digital stamp set.
http://fromtheheartstamps.com/shop/home/192-easter-trio.html

This is Stamp of the Month March 2015 and I got mine for playing February From the Heart Stamps Stamp of the Month challenge. FTHS SOTM is a progressive challenge. Faith, illustrator and owner, generously gives a digital stamp of the month to everyone who joined previous challenge.


I cropped the image on my computer. I printed bunny on a white paper (160 grams), colored him with colored pencils, fussy cut the frame, colored edges with black permanent marker and glued it on a pink piece of cardstock. I added some glossy varnish on bunny´s eyes and muzzle to create glossy accents.

Beautiful pink paper I used is Sizix 'Flights of Fancy' digital paper I got for free as a subscriber to a newsletter. I printed these on a white cardstock paper.

List of supplies:
  • From the Heart Stamps 'Easter Trio'
  • Sizix 'Flights of Fancy', spots, pink (free for newsletter subscribers)   
  • white cardstock paper
  • white paper (160 grams) 
  • colored pencils (white, pink, grey)
  • Staedtler Lumocolor permanent black pen M (medium) 1.0 mm
  • transparent button 
  • white crochet yarn 
  • Pritt universal glue
  • transparent varnish with extra gloss
  • printer
  • scoring board
  • trimmer
  • scissors
  • crafting needle

I like this sketch a lot! I think I am going to make more cards using this sketch and other blocks from the image. :-D 


I am entering my card to following challenges:
Note: bold text and challenge badge (if any) are direct links to the current challenge and blog badge (if any) is direct link to blog or challenge home page.

1) From the Heart Stamps I {heart} card sketches w/a tWiSt #no.100
http://fromtheheartstamps.com/community/2015/03/09/i-heart-card-sketches-with-a-twist-no-100/
 

Congratulations on your 100th sketch! Thank you for all the inspiration and fun!

2) From the Heart Stamps, March free Stamp of the Month - Easter Trio 

3) The Daily Marker, 30 Day Coloring Challenge
This is my 6th entry to this challenge. 
http://www.thedailymarker.com/2015/03/day-one-30-day-coloring-challenge-giveaway/

4) Without Words, March: The Bunny is Coming / Easter
http://withoutwordschallenge.blogspot.com/


Thank you for stopping by and your kind feedback. Enjoy and smile! :-D


Crafty Milka

Friday, January 16, 2015

Baby Fairy Ladybug Card

Happy Friday everyone :-D

It´s time for new challenge at Fairy Tale Challenge Blog.

Theme for this fortnight is #109, Feen + Prinzessinen / Fairy +Princess.

This time our lucky winner will win a lovely silicone mold from our dear sponsor WOW Embossing Powders. 
http://www.wowembossingpowder.co.uk/

Baby Fairy Ladybug Card is my project for this challenge, sixth project as a Guest Designer at Fairy Tale Challenge Blog. 
 

I called it Baby Fairy Ladybug Card as a lovely Mo´s Manning digital stamp 'Baby Fairy Ladybug' I used. This is my new stamp I bought few days ago.
I colored image with colored and aquarell colored pencils and red fine liner. I made shade beneath fairy with black colored pencil dust. I added some transparent varnish on her dots and antenna, as well on her wings. I also sprinkled red fine glitter on her wings. 

Little glossy dots in corners are made with hole punchers and transparent extra glossy varnish. This is a great way to embellish card when you don´t have enamel dots or something similar.  
Here is a short step by step tutorial:
  1. choose the color of bottom layer; this will be the color of glossy dots
  2. punch holes (or any other shape) on upper layer 
  3. glue upper layer on the bottom layer 
  4. fill punched holes with transparent varnish or similar medium and leave it to dry
Every glossy dot can be different color. Place small piece of scrap paper below upper layer and fill holes with transparent varnish or similar medium. Here you can see how I did glossy dots in different colors.

Card dimensions are 105 mm x 148 mm (4 1/8" x 5 7/8").

List of supplies: 
  • Mo´s Manning digital stamp 'Baby Fairy Ladybug'
  • Crafters Companion Bebunni Christmas 6" x 6" Designer Paper Pad
  • Graphic 45 paper collection 'French Country', 6 x 6 (Patterns and Solids)
  • white cardstock paper
  • red textured cardstock paper 
  • black cardstock paper  
  • white paper (160 grams) 
  • colored pencils (skin color, pink, brown)
  • white pencil
  • Koh-i-noor Mondeluz aquarell colored pencil (red 7, brown 32, black 36)
  • Koh-i-noor universal white pencil for writing on gloss surfaces
  • red fine liner 
  • red fine glitter
  • double sided strong adhesive tape 
  • UHU universal glue 
  • transparent varnish with extra gloss 
  • printer 
  • scoring board 
  • trimmer 
  • scissors 
  • hole punchers (3 sizes)
  • hammer 
  • plank board  
  • pencil sharpener  
  • eraser  
  • crafting needle 

Hop over at Fairy Tale Challenge Blog and see beautiful projects the Design Team and other Guest Designers made for this challenge and do join us, we are looking forward to see your projects. :-D


I am entering my project into the following challenges:
Note: bold text is direct link to current challenge and blog badge is direct link to blog or challenges home page. 

1) djkardkreations, NBUS (never before used schtuff) #3 - Anything Goes
My NBUS is a new stamp 'Baby Fairy Ladybug'.
This is my 2nd entry to this challenge. 
http://www.djkardkreations.com/p/prior-nbus-challenges.html

2) Mo´s Challenge Blog, Anything Goes
http://mosdigitalchallenge.blogspot.com/

3) SugarPea Designs, SPD12 - Anything Goes
http://sugarpeadesigns.com/blog/2014/12/17/spd12-anything-goes/
http://sugarpeadesigns.com/blog/

Thank you for stopping by and your kind  feedback. Enjoy and smile :-D


Crafty Milka


Update, January 29th 2015
As a member at Bronte and Bella´s Clubhouse, I entered this project to Bronte and Bella´s SHOWCASE January Challenge, as one of my projects using Mo´s image I made this month. 
https://www.facebook.com/groups/mosclub/

Wednesday, December 31, 2014

Holiday Spirit Card

Hello everyone :-D  

Today I want to share with you a Holiday Spirit Card, my final card of the year 2014.


I colored image two weeks ago, but finished card just yesterday. I CASEd my Reach for the Stars Card. Card layout for my both cards, this one and CASEd one, was I {heart} sketches sketch089 with a twist by Imke Ludvig.

http://fromtheheartstamps.com/community/2014/12/01/i-heart-card-sketches-w-a-twist-no-89/

Card dimensions are 143 mm x 98 mm (5 5/8" x 3 7/8").

I used From the Heart Stamp 'Christmas Spirit Birdbrain' digital stamp set, which includes funny image and four sentiments.
http://fromtheheartstamps.com/shop/birdbrain-chick/183-christmas-spirit-birdbrain.html

This is Stamp of the Month December 2014. From the Heart Stamps Stamp of the Month Challenge is progressive challenge and everyone is a winner. Faith generously gives a digital stamp of the month to everyone who joined previous challenge. I didn´t play last month, in November, but did get my for free. This was image I choose as December Blog Hop Winner at From the Heart Stamps.

I colored background with light blue colored pencil dust. I have learned this technique from my 3rd grade teacher. I don´t know how that technique is called, if there is any name. :-D 
 
List of supplies: 
  • From the Heart Stamps 'Christmas Spirit Birdbrain' 
  • Crafters Companion Bebunni Christmas 6" x 6" Designer Paper Pad
  • white card stock paper 
  • white paper 160 grams 
  • thick card stock paper
  • colored pencils (yellow, orange) 
  • Koh-i-noor Mondeluz aquarell colored pencils (yellow, orange, green, light blue) 
  • Koh-i-noor universal white pencil for writing on gloss surfaces
  • fine liners 0.5 mm (yellow, red) 
  • ribbon 
  • Freckled Fawn Enamel Warm Dew Drop Stickers
  • double sided strong adhesive tape  
  • printer
  • scoring board
  • trimmer 
  • scissors 
  • office paper puncher   

I am entering this card into the following challenges:
Note: bold text is direct link to current challenge and blog badge is direct link to blog or challenges home page. 

1) From the Heart Stamps, December free Stamp of the Month - Christmas Spirit Birdbrain

2) Christmas Card Challenges, #4 - Anything Goes
http://christmascardchallenges.blogspot.com/2014/12/christmas-card-challenge-4-anything-goes.html
http://christmascardchallenges.blogspot.com/

3) 613 Avenue Create, Challenge #104 - Anything Goes
http://avenue613.blogspot.com/

4) Through The Craft Room, TTCRD Challenge from December 30th to January 5th, Anything Goes

Thank you for stopping by and your kind feedback. Stay around, new post soon. :-D 


Crafty Milka 

Saturday, December 27, 2014

Fairy Snowman Card

Hi everyone :-D

Today I´ll be sharing several projects with you. 

First one for today is this Fairy Snowman Card I made last weekend.


I called it Fairy Snowman Card, as a gorgeous Mo´s Manning digital stamp 'Fairy Snowman' I used. As a registered user at Mo´s Manning Digital Pencil, I got this beautiful image as a gift for Thanksgiving. 
I colored image with blue aquarell colored pencils, white pencil and silver sparkling pen. I colored background with light blue colored pencil dust. I have learned this technique when I was 9 years old from my 3rd grade teacher, but I have no idea how that technique is called. I´ll make a tutorial in the near future.
I added some dots with a pearl maker, glued image to a card base and embellished my card with flower stamens and white flower. 

Card dimensions 140 mm x 140 mm (5 1/2" x 5 1/2").

List of supplies: 
  • Mo´s Manning digital stamp 'Fairy Snowman'
  • blue card stock paper
  • white paper (160 grams) 
  • Koh-i-noor Mondeluz aquarell colored pencils (light and dark blue) 
  • Koh-i-noor universal white pencil for writing on gloss surfaces
  • black fine liner 0.5
  • silver sparkling pen 
  • pearl maker (pastel-white) 
  • decorative flower stamens 
  • white flower 30 mm
  • UHU universal glue 
  • transparent low temperature glue stick 
  • printer 
  • trimmer
  • scoring board  
  • pencil sharpener 
  • eraser
  • round corner paper puncher 
  • Dremel 920 glue gun, low temperature 

I am entering my card into the following challenges:
Note: bold text is direct link to current challenge and blog badge is direct link to blog or challenges home page. 

1) Crafty Sentiments Designs, Anything Goes
My 2nd entry to this challenge. 
http://craftysentiments.blogspot.com/

2) Creative Card Crew, Challenge #77 - Anything Goes 
My 3rd entry to this challenge. 
http://creativecardcrew.blogspot.com/

3) Cute Card Thursday, Challenge 353 - Anything Goes 
http://cutecardthursday.blogspot.com/

4) Simon Says Stamp Wednesday Challenge Blog, Anything Goes  
My 2nd entry to this challenge. 
http://www.simonsaysstampblog.com/wednesdaychallenge/

5) The Paper Nest Dolls Challenges, Challenge #25 - Anything Goes

6) Through The Craft Room, TTCRD Challenge from December 23rd to December 30th, Anything Goes
My 2nd entry to this challenge. 

7) Fairytale Stampers, Challenge 49 - Anything Goes
http://fairytalestamper.blogspot.com/

8) Whimsy Stamps Inspiration Challenges, Challenge #78 - Anything Goes
My 3rd entry to this challenge. 
http://whimsyinspires.blogspot.com/

Thank you for stopping by and your kind feedback. Stop by later today, I´ll be posting again. Enjoy :-D 

Crafty Milka
Related Posts Plugin for WordPress, Blogger...