Showing posts with label My Favorite Things (MFT). Show all posts

Friday, November 6, 2020

Space Mini Circle Card (bastel-traum challenge #94)

Happy Friday! :o)


On October 15th, 2020, a new challenge started at bastel-traum and our theme for the challenge #94 is Background. :o)


I'm a bit late sharing my post here on my blog, but there is still 9 days left to join in the fun. 

The challenge started on October 15th, 2020, at 9 AM, CEST (UTC +2) and ends on November 15th, 2020, at 8:55 AM, CET (UTC +1). Find all the details about the challenge, rules and prizes in a challenge post (here).


And here is my take on the challenge: Space Mini Circle Card. :o)


To make this card I was inspired with a card I made for this year's World Space Week Blog Hop (here).

For my card I used a spaceship stamp from Altenew 'Space Travel' stamp set.


How I made my card...

I colored a background in watercolor technique using Distress Inks Salty Ocean, Blueprint Sketch and Black Soot. I used a thick watercolor paper for it. When I was satisfied with the color, I left the panel to dry on air.

After drying, I die cut a wonky stitched circle from the panel. I stamped the spaceship in black on the panel and colored it with a black marker.

I mixed a white tempera color with a bit of water and splattered the panel with it. I left the panel to dry on air.

After drying, I ink blended edges with the Distress Ink Black Soot to achieve more dramatic look.

Next up was the spaceship. I stamped the spaceship on a thin watercolor paper and colored it in watercolor technique using Distress Inks. After drying, I fussy cut the spaceship, traced edges with the black marker and glued it over the spaceship that I stamped on the panel.

I made a card base from two circles that I cut from a black cardstock paper. I glued circles together on the top and glued the panel on the card base.

As a finishing touch, I drew couple white dots (stars) here and there on the panel using a white pigment ink pen and my card was finished. :o)


Card measurements: d = 83 mm (3 1/4")

List of supplies:
  • Altenew 'Space Travel' stamp set (spaceship)
  • black cardstock paper
  • Canson XL Mixed Media Paper, 300 g
  • Ranger Archival Ink (Jet Black)
  • Tsukineko VersaMark Watermark Stamp Pad
  • WOW! Embossing Powderer (Opaque Bright White, Regular, WL01R)
  • Tim's Holtz Distress Inks:
    • Salty Ocean 
    • Blueprint Sketch
    • Hickory Smoke
    • Black Soot
  • Koh-i-noor tempera color (white)
  • Stabilo Fibre Tip Pen (Marker), Black 68/46
  • Uniball Signo White Pigment Ink pen
  • UHU liquid glue
  • round acrylic block
  • Fiskars High Precision Personal Paper Trimmer
  • bone folder
  • scissors
  • Sizzix Big Shot
  • Stabilo Fibre Tip Pen (Marker), Black 68/46
  • Ranger Heat It Tool
  • Ranger Mini Ink Blending Tool
  • Optima rounded fine paint brush no. #4
  • Marabu rounded fine paint brush no. 3/0
  • paper towels
  • water
  • powder bag

I love how my card turned out. :o)


I hope you'll like my card for this challenge and get inspired. For more inspiration, check out GORGEOUS cards my super talented Design Teammates created for the challenge. Do join us in this challenge, we are looking forward to see your creations. :o)


Thank you for stopping by and your kind feedback. Enjoy and smile! :o)


Milka

Thursday, October 8, 2020

Whale of a Day Card (Jane's Doodles DT October Spotlight)


Hi everyone! :o)

This is my third post today. If you missed previous two, just scroll down or follow direct links here and here. :o)


Last weekend I planed to share my Jane's Doodles spotlight projects that I made in June, July, August and September, but I didn't share them here on my blog (full list of projects that I planed to share here). I managed to share all except my September's JD spotlight projects. My plan was to share them on Sunday, but I spent the day outside and didn't have strength to write after I came home.

Today I'm sharing my September spotlights and my JD spotlight project from last week, three spotlights in total, all in separate blog posts. My posts are scheduled and will go live every hour.


My third and last card for today is this Whale of a Day Card. It was my spotlight project for Jane's Doodles on Friday, October 2nd, 2020.  :o)


To make this card I used stamps from a GORGEOUS Jane's Doodles 'Whales' stamp set. Jane's whales from the set are the most beautiful and realistic whale images available as stamps and that I'm familiar with . ♥


How I made my card...

First I created a panel. I made a circle stencil from a paper scrap using a circle die cut and a Sizzix Big Shot machine. I ink blended Distress Inks on a white cardstock paper panel through the circle stencil. When I was satisfied with the color, I removed the stencil and splattered the ink blended circle with water. After drying, I splattered the circle with a white tempera color mixed with a bit of water. I left the panel to dry on air.

Next up was an image. I used a gorgeous Sperm Whale (lat. Physeter macrocephalus). Find more about Blue Whales on National Geographic pages (here).

I stamped the whale on the watercolor paper and colored it in watercolor technique using a Distress Ink Hickory Smoke.

After drying, I fussy cut the whale and traced edges with a black marker. I stamped another whale on a piece of the white cardstock paper, fussy cut it, leaving white thin border around it and glued the watercolored whale over it. I did this because the watercolor paper I use is thin and I needed a thicker image. :o)

With all parts ready, I assembled my card.

I stamped a sentiment on the panel. I wanted to add dimension to my card, but I didn't want to use 3-D foam squares to add dimension to the panel. Instead, I used white cardstock paper scraps and cut two rectangles out of them, just a slightly smaller than the panel with the stamped sentiment. I glued all panels together and glued them on a white top folded cardstock paper card base. Just to make my card a bit sturdier and possible to stand, as the front of the card was quite heavy, I glued another white cardstock paper panel inside the card base.

Lastly, I glued 3-D foam squares on the back of the whale and glued it on the card and my card was finished. :o)


Card measurements: 102 mm x 133 mm (4" x 5 1/4")

List of supplies:
  • Jane's Doodles 'Whales' stamp set
  • white cardstock paper
  • watercolor paper
    • Tumbled Glass
    • Salty Ocean
    • Blueprint Sketch
    • Hickory Smoke
  • Stabilo Fiber Tip Pen (Marker), Black 68/46
  • Koh-i-noor tempera color (titanium white)
  • UHU liquid glue
  • 3-D foam squares, 5 x 5 x 2 mm
  • acrylic block (102 mm x 102 mm)
  • round acrylic block
  • Fiskars High Precision Personal Paper Trimmer
  • bone folder
  • Marabu fine rounded paint brush no. 3/0
  • Ranger Mini Ink Blending Tools 
  • scissors
  • water
  • paper towels


Thank you for stopping by and your kind feedback. Stop by at 7 PM, I have scheduled one more blog post. Not a card but something else. :o) Enjoy and smile! :o)


Milka
 

Tuesday, September 15, 2020

Happy Fall Mini Circle Card (bastel-traum challenge #93)

Hi everyone! :o)


It's time for a new challenge over at bastel-traum and our theme for the challenge #93 is Autumn/Fall. :o)


The challenge starts today, September 15th, 2020, at 9 AM, CEST (UTC +2) and ends on October 15th, 2020, at 8:55 AM, CEST (UTC +2). Find all the details about the challenge, rules and prizes in a challenge post (here).


And here is my take on the challenge: Happy Fall Mini Circle Card. :o)


To make this card I was inspired with my own card that I created last year (here).

I used stamps from a super adorable Gerda Steiner Designs 'Happy Fall' stamp set, that I won in April 2017 from GSD. :o)


How I made my card....

First I created a background panel. I stamped randomly leaves and an acorn on a Kraft paper in watermark stamping technique using VersaMark Watermark Ink. Then I die cut a wonky stitched circle from the paper and stamped a sentiment in black on it.

Then I made a card base. I cut two circles from a white cardstock paper and glued them together on the top.

I glued the panel on the circle card base.

Next up were images. I stamped an adorable happy squirrel, leaves and acorns on a watercolor paper and colored them in watercolor technique with Distress Inks. After drying, I fussy cut images and traced their edges with a black marker.

Then I stamped same images again on a white cardstock paper. I colored images with the black marker and a black fine liner and fussy cut them, leaving thin white border around them. I glued watercolored images over the grey ones. I did this to make images thicker, as the watercolor paper I use is very thin.

I love dimension on my cards. I glued 3-D foams (2 different thickness) on each image, glued images on the card and my card was finished. I love how my card turned out!! :o)


Card measurements: d = 83 mm (3 1/4")

List of supplies:
  • Gerda Steiner Designs 'Happy Fall' stamp set (bastel-traum shop here)
  • white cardstock paper
  • watercolor paper
  • Crafter's Companion Neenah Desert Storm Kraft Coloring Card
  • Tsukineko VersaMark Watermark Stamp Pad
  • Ranger's Archival Ink (Jet Black)
  • Tim's Holtz Distress Inks:
    • Mustard Seed
    • Fossilized Amber
    • Spiced Marmalade
    • Candied Apple
    • Twisted Citron
    • Walnut Stain
    • Ground Espresso
  • Stabilo Fibre Tip Pen (Marker), Black 68/46
  • Mitsubishi Black Fine Liner 0.4
  • UHU liquid glue
  • 3-D square foams, 5 x 5 x 2 mm
  • 3-D square foams, 5 x 5 x 3 mm
  • Quickie Glue Pen
  • Fiskars High Precision Personal Paper Trimmer
  • bone folder
  • Sizzix Big Shot
  • My Favorite Things, Die-namics Wonky Stitched Circle STAX
  • EK Success circle cutter
  • Xcut SelfHealing Cutting Mat A4
  • round acrylic block
  • Marabu fine rounded paint brush no. 3/0
  • scissors
  • paper towels
  • water
  • masking tape


I hope you'll like my card for this challenge and get inspired. For more inspiration, check out BEAUTIFUL autumnal cards my super talented Design Teammates created for the challenge. Do join us in this challenge, we are looking forward to see your creations. :o)


I'm linking my card to following challenges:
Note: bold text and challenge badge (if any) are direct links to the current challenge and blog badge (if any) is a direct link to blog or challenge home page.

1) Digi Choosday Crafting Challenge, Week 37 - Anything Goes
This is my 1st entry to this challenge.

2) Gerda Steiner Designs, Share Your Designs Challenge, September 2020
This is my 1st entry to this challenge.

3) The Cat's Pajamas, TCP Tuesday Challenge #372: Animals


Thank you for stopping by and your kind feedback. Enjoy and smile! :o)


Milka


Wednesday, April 29, 2020

You're Magical Card (CASology Week #367)


Hi everyone! :o)


Yesterday, April 28th, a new challenge started at CASology. This fortnight's cue word is Magical. :o)


I had some unexpected situation and couldn't publish this post on time, so I'm bringing it today. The challenge ends on Monday, May 11th, 2020, 9 AM, CDT (UTC -5).

We also have a sponsor for this challenge: UNIKO. Find all details about the prize over at CASology blog.


And here is my take on the challenge: CAS (clean and simple), You're Magical Card. :o)


Design defined: 
Plenty of white space, a small amount of color and adding dimension gives a CAS card special interest.


How I made my card....

To make my card I CASEd (copy and share everything) my own card that I made two years ago (here). I went with same design, layout, used same products, only went with a different color scheme. :o)

I used stamps from My Favorite Things 'BB Magical Dragons' stamp set.

I colored an adorable tiny dragon during Kathy's Racoosin 9th 30 Day Coloring Challenge, in February 2018, but didn't use it until now. I still have some images colored during past 30 Day Coloring Challenges that I didn't use on any project, but will surely use them for something. :o)


I stamped the tiny dragon on a watercolor paper and colored it in watercolor technique using Distress Inks. After drying, I fussy cut the dragon and colored the edges with a black marker. And then it waited in a drawer for two years to be used. :o)

I stamped another dragon on a white cardstock paper and colored it in black. I fussy cut it, leaving a thin white border around the dragon. Then I softened the watercolored dragon with a stylus ball and glued it over the black dragon.

Then I heat embossed in white a sentiment on a black cardstock paper, cut out a banner, glued some 3-D foam on it and glued the sentiment on a white top folded card base. I glued 3-D foam on the dragon and placed it to sit on the banner.

As a finishing touch, I embellished the card with two enamel dots. :o)


Card measurements:  89 mm x 121 mm (3 1/2" x 4 3/4")

List of supplies:
  • My Favorite Things 'BB Magical Dragons' stamp set
  • white cardstock paper
  • black cardstock paper
  • watercolor paper
  • Ranger Archival Ink, Jet Black
  • Tsukineko VersaMark Watermark Stamp Pad
  • WOW! Embossing Powder (Opaque Bright White, Regular, WL01R)
  • Tim's Holtz Distress Inks.
    • Festive Berries
    • Hickory Smoke
  • Stabilo Fibre Tip Pen (Markers), Black 68/46
  • UHU universal glue
  • 3-D foam squares, 1 mm thick
  • 3-D foam squares, 2 mm thick
  • Create a Smile enamel stickers ('Beach Party', 'Pretty Cool')
  • Fiskars High Precision Personal Paper Trimmer
  • Ranger Heat It Craft Tool
  • acrylic block (102 mm x 102 mm)
  • bone folder
  • scissors
  • Marabu fine rounded paint brush no.#0
  • stylus ball
  • soft working mat
  • crafting needle
  • water
  • paper towels
  • powder bag


I hope you'll like my card for this challenge and get inspired. For more inspiration, check out beautiful cards my Design Teammates and our Guest Designer created. Do join us in this challenge, we are looking forward to see your CAS creations. :o)


Milka Gubo (you are here)
Sue Symens
Hannelie (Guest Designer)


I'm linking my card to following challenges:
Note: bold text and challenge badge (if any) are direct links to the current challenge and blog badge (if any) is a direct link to blog or challenge home page.

1) AAA Cards, CAS Game #164 - One Image

2) Digi Choosday Crafting Challenge, Week 17 - Anything Goes
This is my 1st entry to this challenge.


Thank you for stopping by and your kind feedback. Enjoy and smile! :o)


Milka


Friday, December 13, 2019

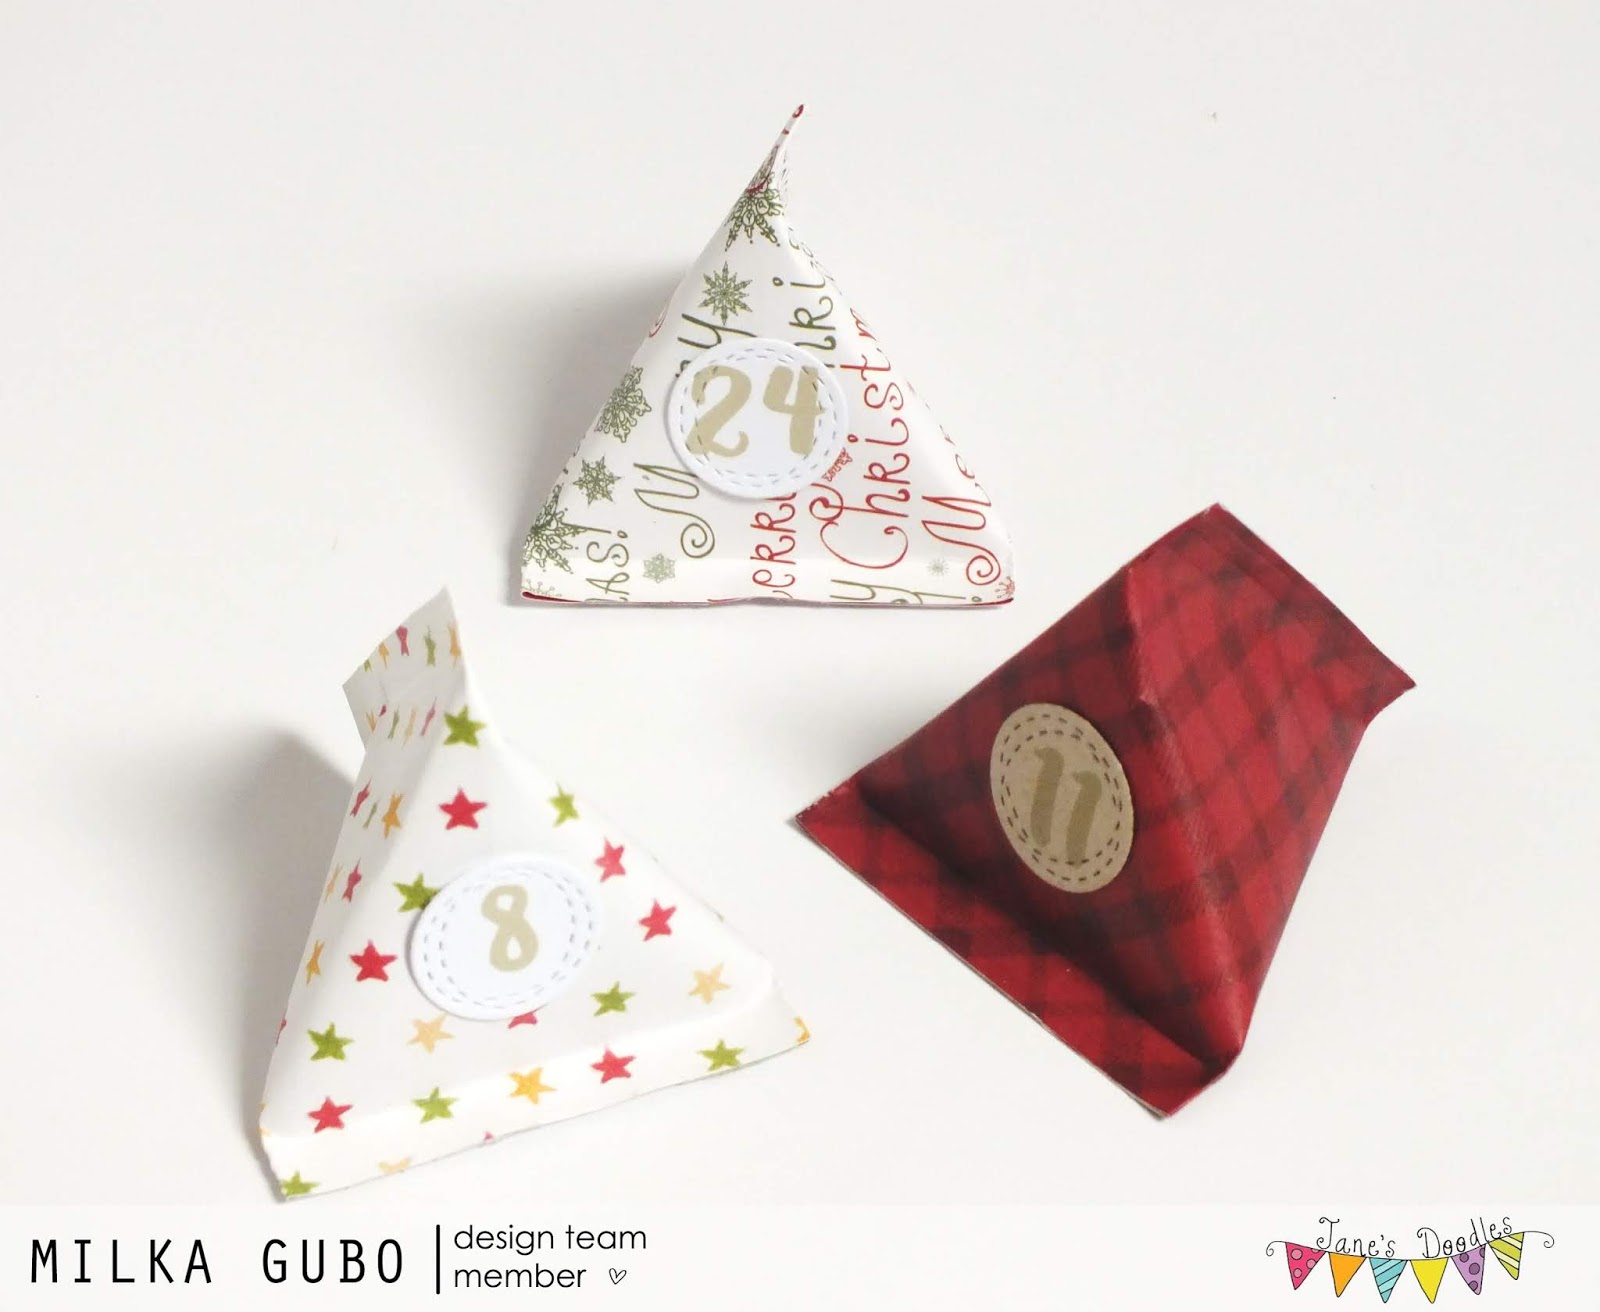
Sour Cream Containers Advent Calendar (Jane's Doodles DT Spotlight)


Happy Friday! :o)

I hope you're all well. Another busy week and I didn't find any time to write here on my blog. Today I'll be sharing two projects with you, both my DT spotlights for Jane's Doodles, one for last week and other for today. I'll be sharing my projects in two separate blog posts. :o)


On Wednesday, December 4th, 2019, was my turn to be on the spotlight over at Jane's Doodles and I made this Sour Cream Containers Advent Calendar. :o)


I made this Advent Calendar for my nieces. They were thrilled. :o)

To make this Advent Calendar I used patterned paper and adorable numeral stamps from Jane's Doodles 'ABC's' stamp set.


How I made this Advent Calendar... 

First I folded containers. I found great photo tutorial here.

I used 3" x 6" paper and folded 24 sour cream containers following the tutorial. I left one side of each container unglued and open to fill them later.

After folding, I filled containers, each with two same chocolate candies, glued opened part and "closed" containers.

Then I worked on numerals. I die cut circles in from white and a Kraft cardstock paper. I stamped numbers from 1 to 24 on each circle, using Kraft color ink pad. Lastly, I glued numbered circles on each container and my project was finished. :o)


List of supplies:
  • Jane's Doodles 'ABC's' stamp set
  • Crafter's Companion Bebunni Christmas 6" x 6" Designer Paper Pad
  • white cardstock paper
  • Crafter's Companion Neenah Desert Storm Kraft Coloring Card
  • UHU liquid glue
  • double sided adhesive tape
  • Sizzix Big Shot
  • My Favorite Things, Die-namics Wonky Stitched Circle STAX
  • Fiskars High Precision Personal Paper Trimmer
  • bone folder
  • acrylic block 102 mm x 102 mm
  • scissors


I'm linking my project to a challenge:

Uniko, Challenge #56 - Christmas
This is my 4th entry to this challenge.


Thank you for stopping by and your kind feedback. Stop by in two hours, I'll be sharing one more project. Enjoy and smile! :o)


Milka

Related Posts Plugin for WordPress, Blogger...