Showing posts with label DECORATION. Show all posts

Thursday, December 24, 2020

Advent Wreath

Hi everyone! :o)

I hope you're all well and getting ready for Christmas. :o)

Although today is last Advent Day, I want to share with you my Advent Wreath. :o) I wanted to share it on a first Advent day, but things weren't going as I planed, so I'm bringing it today. :o)


My mom borrowed me a gorgeous white tray, I bought white candles and my honey bought me lovely jingle bells. All other stuff that I used I had at home: a snowman figurine, star shaped sequins, snowflake die-cuts, snowballs etc. I played and arranged everything on the tray and was finished in less than an hour. :o)


I love how it turned out!! :o)

Tomorrow is Christmas and I'm starting 12 Days of Christmas Series here on my blog. I wanted to do Count down to Christmas Series through the Advent, but as I mentioned at the beginning of this post, things didn't go as I planed so I'll go with a shorter series. I hope you'll visit and check my 12 Days of Christmas series in next 12 days. I'll be sharing some cards and there will be also some giveaways. :o)

Update: December 30th, 2020
Due to the earthquakes situation in the central part of Croatia, series will be postponed and continued after I'll be ready to post here on my blog.


Thank you for stopping by and your kind feedback. Enjoy and smile!! :o) 


Milka

Friday, December 18, 2020

Jane's Birthday Party Blog Hop


Happy Friday!! :o)

Welcome to a special, Jane's Birthday Party Blog Hop. :o) 

Our Jane turned 46 today and is celebrating with this blog hop, two giveaways, one here and one on Instagram, as well with 46% off 24 hours sale. :o)

Happy birthday, Jane!!! ♥


Jane gave us, the Design Team, a simple "task" for today: to showcase our favorite Jane's Doodles stamp set. :o)

Although I love all Jane's Doodles stamp sets that I have, 122 of them, I didn't think too much which stamp set to use. I immediately knew I want to use 'Merry Gnomes' stamp set. The cutest Gnomes in stamping world. LOVEEEEE!!!! ♥


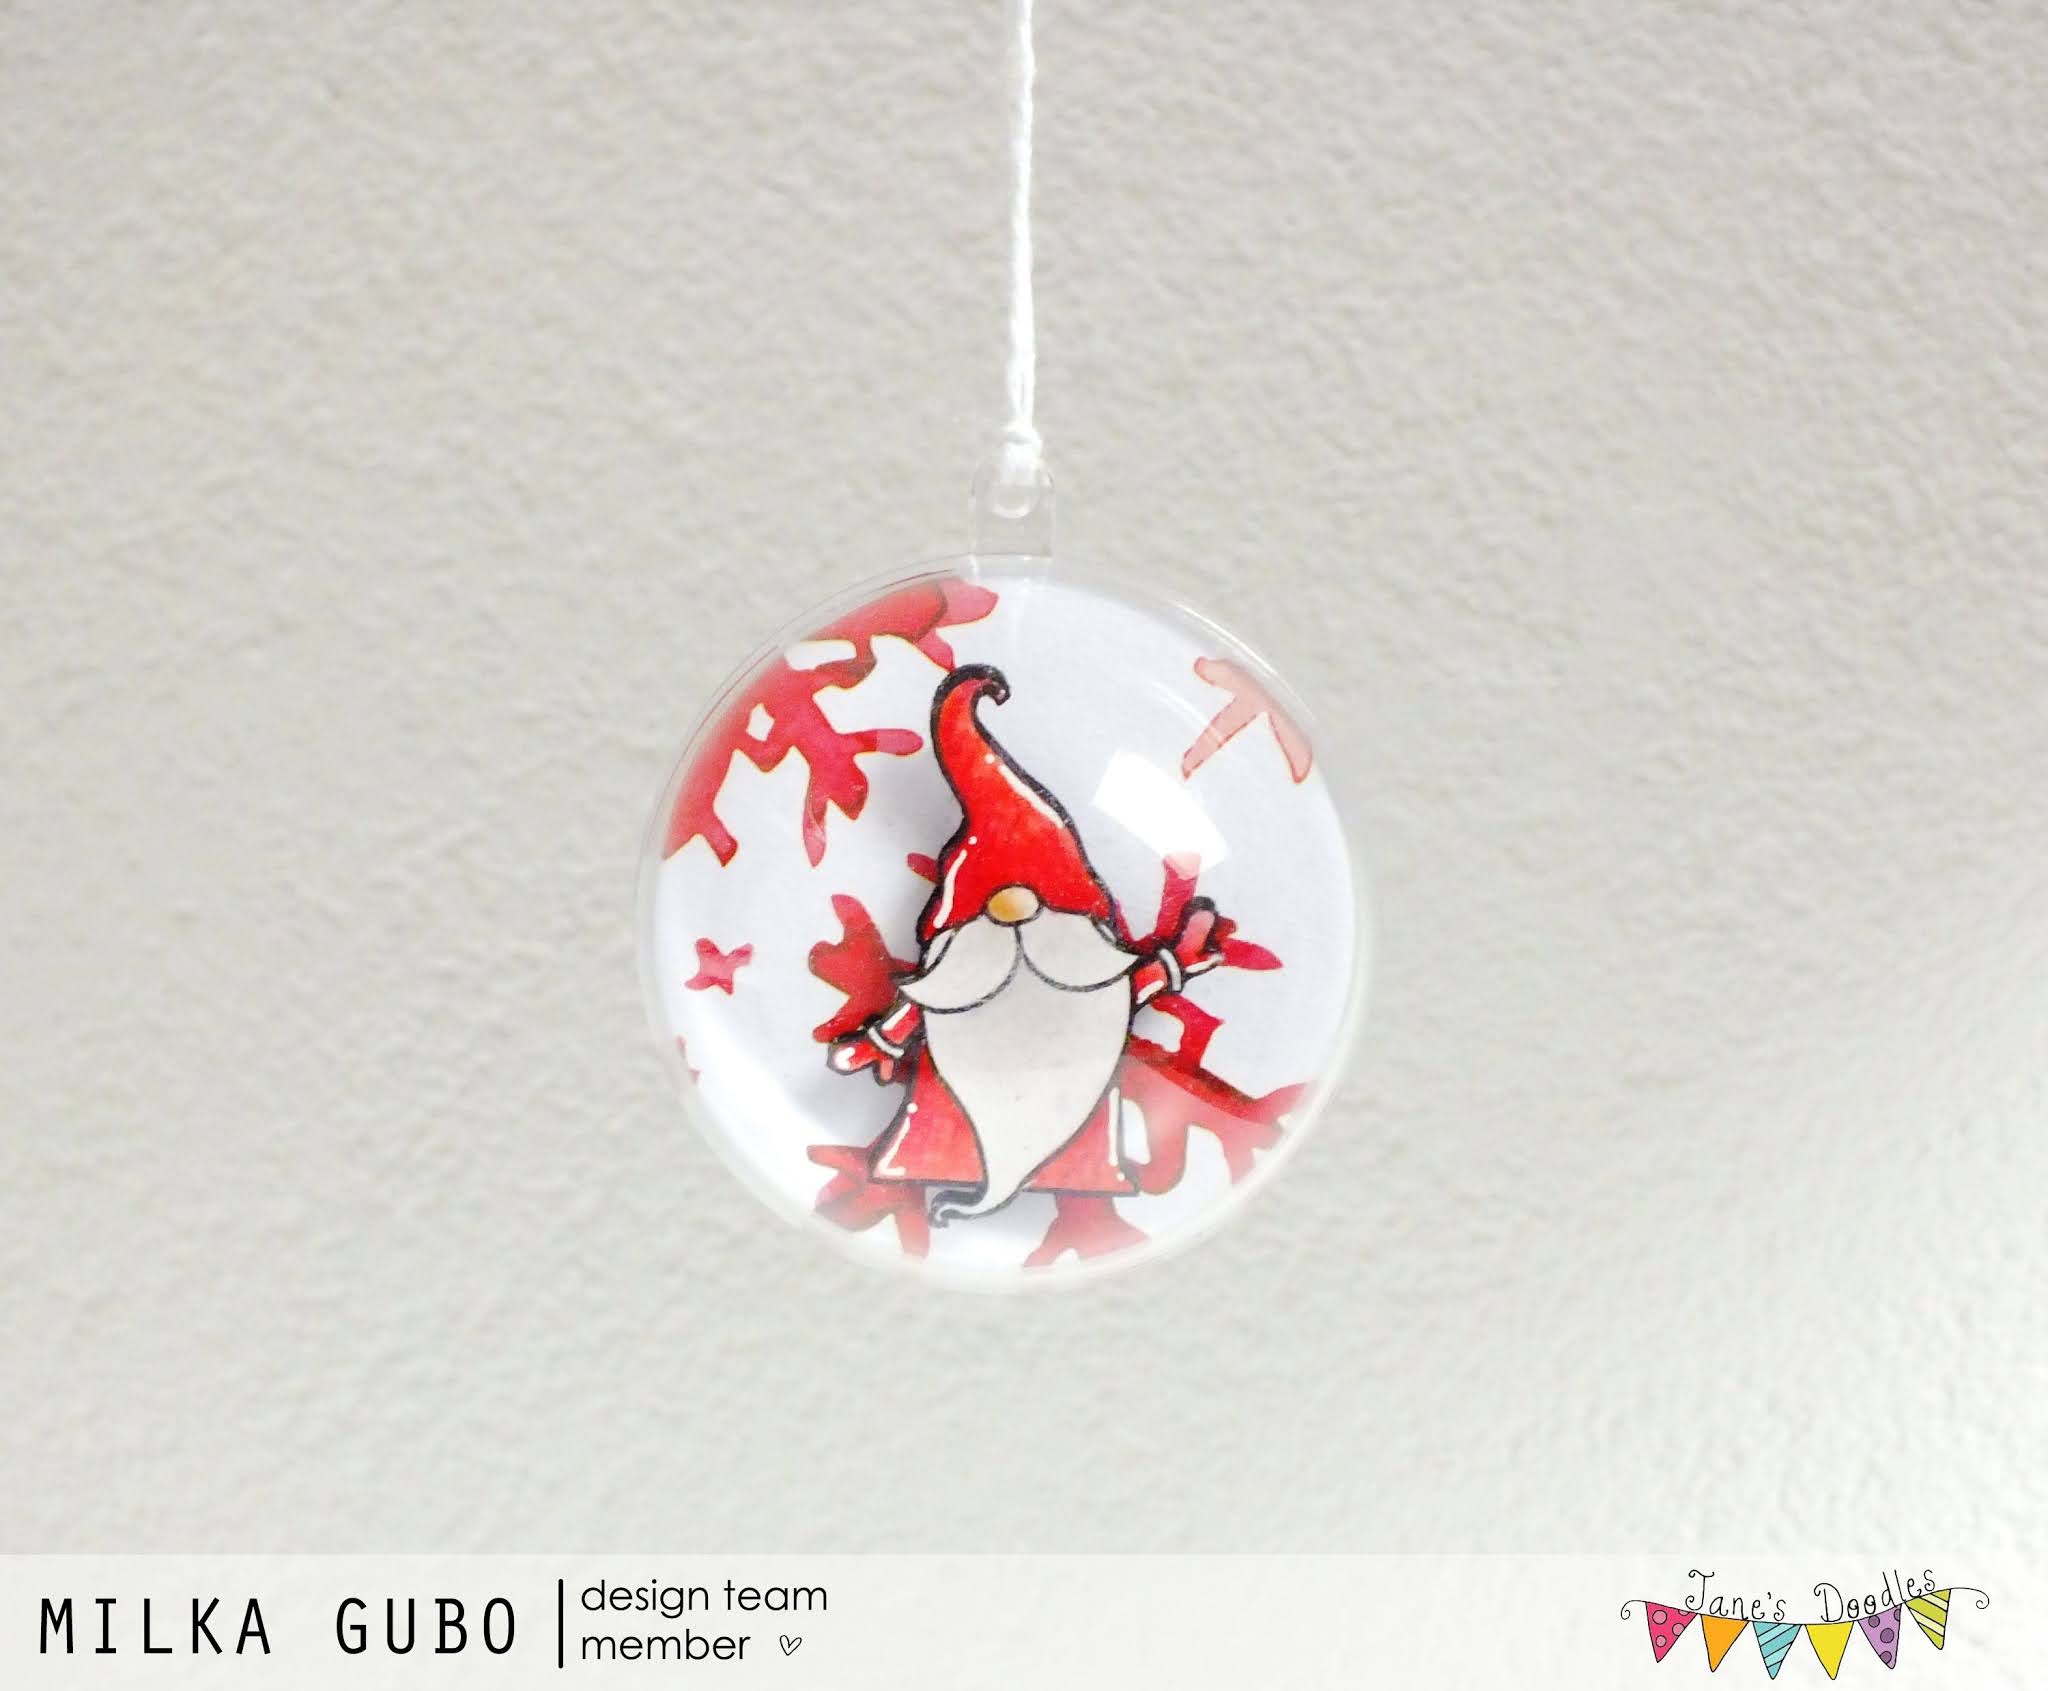
And here is what I prepared for today: Red and White Gnome Christmas Ornament. :o)


I made this one to decorate my Christmas tree. Red&white color combination is the combination I want this year. :o)


How I created my ornament...

I stamped a gnome on a watercolor paper and colored him in watercolor technique, using Distress Inks and colored pencils. After drying, I fussy cut the gnome, traced edges with a black marker and left him aside. 

I cut a circle from a beautiful patterned paper Jane sent me last month. I cut another circle from a white cardstock paper and glued two circles together just to make it a bit thicker.

Then I stamped the gnome on the circle and colored him with the black marker. I stamped another gnome on the white cardstock paper, fussy cut him out, traced edges with the black marker and glued the watercolored gnome over him. I did this to make the image thicker. 

I glued 3-D foam squares on the back of the gnome and glued him on the circle over the gnome colored with black marker, which adds extra shade.

I drew white highlights on the gnome's outfit with a white pigment ink pen.

Lastly, I placed circle in a clear acrylic fillable ornament ball, closed the ball, tied a white twine on the top and my ornament was finished. :o)


I love how my ornament turned out!! :o)

At the bottom of this post you can find detailed supply lists of my today's project. Link to this post will be in a right sidebar until the Blog Hop ends. :o)


And now to the Blog Hop prize...

With each Blog Hop three is a giveaway too. Our generous Jane is giving away 4 Pucker Up! stamp sets. Find all the details about blog hop prizes over at Jane's Doodles blog.

Here is the Blog Hop order:

Kaja Vezenšek
Milka Gubo (you are here)
Katerina Vorsobina (on Jane's Doodles blog)


Jane will announce winners on Monday, December 21st, 2020, at Jane's Doodles Blog.

Don't forget, Jane is having 46% off sale today. Ends midnight CET. No code needed. :o) 

There is one more giveaway on Jane's Doodles Instagram account. :o)

Now hop over to Neha's blog and see what she created for today's hop.


Thank you for visiting. I hope you enjoyed on my stop today and got inspired. :o) 

Happy hopping and good luck to all!!! :o)


    Milka


    List of supplies:
    • Jane's Doodles 'Merry Gnomes' stamp set
    • white cardstock paper
    • watercolor paper
    • patterned paper
    • Ranger's Archival Ink (Jet Black)
    • Tim's Holtz Distress Inks:
      • Tea Dye
      • Hickory Smoke
    • Caran D'Ache Prismalo Aquarelle colored pencils (two red shades)
    • Stabilo Fibre Tip Pen (Marker), Black 68/46
    • Uniball Signo White pigment ink pen
    • UHU liquid glue
    • Sakura Quickie Glue pen
    • clear acrylic fillable ball ornament (d = 60 mm)
    • white twine
    • 3-D square foams, 5 x 5 x 2 mm
    • round acrylic block
    • Marabu fine rounded paint brush no. 3/0
    • Marabu fine rounded paint brush no. 5/0
    • scissors
    • paper towels
    • water
    • pencil

    Ornament measurements: d = 60 mm 


    Saturday, December 7, 2019

    Advent Wreath

    Hi everyone! :o)

    I hope you're all well. :o) It's been quiet here on my blog for a week. I had quite busy schedule and I didn't find any time to write during the week.

    Today I want to share with you my Advent Wreath. I arranged it last Saturday. :o)


    My mom borrowed me a gorgeous white plate with golden stars and I bought white candles. All other stuff I used I had at home. I played around an hour and arranged everything on the plate. :o)


    I love how it turned out!! :o)

    Thank you for stopping by and your kind feedback. Enjoy and smile!! :o) 


    Milka


    Thursday, October 31, 2019

    13 Days of Halloween - Day 9 - Polymer Clay Dancing Ghost

    Happy Halloween!!! :o)

    Today I'm bringing DAY 9 of the 13 Days of Halloween series with this Polymer Clay Dancing Ghost sculpture. :o)


    To make this tiny ghost I went with same design as on two ghosts that I shared couple days ago as one of my project from my 13 Days of Halloween series (here).


    How I made my sculpture...

    When I work with a polymer clay, I work on the glass surface plate I have. I find the glass to be best surface to work with the polymer clay. It's also very important to have clean hands, as the polymer clay picks absolutely everything from your hands or working surface.

    I softened a night glow polymer clay with my hands. Polymer clay has to be softened, as it's not possible to work with hardened polymer clay. 

    Using my hands and a glass working surface, I shaped the ghost. Using various modeling tools, I shaped holes for eyes and inserted a tiny black glass bead for each eye. Using a toothpick, I made a hole through the ghosts. Then I worked on wrinkles, shaping them with my hands.

    When I was satisfied with the shape of the ghost, I baked it for 30 minutes in an oven following producer's instructions.

    After baking, I put the ghost to cool on air. After cooling, I sanded it using a fine grit sanding paper .

    Then I made a tiny polymer clay sphere, made a hole through it and baked it. This tiny part was for "closing" the bottom part of the ghost and to tie a nylon thread through it. After cooling, I tied the nylon thread around the sphere with a hole, thread it through the ghost and my tiny ghost was finished. :o)

    I really like how this one turned out. And it glows in the dark. :o)


    List of supplies:
    • FIMO EFFECT polymer clay, night glow 04
    • black glass beads (for eyes)
    • modeling tools
    • 32 cm x 32 cm x 1 cm glass plate
    • oven
    • baking paper
    • baking plate
    • fine grit sanding paper
    • toothpick
    • nylon thread


    Here is a short video. :o)

    Music:
    (incompetech.com)
    Licensed under Creative Commons: By Attribution 4.0


    I'm linking my project to the challenge:
    Note: bold text is a direct link to the current challenge and blog badge ) is a direct link to a challenge home page.

    This is my 1st entry to this challenge.


    Thank you for stopping by and your kind feedback. Enjoy and smile! :o)


    Milka

    Wednesday, October 30, 2019

    13 Days of Halloween - Day 8 - Black Mini Pumpkins Decorations

    Hi everyone!!! :o)

    Today I'm bringing DAY 8 of the 13 Days of Halloween series with these two Black Mini Pumpkins Decorations. :o)


    I made these (and other decorations) to decorate our apartment for Halloween night. This year's theme is black&white. :o) Although it's not common here in Croatia to celebrate Halloween, my honey and I celebrate it each year. We started to date in the Halloween night 13 years ago. :o)


    How I made my decorations...

    My honey brought me adorable mini pumpkins couple days ago to do something with them for Halloween. I knew immediately they will be black. 

    I cleaned pumpkins with a dry cloth and painted them with a black acrylic paint. I mostly used my fingers to color (with disposable latex gloves on my hands), I just used a paint brush to paint pumpkins around stems.

    First I painted bottom part of pumpkins and left them dry through the night. Next day I painted top part of pumpkins and left them dry through the night again.

    I love how they turned out!! :o)

    List of supplies:
    • mini pumpkins
    • dry cloth
    • acrylic paint, black
    • Marabu fine rounded paint brush no. #2
    • disposable latex gloves


    Thank you for stopping by and your kind feedback. Enjoy and smile! :o)


    Milka

    Saturday, October 26, 2019

    13 Days of Halloween - Day 5 - White Pumpkin Polymer Clay Sculpture

    Hi everyone!!! :o)

    Today I'm bringing DAY 5 of the 13 Days of Halloween series with this White Pumpkin Polymer Clay sculpture. :o)


    How I made my sculpture...

    When I work with a polymer clay, I work on the glass surface plate I have. I find the glass to be best surface to work with the polymer clay. It's also very important to have clean hands, as the polymer clay picks absolutely everything from your hands or working surface.

    I softened a night glow polymer clay with my hands. Polymer clay has to be softened, as it's not possible to work with hardened polymer clay. 

    Then I made a ball from an aluminium foil and wrapped the polymer clay around it. Using my hands and glass working surface, I shaped a sphere. Using various modeling tools, I shaped the pumpkin. From a tiny piece of the polymer clay, I made a stem and attached it to the pumpkin. Lastly, I scratched the pumpkin to get nice skin texture. 

    Then I baked the pumpkin for 30 minutes in an oven following producer's instructions.

    After 30 minutes of baking, I put the pumpkin to cool on air for 15 minutes and it was finished. :o)


    List of supplies:
    • FIMO EFFECT polymer clay, night glow 04
    • aluminum foil
    • modeling tools
    • 32 cm x 32 cm x 1 cm glass plate
    • oven
    • baking paper
    • baking plate

    I really like how my pumpkin turned out. :o)


    And it glows in the dark. :o)


    I'm linking my project to the challenge:
    Note: bold text is a direct link to the current challenge and blog badge ) is a direct link to a challenge home page.

    Love To Craft Challenge, LTCCB #39 October Anything Goes
    This is my 5th entry to this challenge.


    Thank you for stopping by and your kind feedback. Enjoy and smile! :o)


    Milka

    Friday, October 25, 2019

    13 Days of Halloween - Day 4 - Polymer Clay Ghosts

    Happy Friday!!! :o)

    Today I'm bringing DAY 4 of the 13 Days of Halloween series with these two Polymer Clay Ghosts sculptures. :o)


    How I made my sculptures...

    When I work with a polymer clay, I work on the glass surface plate I have. I find the glass to be best surface to work with the polymer clay. It's also very important to have clean hands, as the polymer clay picks absolutely everything from your hands or working surface.

    I softened a night glow polymer clay with my hands. Polymer clay has to be softened, as it's not possible to work with hardened polymer clay. 

    Using my hands and a glass working surface, I shaped ghosts. Using various modeling tools, I shaped holes for eyes and inserted a tiny black glass bead for each eye. Then I worked on wrinkles, shaping them with my hands.

    Then I baked ghosts for 30 minutes in an oven following producer's instructions.

    After baking, I put ghosts to cool on air. After cooling, I sanded them using a fine grit sanding paper and my tiny ghosts were finished. :o)


    I really like how these two turned out. :o)


    And they glow in the dark. :o)


    List of supplies:
    • FIMO EFFECT polymer clay, night glow 04
    • black glass beads (for eyes)
    • modeling tools
    • 32 cm x 32 cm x 1 cm glass plate
    • oven
    • baking paper
    • baking plate
    • fine grit sanding paper


    Here is a short video. :o)

    Music:
    (incompetech.com)
    Licensed under Creative Commons: By Attribution 4.0


    I'm linking my project to the challenge:
    Note: bold text is a direct link to the current challenge and blog badge ) is a direct link to a challenge home page.

    Your Next Stamp, Fun Friday Challenge #125 - Trick or Treat
    This is my 2nd entry to this challenge.


    Thank you for stopping by and your kind feedback. Enjoy and smile! :o)


    Milka
    Related Posts Plugin for WordPress, Blogger...