Showing posts with label Colored Pencils. Show all posts

Thursday, March 24, 2022

Jane's Doodles Release Blog Hop


Hello everyone! :o)

Welcome to a Jane's Doodles Release Blog Hop. Today we are featuring two GORGEOUS stamp sets released into the store. :o) 

Love love LOVE!!!!! :o)


And here is what I prepared for today: Happy Birthday Card, using stamps from 'Happy Day' stamp set. :o)
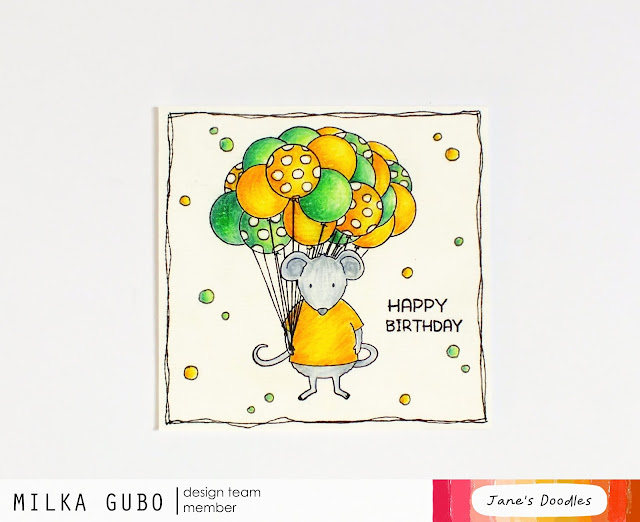

To make this card I was inspired with my baby boy's Fran 1st Birthday Party theme: yellow and green balloons. :o) He was thrilled. :o) 


We had two parties, first on his actual birthday, March 9th, and second last Sunday, on 1 st day of Spring, when we both celebrated our birthdays with our family. Second party was in different color scheme. He was thrilled again. :o)


How I made this Card... 
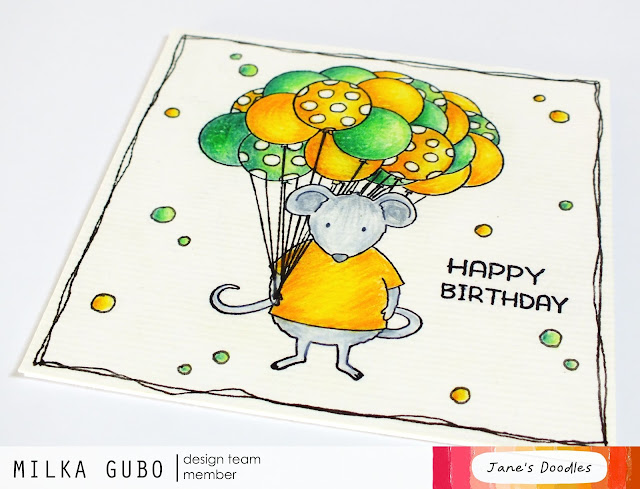
I stamped an adorable mouse on a square thick mix media paper panel. With some masking, I stamped 21 balloon and a sentiment. Then I drew balloon strings, a frame and circles on the panel and my scene was ready to be colored. :o)

My first intention was to watercolor images, but I changed my mind and colored everything with colored pencils. I spent around 2 hours coloring. I like the result. :o)


Lastly, I glued the panel on a white top folded square card base and my card was finished. :o)


At the bottom of this post you can find detailed supply lists of my today's card. Link to this post will be in a right sidebar until the Blog Hop ends. :o)


And now to the Blog Hop prize...

Our generous Jane will be giving away one stamp set of winner's choice to one lucky winner. All you have to do is leave a comment on all blogs along the Hop for your chance to win.

Here is the Blog Hop order:

Milka (you are here)


Jane will announce the winner on Monday, March 28th, 2022, at Jane's Doodles Blog.

Also, Jane is having 25% off sale through this weekend. No code needed.


Now hop over to Marion's blog and see what she created for today's hop.


Thank you for visiting. I hope you enjoyed on my stop today and got inspired. :o) 

Happy hopping and good luck to all!!! :o)

    Milka


    List of supplies:
    • Jane's Doodles 'Happy Day' stamp set
    • Canson XL Mixed Media Paper, 300 g
    • Ranger's Archival Ink (Jet Black)
    • Caran D'Ache Prismalo Aquarelle colored pencils
    • Mitsubishi UniPin black 0.3
    • UHU universal liquid glue
    • Fiskars High Precision Personal Paper Trimmer
    • bone folder
    • Tonic Studios Tim Holtz stamp platform 
    • pencil 
    • eraser

    Card measurements: 103 mm x 103 mm


    Monday, January 17, 2022

    Jane's Doodles Release Blog Hop


    Happy Monday! :o)

    Welcome to a Jane's Doodles Release Blog Hop. Today we are featuring two BEAUTIFUL Love/Valentines themed stamp sets and a GORGEOUS stencil released into the store. :o) We also have 2 amazing Guest Designers joining us today. :o)

    GORGEOUS!!! Love love LOVE!!!!! :o)


    For today I prepared three cards. :o) 


    On all my three cards I used the Hearts Stencil and a handmade heart mask. I made the mask from a post-it paper. I traced Jane's heart on the post-it paper and then drew large heart similar to Jane's "original" heart. I fussy cut it carefully, as I needed both masks, positive and negative. :o)


    My first card for today is Sending Love CAS (clean and simple) Card.


    How I made this card...

    I glued the negative part of heart mask on a white cardstock paper panel and ink blended the background. Then I placed the hearts stencil over the masked part and ink blended hearts. I added some extra shades with colored pencils.

    When I was satisfied with the color, I removed the stencil and the mask and drew light reflections, stars and dots with a white pigment ink pen. I love a sparkle effect that I achieved. :o)

    I stamped a sentiment from Love You stamp set on the panel, glued the panel on a black top folded card base and my card was finished. :o)

    Card measurements: 95 mm x 140 mm (3 3/4" x 5 1/2")


    My second card for today is Love & Thanks Monochrome Card.


    How I made this card...

    I glued the hart mask on a white cardstock paper panel and ink blended the entire background. Then I placed the hearts stencil on the panel and ink blended hearts. I added some extra shades with colored pencils.

    When I was satisfied with the color, I removed the stencil and the mask and drew light reflections, stars and dots with the white pigment ink pen and again created the sparkle effect. Love it!!! :o)

    I stamped a sentiment from Love You stamp set on the panel creating Ombré Effect. A stamping platform really helped with that. :o)

    On this card I wanted to create a bit of dimension. I didn't use foam. I cut two white panels, glued them together, glued hearts panel on top of the stacked panels and glued everything on a white top folded card base. Lastly, I glued one more panel inside the card to make it a bit sturdier. :o)

    Card measurements: 95 mm x 127 mm (3 3/4" x 5")


    My last card for today is Love is in the Air Mini Square Card.


    How I made this card...

    I glued the negative part of heart mask on a white cardstock paper panel and ink blended the background. Then I placed the hearts stencil over the masked part and ink blended hearts. I added some extra shades with colored pencils.

    When I was satisfied with the color, I removed the stencil and the mask and splattered the panel with water. I dabbed the surface with a paper towel and continued to splatter until I was satisfied with the appearance. I left the panel to dry on air.

    I stamped an adorable bird from the Love Is In The Air stamp set on the white cardstock paper. I also made a mask on the post-it paper. I carefully fussy cut the bird and used the negative part of the mask for this card. I glued the mask over the bird and ink blended the bird. I removed the mask and added some extra shades with colored pencils. When I was satisfied, I fussy cur the bird, leaving thin white border around it and drew white highlights with the white gel pen.

    I heat embossed the sentiment from the same stamp set as the bird in white on a black cardstock paper stripe. I trimmed the sentiment stripe to a desirable size.

    Lastly, I cut out three more squares, same size as the panel and a white square top folded card base.

    With all parts ready, my card was ready for assembling. I glued two squares together (stacked them) and glued ink blended panel on top of them. Then I glued everything on a white square top folded card base. I glued one more square inside the card to make it sturdier. I glued 3-D foam squares behind the sentiment stripe and the bird (two different foam dimensions), glued them on the card and my card was finished. :o)

    Card measurements: 92 mm x 92 mm (3 5/8" x 3 5/8")


    I had so much fun creating these cards and LOVE how they turned out. :o) My baby boy Fran also likes them a lot. He was screaming of joy when I showed them to him. LOL 


    At the bottom of this post you can find detailed supply lists of my today's cards. Link to this post will be in a right sidebar until the Blog Hop ends. :o)


    And now to the Blog Hop prize...

    Our generous Jane will be giving away one stamp set of winner's choice to one lucky winner. All you have to do is leave a comment on all blogs along the Hop for your chance to win.

    Here is the Blog Hop order:


    Jane will announce the winner on Friday, January 21st, 2022, at Jane's Doodles Blog.

    Also, Jane is having 25% off sale from Monday to Wednesday (17-19). No code needed.


    Now hop over to Marion's blog and see what she created for today's hop.


    Thank you for visiting. I hope you enjoyed on my stop today and got inspired. :o) 

    Happy hopping and good luck to all!!! :o)


      Milka


      List of supplies:
      • Jane's Doodles 'Love Is In The Air' stamp set 
      • Jane's Doodles 'Love You' stamp set 
      • Jane's Doodles 'Hearts' stencil
      • white cardstock paper
      • black cardstock paper
      • post-it paper
      • Ranger Archival Ink, Jet Black
      • Tsukineko VersaMark Watermark Stamp Pad
      • WOW! Embossing Powder (Opaque Bright White, Regular, WL01R)
      • Tim Holtz Distress Inks: 
        • Salty Ocean
        • Blueprint Sketch
        • Mustard Seed
      • Faber-Castell Polychromos Colour Pencils:
        • Ultramarine 120
        • Helioblue Reddish 151
        • Cadmium Yellow 107
        • Dark Chrome Yellow 109
      • Uniball Signo White Pigment Ink Pen
      • UHU universal liquid glue
      • 3-D square foams, 5 x 5 x 2 mm
      • 3-D square foams, 5 x 5 x 1 mm
      • Fiskars High Precision Personal Paper Trimmer
      • bone folder
      • Ranger Heat It Tool
      • Xcut self healing working mat
      • Tonic Tim Holtz Stamp Platform
      • scissors
      • powder bag
      • finger sponge dauber
      • ink blending tool
      • paper towel
      • water
      • ruler
      • pencil
      • eraser
      • Washi tape

      Friday, October 8, 2021

      Jane's Doodles Warm Hugs Release Blog Hop


      Happy Friday! :o)

      Welcome to a Jane's Doodles Warm Hugs Release Blog Hop. Today we are featuring a BEAUTIFUL 'Warm Hugs' stamp set released into the store. :o) We also have 5 amazing super talented Guest Designers joining us today. :o)


      Beautiful!!! Love love LOVE!!!!! :o)


      And here is what I prepared for today: Thankful For You Card. :o)


      How I made this Card... 

      For my card I used most stamps from the set. I love to create my own backgrounds. It's a great way to use as much as possible stamps from one set. I call that good use of the set. :o)

      First I arranged tinny stamps on an acrylic block and randomly stamped tiny images from the set on a Kraft paper panel in watermark stamping technique using VersaMark Watermark Ink. I filled gaps by stamping one by one image in gaps. After drying, I stamped the sentiment in black on the panel.

      I cut and folded a card base, slightly larger than the panel. I also cut 3 more panels from the Kraft paper. I glued (stacked) two panels together. I did this to add some dimension on my card, as I don't have any foam sheet in my stash and to glue 3-D foam squares on the entire panel was not an option. I glued the stamped panel on stacked panels and glued them on the card base. Last, 3rd panel, I glued inside the card to make it sturdier.

      Then I stamped a bear and leaves on a thick watercolor paper and colored images in watercolor technique with Caran D'Ache Prismalo Aquarelle colored pencils. After drying, I fussy cut images leaving white thin border around them. I glued 3-D foam squares (2 different thickness) on the back of each image and glued them on the card and my card was finished. :o)


      I love how my card turned out!! :o)

      At the bottom of this post you can find detailed supply lists of my today's card. Link to this post will be in a right sidebar until the Blog Hop ends. :o)


      And now to the Blog Hop prize...

      Our generous Jane will be giving away one stamp set of winner's choice to one lucky winner. All you have to do is leave a comment on all blogs along the Hop for your chance to win.

      Here is the Blog Hop order:


      Jane will announce the winner on Monday, October 11th, 2021, at Jane's Doodles Blog.

      Also, Jane is having 25% off sale through this weekend. No code needed.


      Now hop over to Katerina's IG account and see what she created for today's hop.


      Thank you for visiting. I hope you enjoyed on my stop today and got inspired. :o) 

      Happy hopping and good luck to all!!! :o)


        Milka


        List of supplies:
        • Jane's Doodles 'Warm Hugs' stamp set
        • Canson XL Mixed Media Paper, 300 g
        • Crafter's Companion Neenah Desert Storm Kraft Coloring Card
        • Tsukineko VersaMark Watermark Stamp Pad
        • Ranger's Archival Ink (Jet Black)
        • Caran D'Ache Prismalo Aquarelle colored pencils
        • UHU universal liquid glue
        • 3-D square foams, 5 x 5 x 2 mm
        • 3-D square foams, 5 x 5 x 1 mm
        • Fiskars High Precision Personal Paper Trimmer
        • bone folder
        • round acrylic block
        • acrylic block
        • scissors
        • kraft knife
        • Xcut self healing working mat A4
        • DaVinci fine rounded paint brush no. 2/0
        • paper towels
        • water

        Card measurements: 146 mm x 82 mm (5 3/4" x 3 1/4")


        Tuesday, June 15, 2021

        Birthday Snail Card - Croatian Sentiment (bastel-traum challenge #102)

        Hi everyone :o)

        It's time for a new challenge over at bastel-traum and our theme for the challenge #102 is Animals. :o)


        The challenge starts today, June 15th, 2021, at 9 AM, CET (UTC +1) and ends on July 15th, 2021, at 8:55 AM, CET (UTC +1). Find all the details about the challenge, rules and prizes in a challenge post (here).


        It's been a while since I've joined my DT in challenges and created a card, but today I managed. :o)

        And here is my take on the challenge: CAS (clean and simple), one layer, Birthday Snail Card - Croatian Sentiment. :o)


        To make this card, I CASEd (copied and shared everything) a card that I made two years ago (here). I went with same design, used same products, just went with a bit different color scheme (on this card a snail's house is a bit lighter, yellowish). :o)

        I used stamps from two Jane's Doodles stamp sets: a snail from 'Chameleon' and a speech bubble sentiment from 'Croatian Sentiments'. Sretan rođendan means Happy Birthday. :o)


        How I made my card...

        I stamped the snail and the sentiment directly on a top folded Kraft paper card base.

        I colored the snail and ground with various colored pencils. To add extra shades to the image, I used Stabilo Pens (Markers).

        Then I colored the speech bubble sentiment and snail's eyes with a white pigment ink pen. I managed to mess couple black lines with the white pigment ink, but I fixed them with a black fine liner.

        Lastly, I coated snail's house with a transparent varnish to create glossy accents and left it dry on air through the night.

        I love how my card turned out. :o)


        Card measurements: 89 mm x 121 mm (3 1/2" x 4 3/4")

        List of supplies:


        I hope you'll like my card for this challenge and get inspired. For more inspiration, check out BEAUTIFUL cards my super talented Design Teammates and our Guest Designer created for the challenge. Do join us in this challenge, we are looking forward to see your creations. :o)


        Thank you for stopping by and your kind feedback. Enjoy and smile! :o)


        Milka

        Friday, December 18, 2020

        Jane's Birthday Party Blog Hop


        Happy Friday!! :o)

        Welcome to a special, Jane's Birthday Party Blog Hop. :o) 

        Our Jane turned 46 today and is celebrating with this blog hop, two giveaways, one here and one on Instagram, as well with 46% off 24 hours sale. :o)

        Happy birthday, Jane!!! ♥


        Jane gave us, the Design Team, a simple "task" for today: to showcase our favorite Jane's Doodles stamp set. :o)

        Although I love all Jane's Doodles stamp sets that I have, 122 of them, I didn't think too much which stamp set to use. I immediately knew I want to use 'Merry Gnomes' stamp set. The cutest Gnomes in stamping world. LOVEEEEE!!!! ♥


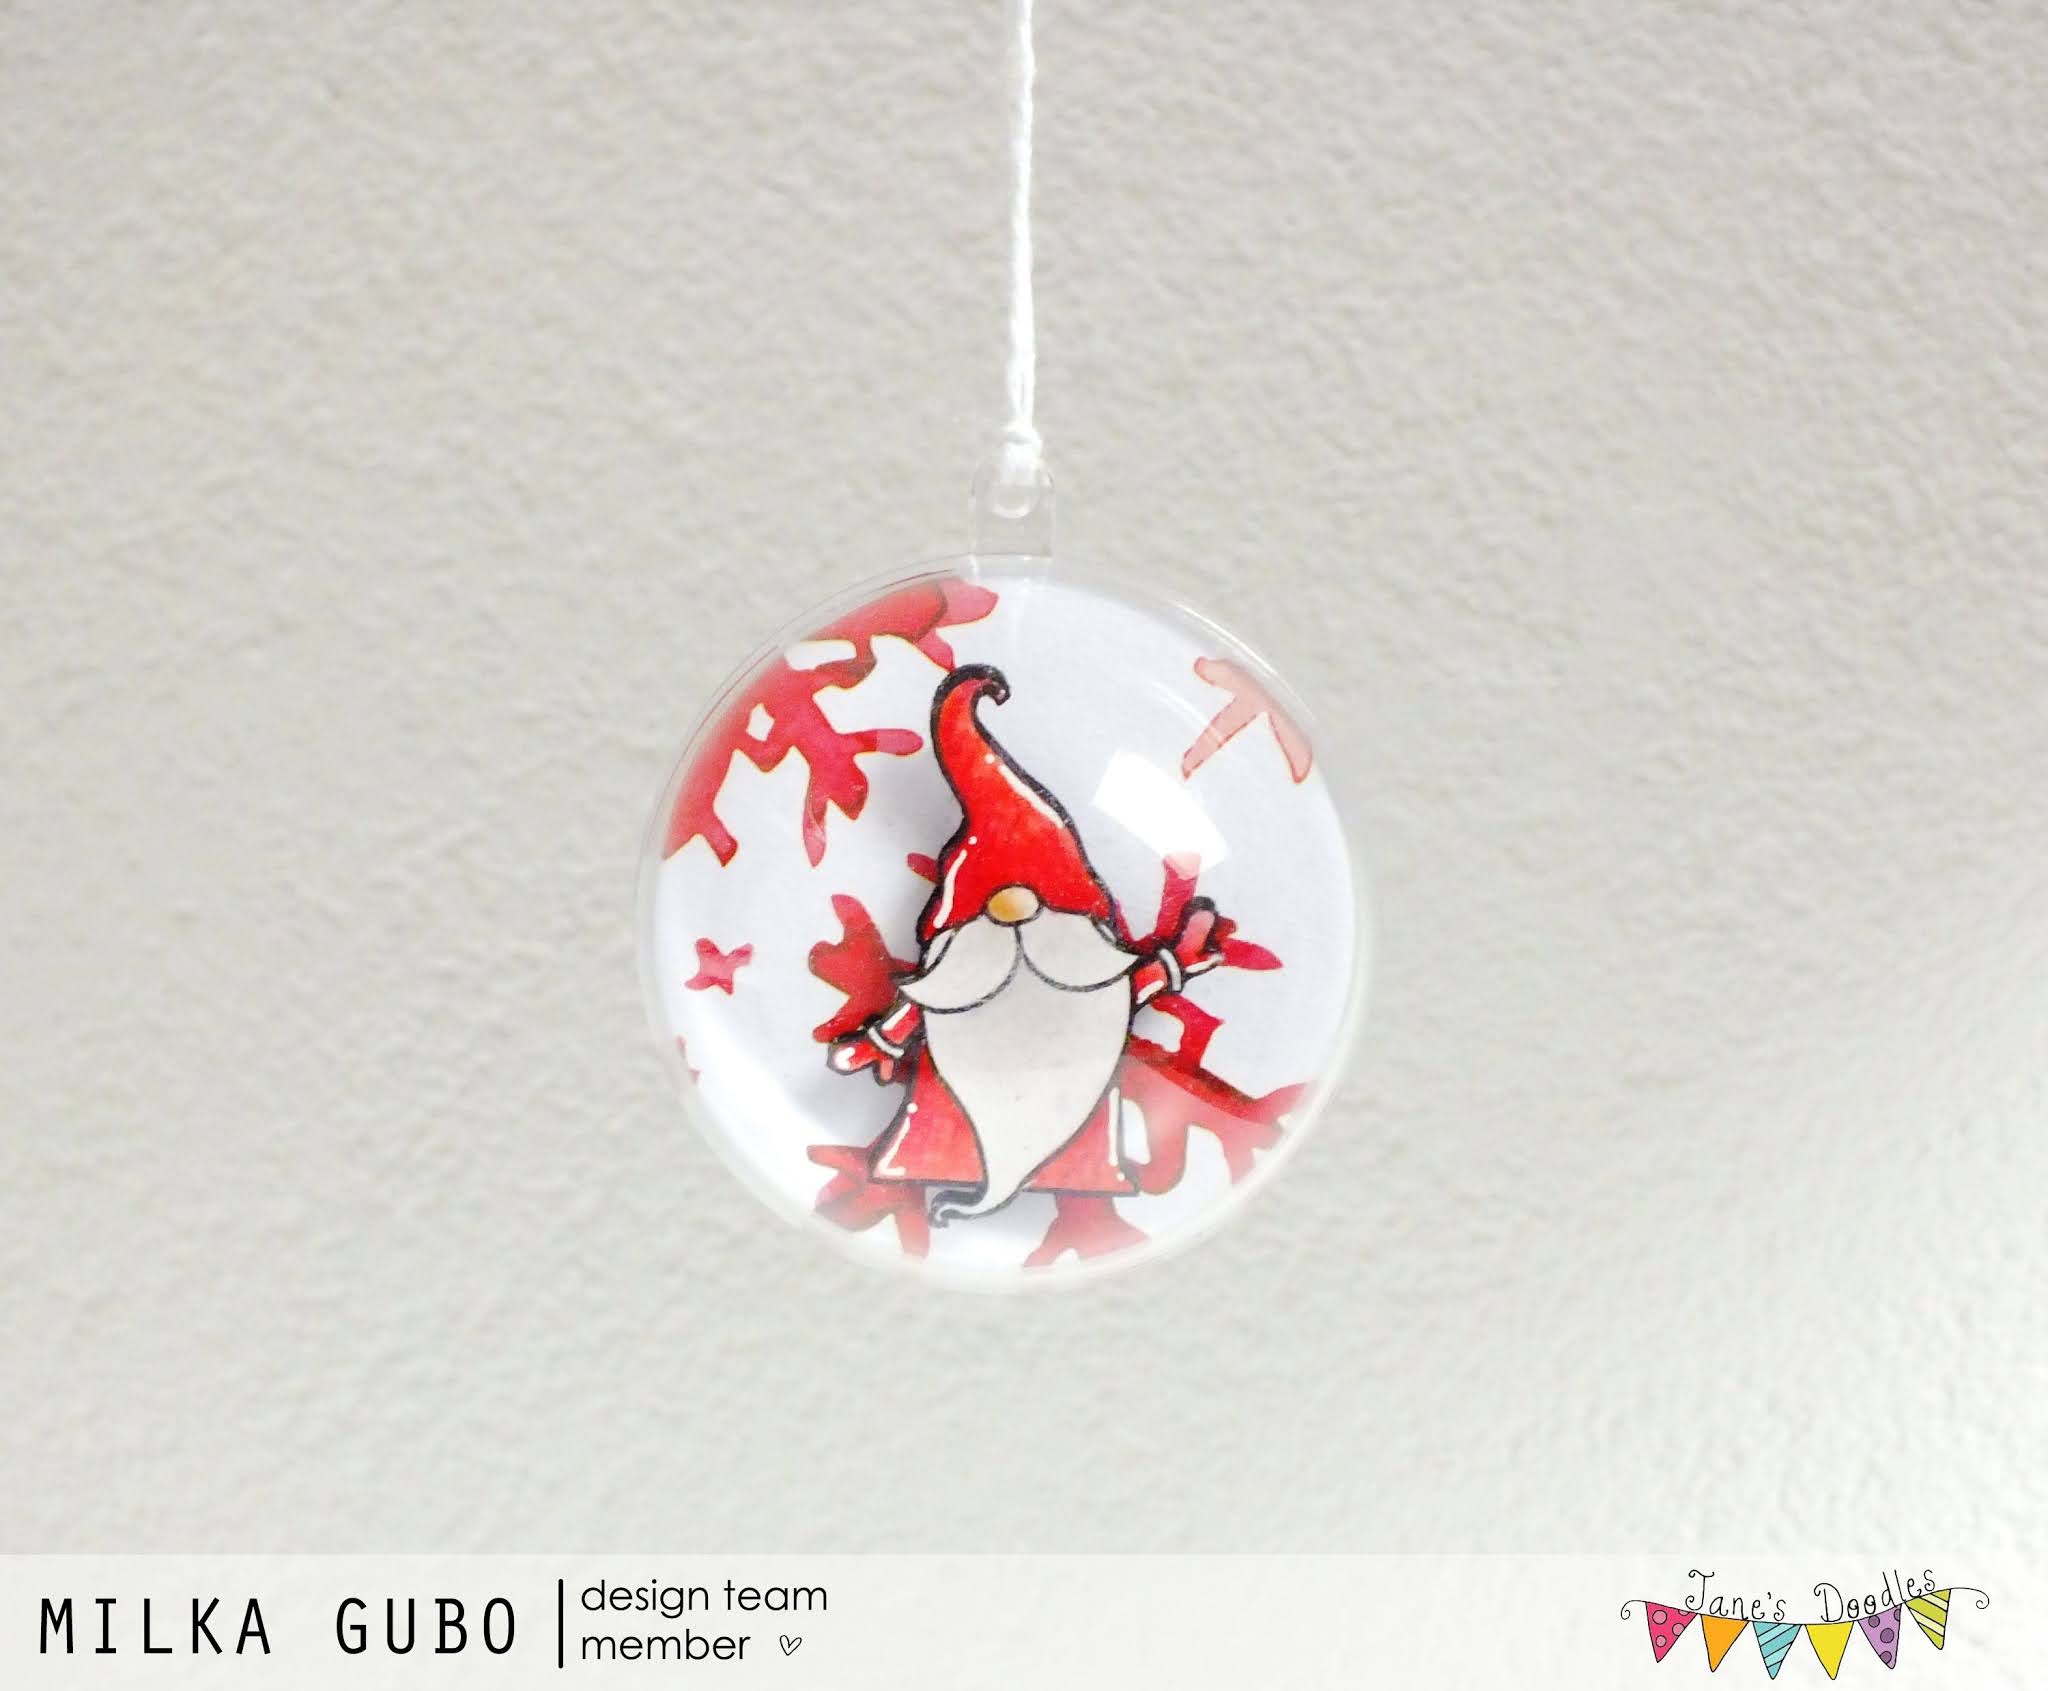
        And here is what I prepared for today: Red and White Gnome Christmas Ornament. :o)


        I made this one to decorate my Christmas tree. Red&white color combination is the combination I want this year. :o)


        How I created my ornament...

        I stamped a gnome on a watercolor paper and colored him in watercolor technique, using Distress Inks and colored pencils. After drying, I fussy cut the gnome, traced edges with a black marker and left him aside. 

        I cut a circle from a beautiful patterned paper Jane sent me last month. I cut another circle from a white cardstock paper and glued two circles together just to make it a bit thicker.

        Then I stamped the gnome on the circle and colored him with the black marker. I stamped another gnome on the white cardstock paper, fussy cut him out, traced edges with the black marker and glued the watercolored gnome over him. I did this to make the image thicker. 

        I glued 3-D foam squares on the back of the gnome and glued him on the circle over the gnome colored with black marker, which adds extra shade.

        I drew white highlights on the gnome's outfit with a white pigment ink pen.

        Lastly, I placed circle in a clear acrylic fillable ornament ball, closed the ball, tied a white twine on the top and my ornament was finished. :o)


        I love how my ornament turned out!! :o)

        At the bottom of this post you can find detailed supply lists of my today's project. Link to this post will be in a right sidebar until the Blog Hop ends. :o)


        And now to the Blog Hop prize...

        With each Blog Hop three is a giveaway too. Our generous Jane is giving away 4 Pucker Up! stamp sets. Find all the details about blog hop prizes over at Jane's Doodles blog.

        Here is the Blog Hop order:

        Kaja Vezenšek
        Milka Gubo (you are here)
        Katerina Vorsobina (on Jane's Doodles blog)


        Jane will announce winners on Monday, December 21st, 2020, at Jane's Doodles Blog.

        Don't forget, Jane is having 46% off sale today. Ends midnight CET. No code needed. :o) 

        There is one more giveaway on Jane's Doodles Instagram account. :o)

        Now hop over to Neha's blog and see what she created for today's hop.


        Thank you for visiting. I hope you enjoyed on my stop today and got inspired. :o) 

        Happy hopping and good luck to all!!! :o)


          Milka


          List of supplies:
          • Jane's Doodles 'Merry Gnomes' stamp set
          • white cardstock paper
          • watercolor paper
          • patterned paper
          • Ranger's Archival Ink (Jet Black)
          • Tim's Holtz Distress Inks:
            • Tea Dye
            • Hickory Smoke
          • Caran D'Ache Prismalo Aquarelle colored pencils (two red shades)
          • Stabilo Fibre Tip Pen (Marker), Black 68/46
          • Uniball Signo White pigment ink pen
          • UHU liquid glue
          • Sakura Quickie Glue pen
          • clear acrylic fillable ball ornament (d = 60 mm)
          • white twine
          • 3-D square foams, 5 x 5 x 2 mm
          • round acrylic block
          • Marabu fine rounded paint brush no. 3/0
          • Marabu fine rounded paint brush no. 5/0
          • scissors
          • paper towels
          • water
          • pencil

          Ornament measurements: d = 60 mm 


          Saturday, October 3, 2020

          Cheers Card (Jane's Dodles DT August Spotlight)


          Hi everyone! :o)

          This is my fifth and last post today. If you missed previous posts, just scroll down or follow direct links here, here, here and here. :o)


          This weekend I'm sharing my Jane's Doodles spotlight projects that I made in June, July, August and September, but I didn't share them here on my blog yet. Three days ago I shared full list of projects that I'll be sharing (here).

          Today I'm sharing four cards, my August spotlights. I'll share them all in separate blog posts, which are scheduled and will go live every hour.


          My fourth and last card for today is this one layer, Cheers Card. It was my spotlight project for Jane's Doodles on Thursday, August 27th, 2020. :o)


          To make my card I used beautiful stamps from Jane's Doodles 'Happy Hour' stamp set.


          How I made my card ....

          I stamped a cocktail glass directly on a white top folded card base. Then I masked the cocktail glass. I used a post-it paper to make a mask.

          I stamped a sentiment 'Cheers' in the background using two colors and 2nd generation stamping technique. I used a Ranger's Archival Ink, Jet Black and a Tim's Holtz Distress Ink Hickory Smoke.

          When I finished with stamping, I removed the mask and colored the cocktail glass with Caran D'Ache Prismalo Aquarelle colored pencils.

          I love how my card turned out. :o)


          Cards measurements: 83 mm x 120 mm (3 1/4" x 4 3/4")

          List of supplies:
          • Jane's Doodles 'Happy Hour' stamp set 
          • white cardstock paper
          • Ranger's Archival Ink, Jet Black
          • Tim's Holtz Distress Ink Hickory Smoke
          • Caran D'Ache Prismalo Aquarelle colored pencils
          • Fiskars High Precision Personal Paper Trimmer
          • bone folder
          • acrylic block (102 mm x 102 mm)
          • scissors 
          • post-it papers (for masking)


          At the end of this post...

          Jane is offering free shipping worldwide weekend. No code needed. For more information jump over to Jane's Doodles blog.


          And that would be all from me for today. Thank you for stopping by and your kind feedback. Enjoy and smile! :o)


          Milka


          Related Posts Plugin for WordPress, Blogger...