Showing posts with label Bubble. Show all posts

Wednesday, July 18, 2018

Jellyfish Card (Jane's Doodles DT Spotlight)


Hi everyone! :o)

Today is my turn to be on the spotlight over at Jane's Doodles and I made this Jellyfish Card. :o)


To make this card, I was inspired with a card I created in January 2017 (here) and a card I created in July 2017 (here). I used stamps from an adorable Jane's Doodles 'Under the Sea' stamp set.


How I made my card...

I stamped jellyfish on a watercolor paper panel and heat embossed bubbles in white. I masked jellyfish and blended the panel with Distress Inks. I splattered the panel with water, dried the panel and repeated the process. When I was satisfied with panel color, I splattered the panel with a Distress Ink Faded Jeans mixed with a bit of water.

After drying, I removed masks and colored jellyfish in watercolor technique using Distress Inks.

Then I glued the panel on a white top folded card base and coated jellyfish and bubbles with Wink of Stella.

As a finishing touch I drew white highlights and dots on jellyfish and dots on the panel with a white pigment ink. :o)

I really like how my card turned out. Jellyfish look like they're glowing in a sea. :o)


Card dimensions: 95 mm x 127 mm (3 3/4" x 5")

List of supplies:
  • Jane's Doodles 'Under the Sea' stamp set
  • white cardstock paper (card base)
  • watercolor paper
  • black cardstock paper scrap
  • post-it paper (for masking)
    • Ranger's Archival Ink (Jet Black)
    • Tsukineko VersaMark Watermark Stamp Pad
    • WOW! Embossing Powder (Opaque Bright White, Regular, WL01R)
    • Tim's Holtz Distress Inks
      • Mustard Seed
      • Fossilized Amber
      • Tumbled Glass
      • Salty Ocean
      • Blueprint Sketch
      • Faded Jeans
    • Uniball Singo White Pigment Ink
    • UHU liquid glue
    • ZIG Wink of Stella Brush (Gl. clear 999)
    • acrylic block (102 mm x 102 mm)
    • Fiskars High Precision Personal Paper Trimmer
    • Ranger Mini Ink Blending Tool
    • Ranger Heat It Tool
    • scissors
    • bone folder
    • Marabu fine rounded paint brush no. #0
    • powder bag
    • paper towels
    • dry cloth
    • water


    I'm linking my card to following challenges:
    Note: bold text and challenge badge (if any) are direct links to the current challenge and blog badge (if any) is a direct link to blog or challenge home page.

    1) Addicted to Stamps and More, Challenge #301 - Anything Goes
    This is my 1st entry to this challenge.

    2) Card Mania Challenges, Challenge #106, Anything Goes
    This is my 3rd entry to this challenge.

    3) Crafty Creations Challenges, #370 - Anything Goes
    This is my 1st entry to this challenge.

    4) Happy Little Stampers, Watercolour Challenge, July 2018, Anything Goes
    This is my 3rd entry to this challenge.
    Only jellyfish are watercolored on this card. :o)

    5) Little Miss Muffet Challenges, Challenge #193 - Anything Goes

    6) Simon Says Stamp Monday Challenge, Add A Little Sparkle
    This is my 1st entry to this challenge.
    Jellyfish are coated with Clear Wink of Stella. :o)


    At the end of this post...

    Jane has a sale and is offering 30% off on entire store. No code needed. The discount is calculated at the checkout. Find more details on Jane's Doodles blog. :o)


    Thank you for stopping by and your kind feedback. Enjoy and smile! :o)


    Milka

    Saturday, June 9, 2018

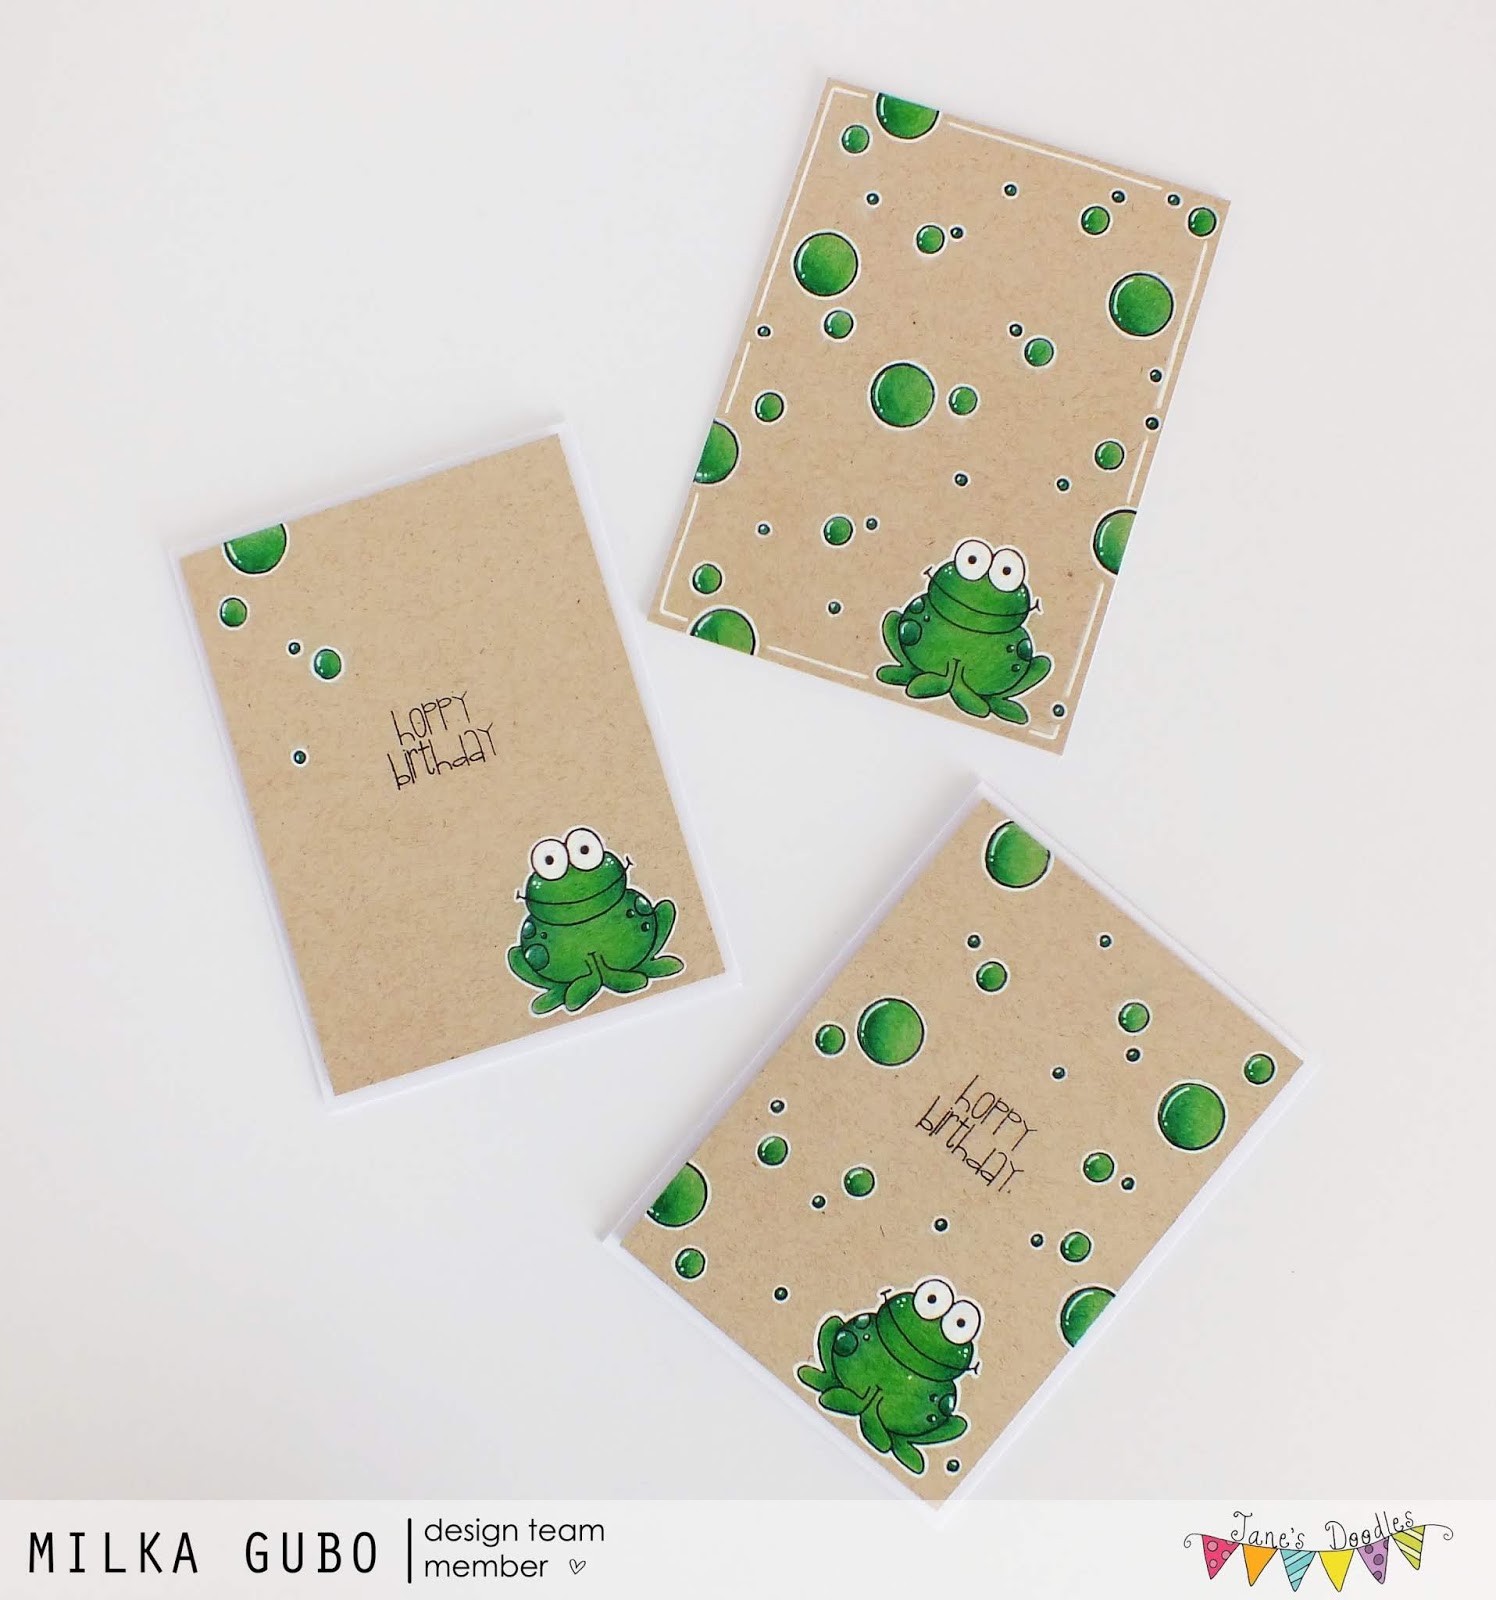
    Hoppy Birthday Card Set (Jane's Doodles DT Spotlight)


    Hi everyone! :o)

    On Wednesday, May 6th, was my turn to be on the spotlight over at Jane's Doodles and I shared this Hoppy Birthday Card Set. :o)


    To make this card set, I used stamps from two AMAZING Jane's Doodles stamp sets: 'Garden Friends' (stamp set is discounted and is half price) and 'Geometric Patterns' (stamp set is discontinued from Jane's store). I also used two tiny circle stamps from another artist (see detailed supply list below).


    I colored frogs and bubbles during the 9th 30 Day Coloring Challenge (January 15th - February 15th 2018) by Kathy Racoosin of The Daily Marker. I shared progress of coloring on my Instagram account as well as in my preview post (here).

    I finished cards after the coloring challenge ended (mid February), but didn't share finished cards until now. I knew the time will come I won't have any free time to create anything and it would be good to keep project or two in "a drawer". :o)


    How I made my cards...

    My first idea was to make only one card, but my first attempt didn't go well. :o)

    I stamped a frog on a Kraft cardstock paper panel and colored it with colored pencils and white gel pen. I shaded the frog with Stabilo Fine Liners.


    Next day I continued with stamping and coloring, but somehow managed to smear the frog and ruin everything. I started all over. Just in case, I stamped and colored the frog on three Kraft panels. :o)


    Next up were bubbles. I love bubbles!!! :o) I stamped various size circles all over the panel, colored circles, added white highlights and traced the circles.


    First panel survived. :o) I continued with other two. I stamped a sentiment 'Hoppy Birthday' in the center of each panel, stamped various sized circles here and there, colored circles, added some shades with fine liners, added white highlights and traced bubbles. :o)

    I left my colored panels aside for a while. I focused on coloring during the challenge, not on finishing cards/projects. I still have some colored images from the challenge that are waiting to be placed on some project. :o)

    After Kathy's challenge ended, I finished my cards.

    I trimmed panels to a desirable size, glued them on white top folded card bases, fixed some white lines with white gel pen and my (not planed) card set was finished. :o)


    Card dimensions: 89 mm x 120 mm (3.5" x 4.75")

    List of supplies:
    • Jane's Doodles 'Garden Friends' stamp set (frog and sentiment)
    • Jane's Doodles 'Geometric Patterns' stamp set (large circle; set is discontinued from Jane's Doodles store)
    • Create a Smile 'Eggstraordinary Egghunt' stamp set (mid circle)
    • Create a Smile 'Perfect Tune' stamp set (small circle)
    • Crafter's Companion Neenah Desert Storm Kraft Coloring Card
    • white cardstock paper (card base)
    • Ranger Archival Ink (Jet Black)
    • TOZ Artist Color colored pencils
      • light green
      • dark green
    • Stabilo Fine Liners, fine 0.4:
      • light green 88*43
      • dark green 88/36
    • Mittsubishi Pencil, Black Fine Liner 01 (for fixing black lines)
    • Uniball Signo White 
    • double sided adhesive tape
    • foam sheet, 2 mm thick
    • eraser
    • pencil sharpener
    • Fiskars High Precision Personal Paper Trimmer
    • scissors
    • bone folder
    • acrylic block (102 mm x 102 mm)
    • paper stump no. #4

    "Frogs are symbols of prosperity, wealth, friendship, and abundance in many cultures. In other cultures they symbolize fertility. In the Native American culture of the Southwestern United States, the frog carries a piece of wood in its mouth because the Mojave people believe frogs brought fire to humans. For the ancient Romans, the frog was believed to bring good luck to one's home. Native Aborigines of Australia believe that frogs brought the thunder and rain. Frogs are said to be effective in speeding up recovery from disease. Among the ancient Egyptians and Greeks, frogs symbolized inspiration and fertility. In ancient Egypt, Hekt, the frog goddess, protected newborn babies, hence frogs were symbols of fertility and birth. The frog is also said to attract true friends and to help find long-lasting love."


    At the end of this post...


    Jane is offering 20% off this weekend. No code needed. The discount is calculated at the checkout. For more information, jump over to Jane's Doodles Blog.

    A 10th 30 Day Coloring Challenge by Kathy Racoosin of The Daily Marker started on June 1st. I didn't have time to join until now. I have some cute images here on my desk smiling and waiting to be colored. :o)


    Thank you for stopping by and your kind feedback. Enjoy and smile! :o)


    Milka

    Monday, July 31, 2017

    Sending Smiles Card (Jane's Doodles DT Spotlight)


    Hi everyone! :o)

    This is my second post today. If you missed the first one just scroll down or follow a direct link here.


    On Friday was my turn to be on the spotlight over at Jane's Doodles and I made this Sending Smiles Card. Jane shared my card today on the blog, so I'm sharing it also today. :o)


    To make this card, I was inspired with a card I created earlier this year, Hey GILL Friend Card. I used stamps from three adorable Jane's Doodles stamp sets. A fish is from a 'Simon' stamp set, bubbles from 'Under the Sea' stamp set and a sentiment from 'Monster Squad' stamp set.


    I stamped eight fish on a watercolor paper panel and heat embossed bubbles in white. I masked fish and blended the panel with Distress Inks. I splattered the panel with water, dried the panel with Heat It Tool and repeated the process until I was satisfied.

    After drying, I removed masks, colored fish in watercolor technique using Distress Inks. I heat embossed in white the sentiment directly on the panel and glued the panel on a white top folded card base.

    As a finishing touch I coated fish and bubbles with Wink of Stella. :o)

    Card dimensions: 139 mm x 107 mm (5 1/2" x 4 1/4")

    List of supplies:
    • Jane's Doodles 'Simon' stamp set (fish)
    • Jane's Doodles 'Under the Sea' stamp set (bubbles) 
    • Jane's Doodles 'Monster Squad' stamp set (sentiment)
    • white cardstock paper (card base)
    • white watercolor paper
    • post-it paper (for masking)
      • Ranger's Archival Ink (Jet Black)
      • Tsukineko VersaMark Watermark Stamp Pad
      • WOW! Embossing Powder (Opaque Bright White, Regular, WL01R)
      • Tim's Holtz Distress Inks
        • Mustard Seed
        • Fossilized Amber
        • Tumbled Glass
        • Mermaid Lagoon
        • Blueprint Sketch
        • Faded Jeans
        • Stormy Sky
      • Uniball Signo White
      • ZIG Wink of Stella Brush (Gl. clear 999)
      • UHU universal glue
      • acrylic block (102 mm x 102 mm)
      • Fiskars High Precision Personal Paper Trimmer
      • Ranger Mini Ink Blending Tool
      • Ranger Heat It Tool
      • scissors
      • bone folder
      • Marabu fine rounded paint brush no. #0
      • powder bag
      • paper towels
      • dry cloth
      • water
      • post-it paper (for masking)


      I'm linking my card to following challenges:
      Note: bold text and challenge badge (if any) are direct links to the current challenge and blog badge (if any) is a direct link to blog or challenge home page.

      1) Addicted to Stamps and More, Challenge #252 - Make Your Mark
      This is my 3rd entry to this challenge.

      2) Crafty Creations Challenges, #346 - Anything Goes
      This is my 2nd entry to this challenge.

      This is my 4th entry to this challenge.


      At the end of this post...
      Jane has 30% off all clear stamp sets sale. Sale ends on Wednesday, August 2nd, so be sure to grab this opportunity. :o)


      Thank you for stopping by and your kind feedback. Enjoy and smile! :o)


      Milka

      Tuesday, January 31, 2017

      Hey GILL Friend Card (Fairy Tale Challenge #161)


      Hi everyone! :o)


      It's time for a new challenge at Fairy Tale Challenge Blog.


      Our theme for this fortnight is #161, Karten mit Humor / Cards with humor/fun. Funny images and sentiments, smiles, Smileys.... Anything you find humorous/funny/comic. :o)

      This time our lucky winner will win this lovely stamp. :o)


      And here is my take on this week's theme: Hey GILL Friend Card. :o)


      For my card I used an adorable Paper Smooches 'Surf and Turf' stamp set. I have this set for a while and never used it before. Hmmmm.... I love tinny and funny images, wordplay and humorous sentiments. The set has that all, so it was finally time to open it and play with it. :o)

      gill (English) - die Kieme (German) - škrga (Croatian)

      "Gill... an organ (as of a fish) for taking oxygen from water.'
      I stamped a fish on a watercolor paper panel and heat embossed bubbles in clear. I masked the fish and blended the panel with Distress Inks. I splattered the panel with water and Distress Ink Faded Jeans. I dried the panel with Heat It Tool.

      After drying, I removed the mask, colored the fish in watercolor technique using Distress Inks and glued the panel on a white top folded card base.

      Next up was a sentiment. I heat embossed in white the sentiment from the set on a black cardstock paper, cut it to preferable size, glued foam stripe on the back of it and glued it on the card.

      At this point I didn't like "clear" bubbles at all. They were too pale, so I traced them with white gel pen. As a finishing touch I coated the fish and bubbles with Wink of Stella. Look how it shines!


      Card dimensions: 95 mm x 127 mm (3 3/4" x 5")

      List of supplies:
      • Paper Smooches 'Surf and Turf' stamp set
      • white cardstock paper (card base)
      • white watercolor paper
      • black cardstock paper scrap
      • post-it paper (for masking)
        • Ranger's Archival Ink (Jet Black)
        • Tsukineko VersaMark Watermark Stamp Pad
        • WOW! Embossing Powder (Clear Gloss, Regular, WA01R)
        • WOW! Embossing Powder (Opaque Bright White, Regular, WL01R)
        • Tim's Holtz Distress Inks
          • Mustard Seed
          • Fossilized Amber
          • Broken China
          • Mermaid Lagoon
          • Blueprint Sketch
          • Faded Jeans
          • Hickory Smoke
        • Uniball Signo White
        • ZIG Wink of Stella Brush (Gl. clear 999)
        • UHU universal glue
        • foam sheet scraps, 1 mm thick
        • acrylic block (102 mm x 102 mm)
        • Fiskars High Precision Personal Paper Trimmer
        • Ranger Mini Ink Blending Tool
        • Ranger Heat It Tool
        • scissors
        • bone folder
        • Marabu fine rounded paint brush no. #0
        • powder bag
        • paper towels
        • dry cloth
        • water

        I hope you liked my project for this fortnight and got inspired. Stop by the Fairy Tale Challenge Blog and see gorgeous creations my Design Team Mates made for this challenge. Do join us, we can't wait to see your projects. :o)


        I'm entering my card to following challenges:
        Note: bold text and challenge badge (if any) are direct links to the current challenge and blog badge (if any) is a direct link to blog or challenge home page.

        This is my 2nd entry to this challenge.

        2) Penny Black And More Challenge, January - Anything Goes
        This is my 2nd entry to this challenge.


        3) Simon Says Stamp Wednesday Challenge Blog, Anything Goes
        This is my 3rd entry to this challenge.


        Thank you for stopping by and your kind feedback. Enjoy and smile! :o)


        Milka

        Thursday, October 6, 2016

        Xmas Hamster Card (LMMS Challenge #148)


        Hi everyone! :o)


        Today a new challenge started at Little Miss Muffet Stamps Challenge Blog. It's #148, Anything Goes Challenge.


        This is my first project as a Guest Designer over at LMMS and I made this CAS (clean and simple), Xmas Hamster Card.


        For this card I used super cute 'Xmas Hamster' rubber stamp from Wee Stamps. I love an expression on his face and all little bubbles around him. You can find the stamp in LMMS shop here.

        My first idea was to create totally different card, but as I was coloring this cutie, I was changing my mind as the crazy weather changes here in autumn: wind, no wind, rain, sun, cold, too hot... Crazy!! Well, now I have some ideas (which I put on paper this time) on what to do with this cutie. :o)
        TIP: Get a sketchbook, notebook or something similar to scribble and write down your creative ideas. This might be very helpful, especially when in lack of an inspiration.

        I stamped the image on a watercolor paper and colored it with Distress Inks in watercolor technique.
        TIP: Use fine paint brushes for watercolor, with soft hair. Rough doesn't work good, especially when coloring tiny parts and details. 

        The watercolor paper I use is great for coloring, but is a bit yellowish. I didn't like the yellowish background for my image, so I decided to go with paper piecing.
        TIP: If you don't like a background of your colored images, or you made a mistake while coloring, or you smeared part of your card... save your image and go with paper piecing. This way you'll save the image, as well as paper and other materials, and you'll also add some dimension to your card.

        I fussy cut the image and colored edges with black marker.
        TIP: When fussy cutting, first cut away large pieces of paper and then cut on the lines. Rotate paper, it will be much easier to cut around tiny details. Color edges of fussy cut image with black pen or marker. This way you'll hide white edges and any white space you didn't cut off and your paper pieced image will look much better.

        Then I stamped one more image on a white cardstock paper square panel. I colored bubbles with Distress inks and hamster and ornament with black marker.
        TIP: When paper piecing, simple with two layers like I did here, or more complex with a lot of pieces, color parts you'll be covering with black or dark grey marker to add extra shade and/or to hide any white space.

        To add more interest, I softened the image with stylus ball on a soft working mat. The image curled a bit, and that's what I wanted to achieve. :o) I glued the colored image over the image on the panel, making sure not to press to hard in the middle of the image, because I didn't want it flat.
        TIP: When paper piecing, use white waterbased glue. If you don't have it, use any waterbased glue. If your glue leaks or smears anywhere, you can simply rub it off with your fingers when it's still wet. Make sure your fingers are clean and dry. :o)

        I love adding details on my CAS cards. Here I went with white structure paste circles. When circles were dry, I glued the panel on a slightly larger top folded white card base. I added some white highlights on the image and my card was finished. :o)

        I didn't put any sentiment on my card, because it would be too busy. :o)


        Card dimensions: 104 mm x 104 mm (4 1/8" x 4 1/8")

        List of supplies:
        • Wee Stamps 'Xmas Hamster' rubber stamp
        • white cardstock paper
        • watercolor paper
        • Ranger's Archival Ink (Jet Black)
        • Tim Holtz's Distress Inks
          • Spun Sugar
          • Blueprint Sketch
          • Tea Dye
          • Vintage Photo
          • Walnut Stain
          • Hickory Smoke
        • Stabilo Fibre Tip Pen (Markers), Black 68/46
        • Staedtler Lumocolor permanent black pen S (superfine) 0.4 mm
        • Unibal Signo White
        • double sided strong adhesive tape
        • Marabu Light Structure Paste (805)
        • Fiskars High Precission Personal Paper Trimmer
        • Sigma Rotary Paper Trimmer
        • acrylic block (102 mm x 102 mm)
        • Marabu fine rounded paint brush no. 3/0
        • scissors
        • stylus ball
        • soft working mat
        • palette knife (spatula) no. #1
        • 'Christmas Trees' ARTploarations Stencil (structure paste circles)
        • water
        • paper towels

        I hope you liked my card for today and got inspired. Do join me in a week here on my blog, for more LMMS inspiration.

        Stop by the LMMS Challenge Blog and join us in on Challenge #148. The challenge will last for two weeks. There is also a prize for one lucky winner: $10.00 Gift Voucher to the LMMS shop. We like to select couple other projects to highlight as well. :o)


        I'm entering my card to following challenges:
        Note: bold text and challenge badge (if any) are direct links to the current challenge and blog badge (if any) is a direct link to blog or challenge home page.

        1) Addicted to Stamps and More,Challenge #214 - Clean and Simple

        2) Catch The Bug Challenge, Saturday Weekly Challenge: October Anything Goes Challenge

        3) Holly Jolly Christmas Challenge, Challenge #82 - Ornament

        4) Kraftin' Kimmie Stamps, Weekly Saturday Challenge, Challenge #351 - Pick a Holiday, any Holiday!

        5) Kraftin' Kimmie Stamps, Wonderful Wednesday Challenge, Anything Goes

        6) Lil Patch of Crafty Friends Challenge, LPOCF #43 - Anything Goes

        7) 613 Avenue Create, Challenge #190 - Anything Goes
        This is my 2nd entry to this challenge.


        Thank you for visiting and your kind feedback. Enjoy and smile! :o)


        Milka
        Related Posts Plugin for WordPress, Blogger...