Showing posts with label Bebunni. Show all posts

Sunday, December 27, 2020

12 Days of Christmas - Day 3 - I Love Math Challenge #18


Hello everyone and welcome to 3rd Day of my 12 Days of Christmas Series and a new I Love Math Challenge! :o)


This is our eighteenth challenge. If you're new to my blog, you can find all about the challenge here.

Yes, this challenge should start earlier this month, but it wasn't possible for me to prepare everything earlier, so it's starting today.

My AMAZING Designers Collaborators are on a break from this challenge, to take a well deserved rest from everything at the end of this year. :o)

IMPORTANT: This challenge will last only one month.


I picked a theme for this challenge and it's Christmas/Winter MATH Project.

Christmas/Winter Themed any kind of project: card, layout, box, mixed media... Project must have visible mathematical element/elements: numbers, shapes, lines, formulas, spirals... it can be a box... it can be inspired by some mathematician... There are infinite possibilities. :o)


And here is my take on the challenge: Sour Cream Container Christmas Gift Box . :o)


To make this Christmas Gift Box, I was inspired with a project I created last year: Sour Cream Containers Advent Calendar.

My math elements are:


How I made this Christmas Gift Box... 

First I folded the container. I found great photo tutorial here.

I used 3" x 6" patterned paper and folded a cream container following the tutorial. I left one side of the container unglued and open to fill it later.

I glued a sticker on a white cardstock paper scrap, cut out the circle, glued 3-D foams on the back of the circle and embellished the container with it.

On the unglued part, I pierced a hole with a crafting needle, placed a decorative brad through the hole and my gift box was finished.

Really easy and fun to make. It's a cute way to give a tiny gift to someone. It can be filled with treats, cookie, puzzles... :o)

List of supplies:
  • Crafter's Companion Bebunni Christmas 6" x 6" Designer Paper Pad
  • white cardstock paper
  • Christmas sticker (bought at the local store DM)
  • decorative brad
  • double sided adhesive tape
  • 3-D square foam 5 x 5 x 2 mm
  • Fiskars High Precision Personal Paper Trimmer
  • bone folder
  • scissors
  • crafting needle


Now it's your turn...

Create a Christmas/Winter Themed any kind of project: card, layout, box, mixed media... Project must have visible mathematical element/elements: numbers, shapes, lines, formulas, spirals... it can be a box... it can be inspired by some mathematician... There are infinite possibilities. :o)


More details about the challenge...

Challenge Starts: December 27th, 2020, 10:00 PM CET (UTC +1)

Challenge Ends: January 27th, 2021, 9:55 PM CET (UTC +1)

IMPORTANT: This challenge will last only one month.

Challenge rules:
  1. Math: Anything Goes
  2. Project: Anything Goes
  3. Theme: Christmas/Winter
  4. Design: any design
  5. Create a Christmas/Winter Themed any kind of project: card, layout, box, mixed media... Project must have visible mathematical element/elements: numbers, shapes, lines, formulas, spirals... it can be a box... it can be inspired by some mathematician... There are infinite possibilities. :o)
  6. The challenge is opened Worldwide (+18), except for minors.
  7. You don't have to be a Math Lover to join this challenge. :o)
  8. Your creation must be new. Please do not link creation that has been posted prior to the day the challenge started.
  9. Projects must be handmade!
  10. Any stamp company/artist is welcome.
  11. Any craft supply company/artist is welcome.
  12. You must be my blog follower through Blogger.
  13. Mention the challenge in your blog post and link back to the challenge.
  14. Display Challenge badge in your blog post.
  15. Link up as many projects as you want.
  16. You are welcome to combine your project to as many challenges as you want.
  17. No blog hop and direct selling links are allowed here.
  18. Link your direct blog post and not your entire blog, so we could locate your creation.
  19. Please turn off word verification.
  20. Prior you enter the challenge and add your link to Inlinkz, please read Challenge Rules and Privacy Notice (shared at the bottom of this post below Inlinkz).
  21. Have fun!

I reserve the right to remove links that do not comply with challenge rules.

Prize: 
One Jane's Doodles stamp set of winner's choice.
I will select four favorite projects (TOP 4) from all entries, which will be featured here on my blog on January 31st, 2021, during the day.
Among TOP 4, there will be a random draw (using Random.org) for one lucky winner who will then receive the prize. :o)
Winner has to confirm the prize in a week, by February 7th, 2021, 11:59 PM, CET (UTC +1). Unconfirmed prize will be redrawn and given to another TOP 4.
If there will be 4 or less entries to the challenge, all projects will be considered as TOP projects.


I hope you'll like the new challenge theme, get inspired and join with your Math creations. I can't wait to see what you'll create. :o)

If you have any questions, don't hesitate to contact me. Just leave me a comment on this blog post or send me an e-mail.


Thank you for stopping by and your kind feedback! Enjoy and smile! :o)


Milka 


PRIVACY NOTICE

By entering this challenge you are confirming that you have read this privacy notice and you accept the same.


  • Those entering a piece of artwork into Inlinkz bear in mind that their name and blog link are visible to all those who visit this blog and in that way they have published their own personal details and consented to my use of that personal information if the person is selected as a winner or accredited work.
  • Those entering the challenge need to know that if selected as favorite projects (TOP 4) their name, blog link and the photo of their work (they provided themselves) will be shared here on my blog in winners post.
  • Those entering the challenge have to know that challenge and winners posts are not deleted from this blog.
  • If you entered the challenge and changed your mind and you want your entry to be deleted, you can do it by yourself as the Inlinkz provides that option to anyone.
  • Read more: Data Protection and Privacy Policy Statement.

  • To enter the challenge, you have to follow all challenge rules.
  • To enter the challenge, you have to be my blog follower through Blogger and add a link to your blog post or other social media through Inlinkz.
  • There is no other option to join the challenge than through Inlinkz. 
  • Inlinkz entries are covered by an Inlinkz Privacy Policy.
  • E-mails are not visible on this blog.
  • If any technical difficulty occurs you should contact me.
  • No data will be used in any other way than to run this challenge.
  • Read more: Data Protection and Privacy Policy Statement.

  • Inlinkz opens December 27th. 2020, 10:00 PM CET (UTC +1).
  • Inlinkz closes January 27th, 2021, 9:55 PM CET (UTC +1).

  • Prize is one Jane's Doodles stamp set of winner's choice.
  • Prize is provided by me and can't be exchanged for money or another prize.
  • I will select four favorite projects (TOP 4) from all entries, which will be featured here on my blog on January 31st, 2021, during the day.
  • Among TOP 4, there will be a random draw (using Random.org) for one lucky winner who will then receive the prize.
  • Winner has to confirm the prize in a week, by February 7th, 2021, 11:59 PM, CET (UTC +1). Unconfirmed prize will be redrawn and given to another TOP 4.
  • If there will be 4 or less entries to the challenge, all projects will be considered as TOP projects.

  • Those entering the challenge have to bear in mind that their name, photo of their artwork and link they provided will be shared in winners post here on my blog, if selected as favorite projects or randomly picked as a winner. 
  • If you don't want your name, link and photo of the work you provided to be shared in winners post, you should reconsider entering the challenge.
  • After TOP 4 and winner's names announced here on my blog, winner has to send confirmation e-mail from the e-mail entered to the Inlinkz.
  • If a winner doesn't contact me, I won't contact her or him in any way. 
  • Unconfirmed prizes will be redrawn and be given to another winner. New random winner name will be shared on this blog.
  • Winners name will not be deleted from winners post on this blog, except if requested by a winner itself.
  • Winner's post will not be deleted from my blog.
  • Read more: Data Protection and Privacy Policy Statement.


An InLinkz Link-up

You are invited to the Inlinkz link party!

Click here to enter

Friday, December 13, 2019

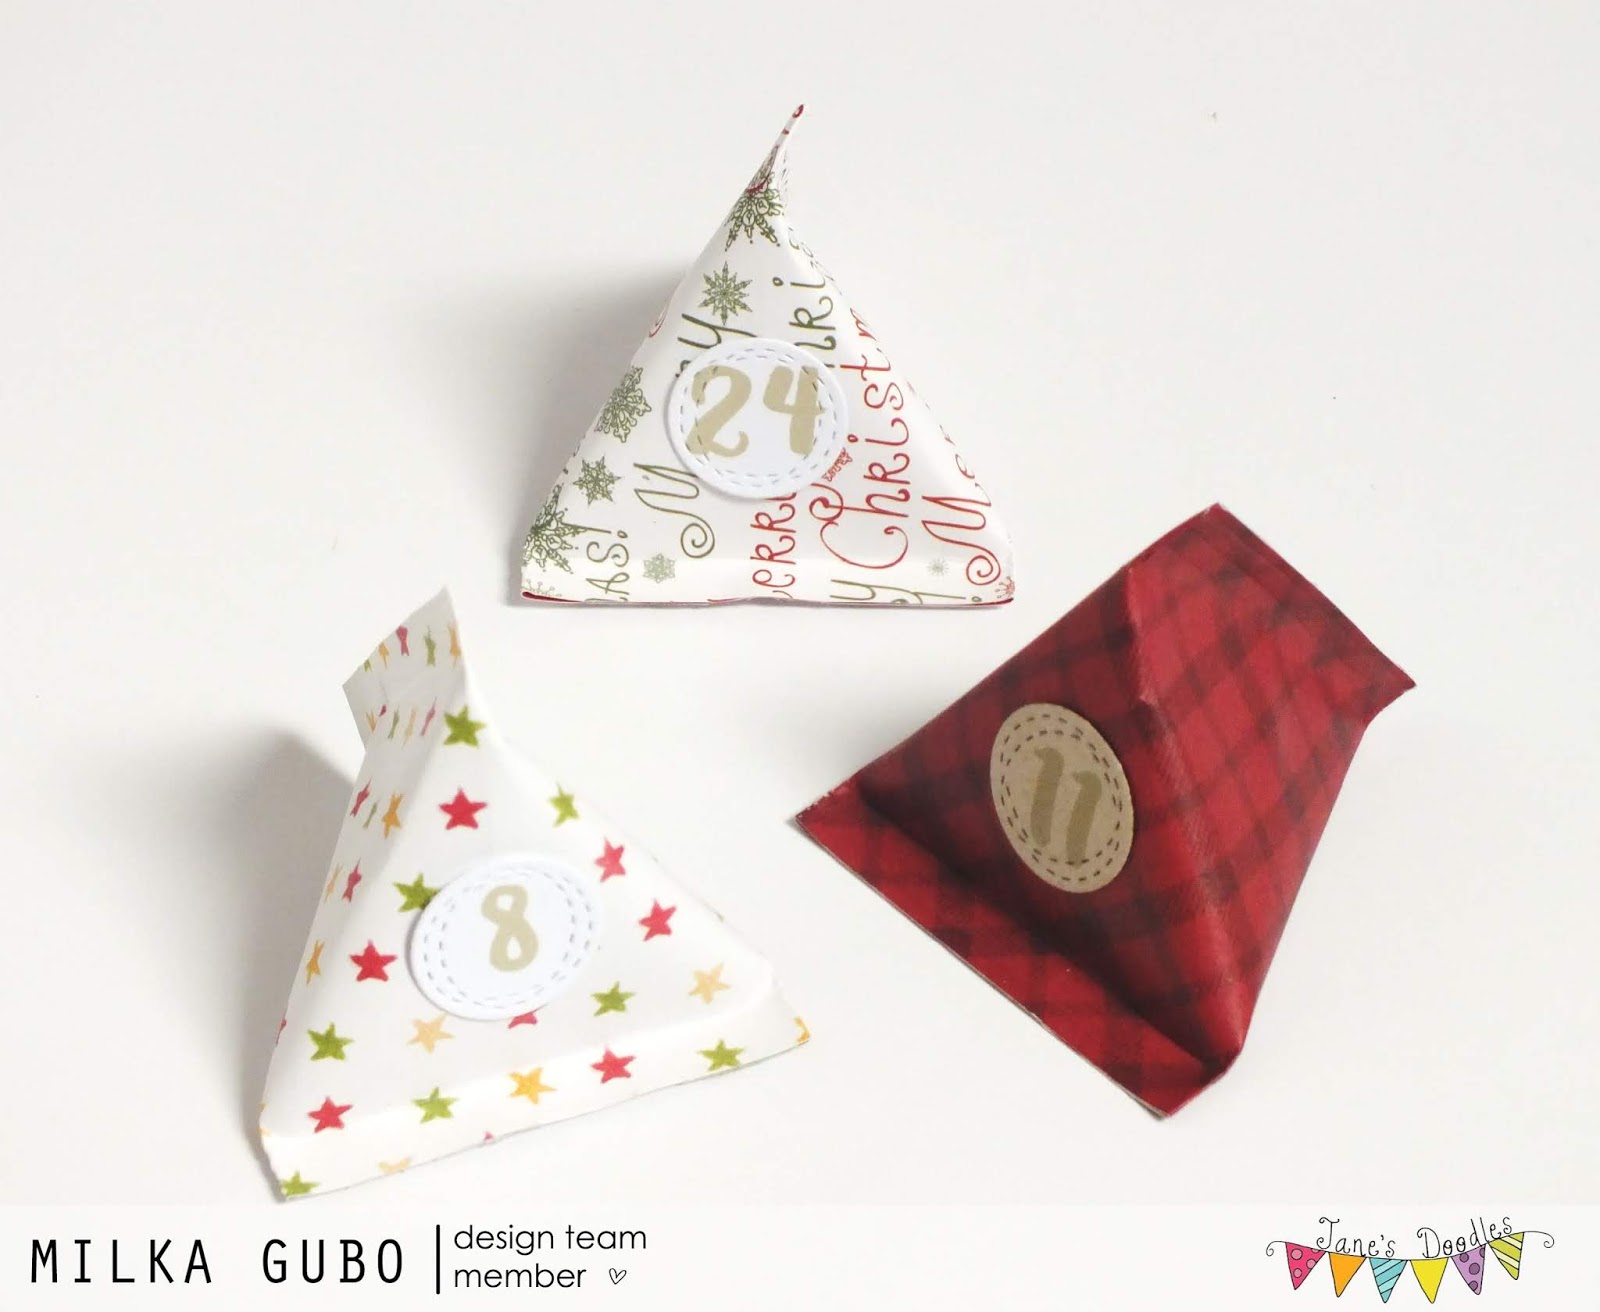
Sour Cream Containers Advent Calendar (Jane's Doodles DT Spotlight)


Happy Friday! :o)

I hope you're all well. Another busy week and I didn't find any time to write here on my blog. Today I'll be sharing two projects with you, both my DT spotlights for Jane's Doodles, one for last week and other for today. I'll be sharing my projects in two separate blog posts. :o)


On Wednesday, December 4th, 2019, was my turn to be on the spotlight over at Jane's Doodles and I made this Sour Cream Containers Advent Calendar. :o)


I made this Advent Calendar for my nieces. They were thrilled. :o)

To make this Advent Calendar I used patterned paper and adorable numeral stamps from Jane's Doodles 'ABC's' stamp set.


How I made this Advent Calendar... 

First I folded containers. I found great photo tutorial here.

I used 3" x 6" paper and folded 24 sour cream containers following the tutorial. I left one side of each container unglued and open to fill them later.

After folding, I filled containers, each with two same chocolate candies, glued opened part and "closed" containers.

Then I worked on numerals. I die cut circles in from white and a Kraft cardstock paper. I stamped numbers from 1 to 24 on each circle, using Kraft color ink pad. Lastly, I glued numbered circles on each container and my project was finished. :o)


List of supplies:
  • Jane's Doodles 'ABC's' stamp set
  • Crafter's Companion Bebunni Christmas 6" x 6" Designer Paper Pad
  • white cardstock paper
  • Crafter's Companion Neenah Desert Storm Kraft Coloring Card
  • UHU liquid glue
  • double sided adhesive tape
  • Sizzix Big Shot
  • My Favorite Things, Die-namics Wonky Stitched Circle STAX
  • Fiskars High Precision Personal Paper Trimmer
  • bone folder
  • acrylic block 102 mm x 102 mm
  • scissors


I'm linking my project to a challenge:

Uniko, Challenge #56 - Christmas
This is my 4th entry to this challenge.


Thank you for stopping by and your kind feedback. Stop by in two hours, I'll be sharing one more project. Enjoy and smile! :o)


Milka

Friday, December 8, 2017

Happy Reindeer Chocolate/Candy Dispenser Box (Fairy Tale Challenge #182)


Happy Friday! :o)


I hope you're all great.

This Tuesday, December 5th, a new challenge has started over at Fairy Tale Challenge Blog. I didn't have time to share my project earlier.

Our theme for this fortnight is #182, Schokolade / Chocolate. Share a chocolate recipe, make pralines, wrap a chocolate, use an image fitting the theme.... ANYTHING!! There must be chocolate. :o)

This time our lucky winner will win this lovely mini flower bouquet stamp set.


And here is my take on the challenge: Happy Reindeer Chocolate/Candy Dispenser Box.


To make this project, I followed a tutorial by Sandie of The Paper Cave, which is shared on Stamping Bella blog. When I saw Sandie's ADORABLE box, I knew I have to make one for myself. :o)

When I finished the box and closed it, a lid didn't fit well, so I had to make a new one, slightly larger than the first one. I cut a piece of cardstock paper measuring 4 5/8" x 4 5/8" and followed steps from the tutorial. I also extended patterned paper cutouts for the lid.

For the door knob I used plastic snowflake and a brad I had in my stash. The snowflake had some glitter on it, which I didn't like, neither it fitted on my project. I tried to scratch glitter off with the scissors... It worked!!! Completely white, no glitter on it. Happiness overload!! :o) I glued the snowflake and the brad together (I used Loctite Super Gel to glue metal and plastic together) and got pretty door knob. :o)

Next up was an image.

I used an ADORABLE reindeer from Mama Elephant 'Reindeer Games' stamp set.

Image is paper pieced. I stamped the reindeer on a watercolor paper, colored him in watercolor technique with Distress Ink. Then I stamped reindeer's collar on the patterned paper, same I used for the box. I fussy cut both pieces, colored edges with black marker and glued them together. Watercolor paper I use is great and I love it, but it's not thick, so I stamped another reindeer on a white cardstock paper. I colored the reindeer completely with black marker and fussy cut him, leaving white border around him. Lastly I glued two pieces together, glued some foam on the back and placed the reindeer on the box. :o)


I wanted to keep my box as simple as possible, so I didn't add any other embellishments. Also, I love the patterned paper I used and for me it's enough. :o)

Lastly I filled the box with chocolate minis. :o)


List of supplies:
  • Mama Elephant 'Reindeer Games' stamp set
  • Crafter's Companion Bebunni Christmas 6" x 6" Designer Paper Pad
  • white cardstock paper
  • watercolor paper
    • Ranger's Archival Ink (Jet Black)
    • Tim's Holtz Distress Inks
      • Tea Dye
      • Vintage Photo
      • Walnut Stain
      • Hickory Smoke
      • Black Soot
    • Stabilo Fibre Tip Pen (Markers), Black 68/46
    • Tim Holtz Idea-ology Long Fastener
    • plastic snowflake
    • UHU universal glue
    • Loctite Super Attak Gel
    • acrylic block (102 mm x 102 mm)
    • Fiskars High Precision Personal Paper Trimmer
    • foam sheet scraps 1 mm thick
    • bone folder
    • scissors
    • Marabu fine rounded paint brush no. #0
    • paper towels
    • water

    I hope you'll like my project for this fortnight and get inspired. Stop by the Fairy Tale Challenge Blog and see gorgeous creations my Design Team Mates made for this challenge. Do join us, we can't wait to see your chocolate projects. :o)


    I'm linking my project to following challenges:
    Note: bold text and challenge badge (if any) are direct links to the current challenge and blog badge (if any) is a direct link to blog or challenge home page.

    1) Noor! Design U.K., December Challenge: Anything Goes

    2) Simon Says Stamp Monday Challenge Blog, Icy Inspiration
    This is my 1st entry to this challenge.


    Thank you for stopping by and your kind feedback. Enjoy and smile! :o)


    Milka

    Tuesday, November 8, 2016

    Sledging Card (Fairy Tale Challenge #155)


    Hi everyone! :o)


    Today a new challenge started at Fairy Tale Challenge Blog.


    Our theme for this fortnight is #155, Sketch.

    I created this sketch based on a card I made a while ago. You can find it here and two more cards based on the same sketch, here and here.

    This time our lucky winner will win this embossing stencil by Marianne Design.


    And here is my take on the sketch: Sledging Card. :o)


    I used my favorite Winter themed design paper, Crafter's Companion Bebunni Christmas Designer Paper, and beautiful LMM's Forgotten Scraps 'Polka Dot Pals Gary' digital stamp. I got this image for free as a Guest Designer over at Little Miss Muffet Challenges Blog. Thank you Barbara! :o)

    First I decided about the color scheme and what background will I use. I decided to go with same paper for background and to use some paper piecing. I'm so satisfied with snowy scene I got here. :o)

    I cut out all parts from the design paper and a white cardstock.

    I printed the image twice. One image on the designer paper and second on a watercolor paper. I colored the image in watercolor technique using Distress Inks, fussy cut it out, colored edges with black marker, softened image with stylus ball and glued it over the other image printed on the designer paper.

    Lastly I glued all pieces together and glued them on a white top folded card base. I also glued one white cardstock square inside of the card to make it thicker and more stable when standing. I added some white highlights to the image and my card was finished. :o)


    Dimensions: 108 mm x 139 mm (4 1/4" x 5 1/2")

    List of supplies:
    • LMM's Forgoten Scraps 'Polka Dot Pals Gary' digital stamp
    • Crafter's Companion Bebunni Christmas 6" x 6" Designer Paper
    • white cardstock paper
    • watercolor paper
    • Tim Holtz's Distress Inks
      • Spun Sugar
      • Blueprint Sketch
      • Faded Jeans
      • Tea Dye
      • Vintage Photo
      • Brushed Corduroy
      • Walnut Stain
      • Hickory Smoke
    • Stabilo Fibre Tip Pen (Markers), Black 68/46
    • Uniball Signo White
    • UHU liquid glue
    • double sided strong adhesive tape
    • printer
    • Fiskars High Precision Personal Paper Trimmer
    • scissors
    • Marabu fine rounded paint brush no. 3/0
    • Marabu fine rounded paint brush no. #0
    • stylus ball
    • soft working mat
    • Ranger Heat It Craft Tool
    • paper towels
    • water

    I hope you liked my project for this fortnight and got inspired. Stop by the Fairy Tale Challenge Blog and see gorgeous creations my Design Team Mates made for this challenge. Do join us, we can't wait to see your projects. :o)


    I am entering my card to following challenges:
    Note: bold text and challenge badge (if any) are direct links to the current challenge and blog badge (if any) is a direct link to blog or challenge home page.

    1) Cards und More Shop Blog, Challenge no. 5 - Anything Goes
    This is my 11th entry to this challenge.

    2) Catch The Bug Challenge, Saturday Weekly Challenge: November Anything Goes

    3) Digi Designs Challenge Blog, Hand Colored Image Challenge
    This is my 1st entry to this challenge.

    4) Lil Patch of Crafty Friends Challenge, LPOCF #45 - Anything Goes
    This is my 1st entry to this challenge.

    5) 613 Avenue Create, Challenge #191 - Anything Goes
    This is my 1st entry to this challenge.

    6) The Daily Marker, 6th 30 Day Coloring Challenge
    This is my 1st entry to this challenge. 
    colored: DAY 6


    Thank you for stopping by and your kind feedback. Enjoy and smile! :o)


    Milka

    Tuesday, October 25, 2016

    Christmas Tree Card (Fairy Tale Challenge #154)


    Hi everyone! :o)


    Today a new challenge started at Fairy Tale Challenge Blog.


    Our theme for this fortnight is #154, Monochromatic.

    This time our lucky winner will win this little clear stamp set.


    For this challenge I made this Christmas Tree Card. :o)


    I used my favorite Winter themed design paper, Crafter's Companion Bebunni Christmas Designer Paper, and GORGEOUS 'Christmas Trees' ARTploarations Stencil. I won this stencil and beautiful clear stamp at STAMPlorations as a July CAS card challenge winner. :o)

    I cut out a design paper panel and spread structure paste through the stencil directly on the panel. I left it dry through the night. Next day, I distressed edges of the panel using scissors. When I was satisfied with distressing, I glued the panel on a white top folded card base and my card was finished. :o)


    Dimensions: 108 mm x 139 mm (4 1/4" x 5 1/2")

    List of supplies:
    • Crafter's Companion Bebunni Christmas 6" x 6" Designer Paper
    • white cardstock paper
    • 'Christmas Trees' ARTploarations Stencil
    • Marabu Light Structure Paste (805)
    • UHU liquid glue
    • Fiskars High Precision Personal Paper Trimmer
    • scissors
    • palette knife (spatula) no. #1
    • microfiber cloth (for cleaning) 

    I hope you liked my project for this fortnight and got inspired. Stop by the Fairy Tale Challenge Blog and see gorgeous creations my Design Team Mates made for this challenge. Do join us, we can't wait to see your projects. :o)


    I'm entering my card to following challenges:
    Note: bold text and challenge badge (if any) are direct links to the current challenge and blog badge (if any) is a direct link to blog or challenge home page.

    1) Cards und More Shop Blog, Challenge no. 5 - Anything Goes
    This is my 6th entry to this challenge.

    2) STAMPlorations Never-ending Anything Goes Challenge
    This is my 1st entry to this challenge. (1163)

    3) 613 Avenue Create, Challenge #190 - Anything Goes
    This is my 8th and last entry to this challenge.


    Thank you for stopping by and your kind feedback. Enjoy and smile! :o)


    Milka
    Related Posts Plugin for WordPress, Blogger...