Showing posts with label Die Cutting. Show all posts

Friday, May 7, 2021

Jane's Doodles BREW-TEA-FUL Release Blog Hop


Happy Friday! :o)

Welcome to a Jane's Doodles BREW-TEA-FUL Release Blog Hop. Today we are featuring a gorgeous 'BREW-TEA-FUL' stamp set released into the store. :o) We also have 3 super talented Guest Designers joining us today. :o)


GORGEOUS!!!! Love love LOVE!!!!! :o)


And here is what I prepared for today: Yellow Teapot Goodie Bag. :o)


I made this one for my mom for Mother's Day, which is here in Croatia on Sunday, May 9th this year. I'll put some chocolate treats and tiny note card inside. :o)


How I made this Goodie Bag... 

First I die cut goodie bag parts from a Kraft paper. To create my own patterned paper, I randomly stamped a teapot and tea mugs on die-cut pieces in watermark stamping technique using VersaMark Watermark Ink. I mixed a white tempera color with a bit of water and splattered the patterned paper and left it dry on air. After drying I assembled the goodie bag.

Next up was the teapot image. It's so pretty!! :o) 

I stamped the teapot on a watercolor paper and fixed some lines with a black fine liner, as I didn't stamp entire image well. I colored the teapot in watercolor technique with Distress Inks. After drying, I fussy cut the teapot and traced edges with a black marker.

Then I stamped the teapot again on a white cardstock paper. I fussy cut the teapot, leaving white border around it. I glued the watercolored teapot over it. I did this to make the image thicker, as the watercolor paper I use is very thin and I needed thicker image. 

I wanted a simple look of the teapot, so I left floral details white. I just run with a white gel pen over white parts, to hide tiny smears of yellow. :o)

If you follow my blog, you know I love dimension on my projects. This one was no exception. :o) I glued 3-D foams on the back of the teapot and glued it on the front side of the bag. :o)

I left the back side of the bag without additional image.


As a finishing touch, I laced up a twine and my Goodie Bag was finished. :o)

I love how my Goodie Bag turned out!! I'm sure my mom will love it. :o)


At the bottom of this post you can find detailed supply lists of my today's project. Link to this post will be in a right sidebar until the Blog Hop ends. :o)


And now to the Blog Hop prize...

Our generous Jane will be giving away one stamp set of winner's choice to one lucky winner. All you have to do is leave a comment on all blogs along the Hop for your chance to win.

Here is the Blog Hop order:

Jane will announce the winner on Monday, May 10th, 2021, at Jane's Doodles Blog.

Also, Jane is having 25% off sale through this weekend. No code needed.


Now hop over to Marion's blog and see what she created for today's hop.


Thank you for visiting. I hope you enjoyed on my stop today and got inspired. :o) 

Happy hopping and good luck to all!!! :o)


    Milka


    List of supplies:
    • Jane's Doodles 'BREW-TEA-FUL' stamp set
    • white cardstock paper
    • watercolor paper
    • Crafter's Companion Neenah Desert Storm Kraft Coloring Card
    • Tsukineko VersaMark Watermark Stamp Pad
    • Ranger's Archival Ink (Jet Black)
    • Tim's Holtz Distress Inks:
      • Mustard Seed
      • Fossilized Amber
    • Koh-i-noor tempera color, white
    • Stabilo Fibre Tip Pen (Marker), Black 68/46
    • Uniball Signo White pigment ink pen
    • Mitsubishi Uni Pin fine liner 0.2
    • twine
    • Sakura Quickie Glue Pen
    • UHU universal liquid glue
    • 3-D square foams, 5 x 5 x 1 mm
    • Fiskars High Precision Personal Paper Trimmer
    • bone folder
    • round acrylic block
    • Sizzix Big Shot
    • Lawn Fawn 'Goodie Bag' Lawn Cut
    • scissors
    • craft knife
    • Xcut self healing working mat A4
    • DaVinci fine rounded paint brush no. 2/0
    • paper towels
    • water

    Saturday, January 30, 2021

    Happy Holidays Card (ATCAS Cards Challenge #190 GDT)


    Hi everyone! :o)

    I was delighted to be asked to be a Guest Designer at Addicted to CAS for a Challenge #190, after I was chosen as CAS perfectionist in their Challenge #187 - One Layer. I love playing Addicted to CAS challenges, as their challenges are all about CAS (clean and simple) cards, my favorite card design. I'm happy challenges are back after half year break. :o)

    The Challenge #190 theme is Pattern.


    Card design needs to be CAS. Here is a CAS definition from Addicted to CAS Challenge Blog:

    Note: there are various CAS cards definitions on various blogs.


    And here is my take on the challenge: CAS (clean and simple), Happy Holidays Card. :o)


    How I made this card...

    First I prepared all parts for my card: a white top folded card base, a patterned paper stripe and die-cut snowflakes.

    I stamped a sentiment with a Distress Ink directly on the card base. I inked the sentiment stamp with a VersaMark Watermark Ink, wiped it with my palm, inked the stamp with the Distress Ink Hickory Smoke and pressed the sentiment on the card base. I prefer to do it this way when stamping with Distress Inks, as the stamping results are much better than without using the VersaMark Watermark Ink.

    I glued 3-D foam squares on the back of the patterned stripe and glued it on the card. I cut the excess with scissors.

    Then I arranged and glued snowflakes along the patterned stripe, using a glue or a 3-D foam square, just to add a bit more dimension to my card.

    Easy and quick to create. :o)


    Card measurements: 95 mm x 127 mm (3 3/4" x 5")

    List of supplies:

    I hope you'll like my take on the challenge and get inspired. :o) Stop by the Addicted to CAS and see amazing CAS creations the Design Team made for this challenge. The challenge is a fortnight challenge, so there is plenty time to share your CAS cards with us. :o) For more information about the challenge and rules, jump over to challenge post at Addicted to CAS. :o)


    Thank you for stopping by and your kind feedback. Stop by later this evening, I'll be posting again. Enjoy and smile! :o)


    Milka

    Friday, January 29, 2021

    12 Days of Christmas - Day 10 - Ornament Shaped Reindeer Card

    Happy Friday! :o)

    My second post today. If you missed the first one, just scroll down, or follow a direct link here.


    Welcome to 10th Day of my 12 Days of Christmas Series. I took a short break with sharing my series here with you (again). I had doctors' appointments and some tests to run and was too tired to write blog posts since Monday. 

    Today I want to share with you this Ornament Shaped Reindeer Card.

     
    To make this card, I was inspired with my cards that I shared on Monday here on my blog (here).


    How I made the card...

    First I die cut all parts from a white cardstock paper

    I die cut an ornament three times. I used only frames, rest I left for other projects. I glued together frames (stacked frame die-cuts) and left them aside.

    Then I die cut a reindeer three times, glued them together and left them aside.

    Then I die cut a hanger two times and glued them together.

    I used negative part of the die-cut ornament as a stencil. I traced the ornament shape twice on the white cardstock paper and cut them out. I used them to create a card base, but first I ink blended Distress Inks directly on one ornament shape panel. When I was satisfied with the color, I splattered the panel with a water, dabbed the surface with a paper towel and left the panel to dry on air. Then I mixed a white tempera color with a bit of water, splattered the panel and again left it dry on air.

    After drying, all parts for my card were ready. I assembled the card. I glued two ornament shapes on the top and got the card base. Then I glued the frame on the card base, glued the stacked reindeer in the center of ornament shape glued the stacked hanger on the top of the ornament and my card was finished. I really like how my card turned out. :o)


    List of supplies:
    • Wiler Creativity Cutting Dies, reindeer die cut (gift from a dear friend Alice of Scrap & C... THANK YOU ALICE!!! ♥)
    • Create a Smile 'Frosty Fun' kit (ornament die)
    • Sizzix Big Shot
    • white cardstock paper
    • Tim Holtz Distress Inks:
      • Broken China
      • Peacock Feathers
    • UHU liquid glue
    • Sakura Quickie Glue Pen
    • Fiskars High Precision Personal Paper Trimmer
    • bone folder
    • scissors
    • Ranger Mini Ink Blending Tools
    • Koh-i-noor tempera color, white
    • Marabu fine rounded paint brush no. #0
    • Marabu fine rounded paint brush no. 3/0
    • water
    • paper towels


    Thank you for stopping by and your kind feedback. Enjoy and smile! :o)


    Milka

    Friday, November 6, 2020

    Space Mini Circle Card (bastel-traum challenge #94)

    Happy Friday! :o)


    On October 15th, 2020, a new challenge started at bastel-traum and our theme for the challenge #94 is Background. :o)


    I'm a bit late sharing my post here on my blog, but there is still 9 days left to join in the fun. 

    The challenge started on October 15th, 2020, at 9 AM, CEST (UTC +2) and ends on November 15th, 2020, at 8:55 AM, CET (UTC +1). Find all the details about the challenge, rules and prizes in a challenge post (here).


    And here is my take on the challenge: Space Mini Circle Card. :o)


    To make this card I was inspired with a card I made for this year's World Space Week Blog Hop (here).

    For my card I used a spaceship stamp from Altenew 'Space Travel' stamp set.


    How I made my card...

    I colored a background in watercolor technique using Distress Inks Salty Ocean, Blueprint Sketch and Black Soot. I used a thick watercolor paper for it. When I was satisfied with the color, I left the panel to dry on air.

    After drying, I die cut a wonky stitched circle from the panel. I stamped the spaceship in black on the panel and colored it with a black marker.

    I mixed a white tempera color with a bit of water and splattered the panel with it. I left the panel to dry on air.

    After drying, I ink blended edges with the Distress Ink Black Soot to achieve more dramatic look.

    Next up was the spaceship. I stamped the spaceship on a thin watercolor paper and colored it in watercolor technique using Distress Inks. After drying, I fussy cut the spaceship, traced edges with the black marker and glued it over the spaceship that I stamped on the panel.

    I made a card base from two circles that I cut from a black cardstock paper. I glued circles together on the top and glued the panel on the card base.

    As a finishing touch, I drew couple white dots (stars) here and there on the panel using a white pigment ink pen and my card was finished. :o)


    Card measurements: d = 83 mm (3 1/4")

    List of supplies:
    • Altenew 'Space Travel' stamp set (spaceship)
    • black cardstock paper
    • Canson XL Mixed Media Paper, 300 g
    • Ranger Archival Ink (Jet Black)
    • Tsukineko VersaMark Watermark Stamp Pad
    • WOW! Embossing Powderer (Opaque Bright White, Regular, WL01R)
    • Tim's Holtz Distress Inks:
      • Salty Ocean 
      • Blueprint Sketch
      • Hickory Smoke
      • Black Soot
    • Koh-i-noor tempera color (white)
    • Stabilo Fibre Tip Pen (Marker), Black 68/46
    • Uniball Signo White Pigment Ink pen
    • UHU liquid glue
    • round acrylic block
    • Fiskars High Precision Personal Paper Trimmer
    • bone folder
    • scissors
    • Sizzix Big Shot
    • Stabilo Fibre Tip Pen (Marker), Black 68/46
    • Ranger Heat It Tool
    • Ranger Mini Ink Blending Tool
    • Optima rounded fine paint brush no. #4
    • Marabu rounded fine paint brush no. 3/0
    • paper towels
    • water
    • powder bag

    I love how my card turned out. :o)


    I hope you'll like my card for this challenge and get inspired. For more inspiration, check out GORGEOUS cards my super talented Design Teammates created for the challenge. Do join us in this challenge, we are looking forward to see your creations. :o)


    Thank you for stopping by and your kind feedback. Enjoy and smile! :o)


    Milka

    Saturday, May 30, 2020

    Bee Happy CAS Shaker Card (Jane's Doodles DT Spotlight)


    Hi everyone! :o)

    I hope you're all well and enjoying the weekend. :o)

    This Monday, May 25th, was my turn to be on the spotlight over at Jane's Doodles Blog and I made this Bee Happy CAS Shaker Card. :o)


    To make this card I used stamps from two Jane's Doodles stamp sets: a bee from 'Spring Icons' and a sentiment from discontinued stamp set 'Boris the Bunny'.


    How I made my card....

    First I worked on a shaker window.

    I die-cut a honeycomb in two white cardstock paper panel, glued an acetate sheet over the window between two panels. I stamped the sentiment on the panel and glued the honexcomb die cut over the acetate window.

    I blended Distress Inks on a white cardstock paper scrap, splattered the surface with water, dried it and repeated the process. When I was satisfied with the color, I glued  the ink blended scrap on a white top folded card base.


    Then I glued 2 mm thick foam squares on the panel, filled window with transparent beads and glued the panel on the card base. I glued another white panel inside the card base to make my card sturdier.

    Next up was the adorable bee. I paper pieced the image.

    I stamped the bee twice on a watercolor paper and colored it in watercolor technique using Distress Inks. On one image I colored only wings and other bee's body. After drying, I fussy cut parts I needed and traced edges with black marker.

    I stamped another bee on a white cardstock paper and fussy cut it, leaving thin white border around it. I colored the bee with a grey marker. I glued watercolored parts over the grey bee, first wings then body.

    Lastly, I glued 1 mm thick foam squares at the back of the bee, glued it on the card and my card was finished. :o)

    I really like how my card turned out. :o)


    Card measurements: 3 3/4" x 5" (95 mm x 127 mm)

    List of supplies:
    • Jane's Doodles 'Spring Icons' stamp set
    • Jane's Doodles 'Boris the Bunny' stamp set (discontinued) 
    • Your Next Stamp 'Honey Drip and Honeycomb Combo' die set
    • white cardstock paper
    • watercolor paper
    • Ranger Archival Ink (Jet Black)
    • Tim's Holtz Distress Inks:
      • Mustard Seed
      • Fossilized Amber
      • Ground Espresso 
      • Hickory Smoke
    • Stabilo Fiber Tip Pen (Marker) 68/46, Black
    • Stabilo Fiber Tip Pen (Marker) 68/94, Light Grey
    • transparent beads
    • UHU liquid glue
    • Saqura Quickie Glue Pen
    • 3-D foam squares, 5 x 5 x 2 mm
    • 3-D foam squares, 5 x 5 x 1 mm
    • acrylic sheet 
    • acrylic block (102 mm x 102 mm)
    • Fiskars High Precision Personal Paper Trimmer
    • bone folder
    • Sizzix Big Shot
    • Marabu rounded fine paint brush no. 3/0
    • Ranger Heat It Tool (for drying)
    • Ranger Mini Ink Blending Tools
    • scissors
    • paper towels 
    • water


    And here is a short video. :o)


    Thank you for stopping by and your kind feedback. Enjoy and smile! :o)


    Milka

    Wednesday, May 20, 2020

    To Bee or Not To Bee Blog Hop


    Hello everyone!!! :o)


    Welcome to a special annual blog hop supporting bees, 4th To Bee Or Not To Bee Blog Hop. :o)

    I've invited some of my crafty friends, whom I admire greatly, to hop along with me, and I have some amazing sponsors lined up with gifts to give away to You! :o)


    Aim of the hop is to celebrate 3rd World Bee Day, to support bees and bees protection, to raise public awareness of the importance of bees and beekeeping and benefits of using apicultural products for our health.


    Bees and other pollinators are very important for ensuring food quality, as well as preserving the entire ecosystem and natural biodiversity. Bees provide a wide range of benefits to humans from pollination of food crops and apicultural products.

    Bees Species (general classification):

    Solitary Bee
    Photo credit: GKV

    Bumblebee


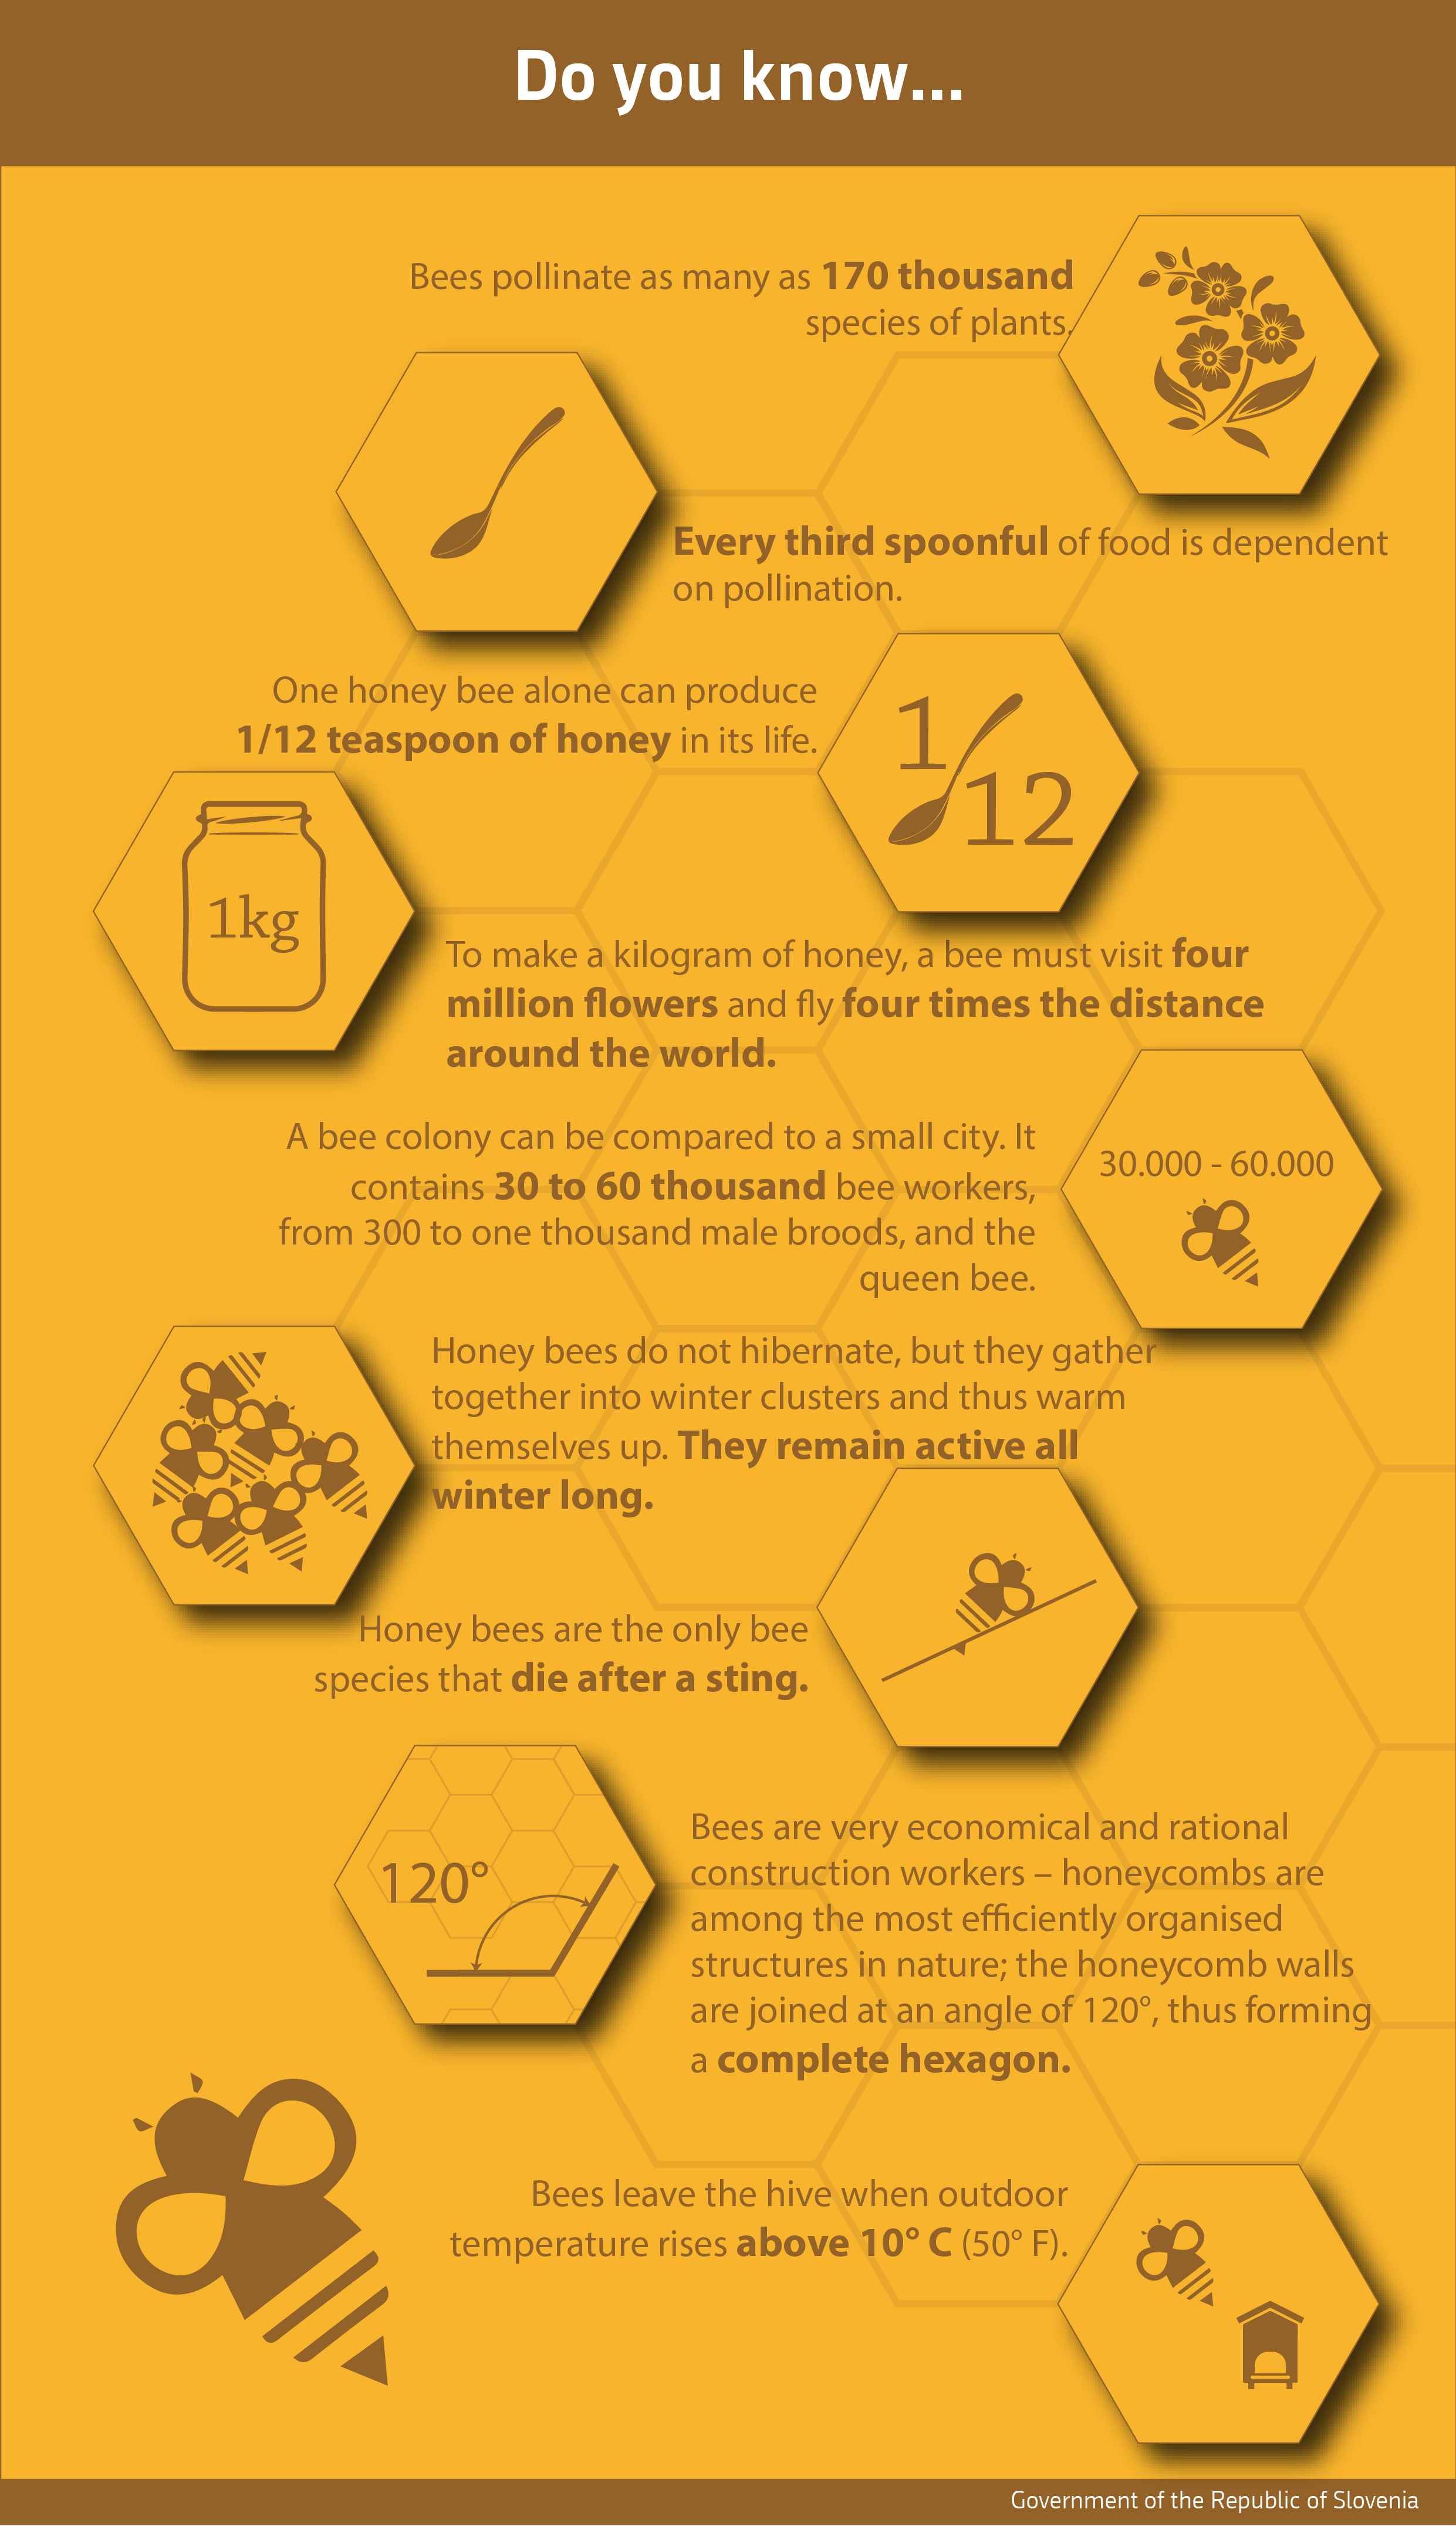
    Interesting facts...
    • "Bees pollinate as many as 170,000 species of plants.
    • Without bees, there would not be so many different kinds of fruits and vegetables, or such beautiful colors on the lawn.
    • A bee colony is as big as a small town. There are from 30,000 to 60,000 bees in each colony.
    • The queen bee is the only one that lays eggs. She lays up to 2,000 eggs per day.
    • Out of 20,000 species of bees, only one is widely used for commercial honey production.
    • The Carniolan honey bee, Apis mellifera carnica, is an indigenous Slovenian race of bee and the second most widespread bee race in the world.
    • Honey bees’ wings strike 11,400 times per minute, thus making their distinctive buzz.
    • Honey bees are the only bees that die after they sting. 
    • To make one kilogram of honey, the bees have to visit 4 million flowers and fly four times the distance around the world."

    Honey bees provide a wide range of benefits to humans from apicultural products, pollination of food crops and ecological services. Beekeeping is practiced all around the world. Honey and wax are the best known primary products of beekeeping, but there are more products of beekeeping that are very valuable. The main bee products that are used for human consumption are: honey, pollen, propolis, royal jelly and venom.
    Source: http://www.fao.org/fsnforum/activities/discussions/beekeeping

    I use most products mentioned above regularly: honey, pollen, propolis and royal jelly. I find these all great for my health and for boosting my immune system. :o)

    Only thing I don't and can't use from bees is venom. I'm very allergic to bee's venom (and other stinging insects) and have very bad allergic response to those.


    What can we do to protect bees and other pollinators...
    • "Care for the environment and avoid harming it.
    • Plant a variety of nectar-bearing plants and native species that bloom form spring to autumn to provide food for pollinators.
    • Provide a welcoming environment for solitary bees and other pollinators with a feeder hut/shelter.
    • Mow lawn less often and when bees are not present (i.e. early morning or late afternoon).
    • Seek out local beekeepers and support them by buying bee products.
    • Educate our community about the importance of bees and encourage pollinator-friendly campaigns and events."

    Illustrator: Hannah Rosengren Moran


    Find out more about World Bee Day, key milestones in the proclamation of World Bee Day, interesting facts about bees, pollinators, apiculture, what each individual can do for bees etc. in a World Bee Day Organization's Interactive brochure about World Bee Day and Brochure Why bees matters - Food and Agriculture Organisation of the United Nations.


    And here is what I created for today's hop: Just BEE-cause Card. :o)


    How I made my card...

    To make my card I used Your Next Stamp 'Honey Bee' stamp set and a mini honeycomb die from Your Next Stamp 'Honey Drip and Honeycomb Combo' die set. Super cuteness overload!!! LOVE!!!! ♥

    I ink blended a white cardstock panel with Distress Inks, Mustard Seed and Fossilized Amber. I splattered the panel with water, dried it, ink blended and splattered it with water again. I mixed both Distress Inks with water and splattered the panel. When I was satisfied with color, I dried the panel.

    Then I worked on a honeycomb. I die cut honeycombs, glued die cuts on the panel and cut off the excess.

    I cut three more rectangles, slightly smaller than the panel, glued them together and glued them on the back of the panel. I did this to add some dimension to my card, but didn't want to use tiny foam squares for this. I glued the panel on a white top folded card base. Just to make my card sturdier, I glued one more white cardstock panel inside my card.

    Next up was an adorable bee. I stamped the bee on the white cardstock paper, colored it in grey and fussy cut it leaving a thin white border around it. Then I stamped another bee on a watercolor paper and colored it in watercolor technique using Distress Inks. I fussy cut the bee, traced edges with a black marker and glued the watercolored bee over the grey one. I did this to make the image thicker, because the watercolor paper I use is very thin.

    I heat embossed a sentiment in white on a black cardstock paper, cut the stripe to a desirable size, glued some foam on the back of the sentiment and glued it on the card. Then I glued some foam on the back of the bee and glued the bee on the card.

    As a finishing touch, I drew white highlights on the bee and white dots on the card panel and my card was finished. :o)

    Card measurements: 95 mm x 127 mm (3 3/4" x 5")

    List of supplies:
    • Your Next Stamp 'Honey Bee' stamp set
    • Your Next Stamp 'Honey Drip and Honeycomb Combo' die set
    • white cardstock paper
    • watercolor paper
    • black carstock paper
    • Ranger's Archival Ink (Jet Black)
    • Tsukineko VersaMark Watermark Stamp Pad
    • WOW! Embossing Powder (Opaque Bright White, Regular, WL01R)
    • Tim's Holtz Distress Inks:
      • Mustard Seed
      • Fossilized Amber
      • Tea Dye
      • Ground Espresso
    • Stabilo Fiber Tip Pens:
      • Light Grey 68/94
      • Dark Grey 68/96
      • Black 68/46
    • Mitsubishi Uni Pin 0.2
    • Uniball Signo White Pigment Ink Pen
    • Sakura Quickie Glue Pen
    • 3-D foam squares 5 x 5 x 2 mm
    • Sizzix Big Shot
    • Fiskars High Precision Personal Paper Trimmer
    • bone folder
    • Ranger Heat It Tool
    • acrylic block (102 mm x 102 mm)
    • Marabu fine rounded paint brush no. #2
    • Marabu fine rounded paint brush no. #0
    • Marabu fine rounded paint brush no. 3/0
    • Ranger Mini Ink Blending Tools
    • scissors
    • powder bag
    • crafting needle
    • water
    • paper towels
    • dry cloth

    I love how my card turned out!!! :o)


    GIVEAWAY

    Fantastic artists, designers and companies are supporting the blog hop with incredible generosity.

    These are the prizes they have sponsored:


    Thank you sponsors!! ♥


    I'm also giving away one Jane’s Doodles stamp set of winner's choice to one lucky winner.

    12 prizes will be given away to 12 winners.

    Giveaway is opened Worldwide (+18), except for minors.

    For your chance to win, hop along blogs of the participating designers listed in a blog hop list and leave a comment on each blog hop stop (19 blogs).

    After commenting, return back to my blog and add your name to Inlinkz at the bottom of this blog post, but prior you do, please read Blog Hop details, terms, giveaway rules and privacy policy which are shared at the bottom of this blog post, below InLinkz.

    Giveaway (Inlinkz) opens now, May 20th, 2020, 6:00 PM CEST (UTC +2).

    Giveaway (Inlinkz) closes on May 27th, 2020, 11:59 PM CEST (UTC +2).

    Winners’ names will be announced on my blog on May 31st, 2020, during the day.


    Winners have to confirm prizes by Sunday, June 7th, 2020, 11:59 PM CEST (UTC +2). Unconfirmed prizes will be redrawn. Read more at the bottom of this post below Inlinkz (giveaway terms, rules and privacy notice).


    BLOG HOP LIST

    Here is the full list of designers participating in today's blog hop.


    Milka Gubo (InLinkz – return after commenting and add your name to InLinkz)


    Thanks to all amazing Ladies who have joined me in this hop, for your tremendous help and support. This couldn't be done without you. ♥


    SOCIAL MEDIA


    Find us on social medias. Share your bee themed projects with us. :o)

    These are the hashtags to add to your posts on social medias, so we can visit and hit that button like (heart):
    #tobeeornottobeebloghop
    #savethebees
    #worldbeeday


    And that would be all from me for today. I hope you'll enjoy the hop. I can't wait to see what everyone created. :o)


    Link to this blog hop post will be added into a right sidebar, until the blog hop ends, ie. giveaway (InLinkz) closes.


    Bee happy!!! :o)


    Milka

    You are invited to the Inlinkz link party!
    Click here to enter
    GIVEAWAY TERMS, RULES & PRIVACY NOTICE

    By entering this giveaway you are confirming that you have read these terms, rules and privacy notice and you accept the same.

    These terms, rules and privacy notice are given in line with my Data Protection and Privacy Policy Statement.
    All parties joining the hop (designers, sponsors, commentators, giveaway players etc.) are covered by my Data Protection and Privacy Policy Statement.
    All commentators on this blog are also covered by Google Privacy Policy.
    No data will be used in any other way than to run this To Bee or Not To Bee Blog Hop.

    Giveaway is opened Worldwide (+18), except for minors.

    To enter the giveaway, you have to hop along blogs of the participating designers and sponsors listed in blog hop list and leave comment on each blog hop stop (19 blogs).
    After commenting, return back to this blog and add your name to Inlinkz.

    Inlinkz entries are covered by an Inlinkz Privacy Policy.
    E-mails are not visible on this blog.
    Add links to your blogs or any other profile (NO PROJECTS ARE REQUIRED TO ENTER THE GIVEAWAY, JUST COMMENTING).
    If any technical difficulty occurs you should contact me.

    Only one entry per person!
    Double entries will be removed.
    Entries who don't leave comment on each blog hop stop will be removed and not entered to the random draw.

    PLEASE do not link any disturbing or violent content to this giveaway (Inlinkz). Those will be immediately removed and blocked.

    If you entered your name to the Inlinkz and changed your mind, you can remove your entry by yourself, as the Inlinkz provides that option. If any technical difficulty occurs you should contact me and I'll delete your link through my Inlinkz account or contact Inlinkz by yourself.

    Inlinkz opens May 20th, 2020, 6:00 PM CEST (UTC +2).
    Inlinkz closes May 27th, 2020, 11:59 PM CEST (UTC +2).

    I will permanently delete all Inlinkz entries from this posts after the giveaway is closed and winner's names announced here on my blog, latest by June 30th, 2020.
    No data will be kept neither shared with any other party.
    If you want to delete your entry to Inlinkz earlier (before I permanently delete all entries), you can do it by yourself as the Inlinkz provides that option to anyone or contact me and I'll delete your entry through my Inlinkz account or contact Inlinkzby yourself.

    12 prizes will be given away to 12 winners.

    Prizes can't be exchanged for money.
    Prizes can't be exchanged for other prize.

    Winners will be randomly picked using Random.org from all entries to Inlinkz.
    Winners' names (they provided) will be announced in winners post here on my blog on May 31st, 2020, during the day.
    Winners have to confirm prizes by Sunday, June 7th, 2020, 11:59 PM CEST (UTC +2).

    Unconfirmed prizes will be redrawn (if any) and new winners' names announced on my blog on June 9th, 2020, during the day.
    Prizes will be redrawn until all prizes given away.

    After winners' names announced here on my blog, winners have to contact me via e-mail to arrange prize delivery details.
    Winners can confirm prizes only by contacting me and can't confirm their prizes by contacting sponsor directly.
    Winners have to send me confirmation e-mail from the e-mail entered to the Inlinkz.
    After the winner of a particular prize contacts me, I will forward sponsor's contact details or gift certificate codes provided by each sponsor itself to the winner.

    Winners' names will be permanently deleted from winners post on this blog as soon as all prizes confirmed (or redrawn), as well as correspondence with winners, latest by June 30th, 2020.
    Any comment left on winners post which reveal winners' names will be permanently deleted as well, latest by June 30th, 2020.

    Winners post will not be deleted from my blog.


    No data will be kept neither shared with any other party.


    Update (June 30th, 2020):
    In line with Giveaway Terms, Rules and Privacy Notice (see above) and my Data Protection and Privacy Policy Statement, I've permanently deleted all Inlinkz entries to this giveaway.


    Related Posts Plugin for WordPress, Blogger...