Showing posts with label Bear. Show all posts

Friday, October 8, 2021

Jane's Doodles Warm Hugs Release Blog Hop


Happy Friday! :o)

Welcome to a Jane's Doodles Warm Hugs Release Blog Hop. Today we are featuring a BEAUTIFUL 'Warm Hugs' stamp set released into the store. :o) We also have 5 amazing super talented Guest Designers joining us today. :o)


Beautiful!!! Love love LOVE!!!!! :o)


And here is what I prepared for today: Thankful For You Card. :o)


How I made this Card... 

For my card I used most stamps from the set. I love to create my own backgrounds. It's a great way to use as much as possible stamps from one set. I call that good use of the set. :o)

First I arranged tinny stamps on an acrylic block and randomly stamped tiny images from the set on a Kraft paper panel in watermark stamping technique using VersaMark Watermark Ink. I filled gaps by stamping one by one image in gaps. After drying, I stamped the sentiment in black on the panel.

I cut and folded a card base, slightly larger than the panel. I also cut 3 more panels from the Kraft paper. I glued (stacked) two panels together. I did this to add some dimension on my card, as I don't have any foam sheet in my stash and to glue 3-D foam squares on the entire panel was not an option. I glued the stamped panel on stacked panels and glued them on the card base. Last, 3rd panel, I glued inside the card to make it sturdier.

Then I stamped a bear and leaves on a thick watercolor paper and colored images in watercolor technique with Caran D'Ache Prismalo Aquarelle colored pencils. After drying, I fussy cut images leaving white thin border around them. I glued 3-D foam squares (2 different thickness) on the back of each image and glued them on the card and my card was finished. :o)


I love how my card turned out!! :o)

At the bottom of this post you can find detailed supply lists of my today's card. Link to this post will be in a right sidebar until the Blog Hop ends. :o)


And now to the Blog Hop prize...

Our generous Jane will be giving away one stamp set of winner's choice to one lucky winner. All you have to do is leave a comment on all blogs along the Hop for your chance to win.

Here is the Blog Hop order:


Jane will announce the winner on Monday, October 11th, 2021, at Jane's Doodles Blog.

Also, Jane is having 25% off sale through this weekend. No code needed.


Now hop over to Katerina's IG account and see what she created for today's hop.


Thank you for visiting. I hope you enjoyed on my stop today and got inspired. :o) 

Happy hopping and good luck to all!!! :o)


    Milka


    List of supplies:
    • Jane's Doodles 'Warm Hugs' stamp set
    • Canson XL Mixed Media Paper, 300 g
    • Crafter's Companion Neenah Desert Storm Kraft Coloring Card
    • Tsukineko VersaMark Watermark Stamp Pad
    • Ranger's Archival Ink (Jet Black)
    • Caran D'Ache Prismalo Aquarelle colored pencils
    • UHU universal liquid glue
    • 3-D square foams, 5 x 5 x 2 mm
    • 3-D square foams, 5 x 5 x 1 mm
    • Fiskars High Precision Personal Paper Trimmer
    • bone folder
    • round acrylic block
    • acrylic block
    • scissors
    • kraft knife
    • Xcut self healing working mat A4
    • DaVinci fine rounded paint brush no. 2/0
    • paper towels
    • water

    Card measurements: 146 mm x 82 mm (5 3/4" x 3 1/4")


    Monday, November 30, 2020

    Bear Hugs Mini Circle Card (Jane's Doodles DT)


    Hi everyone! :o)

    Today I want to share with you this Bear Hugs Mini Circle Card. It was my spotlight project for Jane's Doodles on Tuesday, November 3rd, 2020. I didn't manage to share it here on my blog earlier, so I'm sharing it today. :o)


    To make this card I was inspired with a card I made for our last Jane's Doodles Release Blog Hop (here).

    For my card I used stamps from two GORGEOUS Jane's Doodles stamp sets: 'Pumpkin Patch' and 'Bear Hugs'. ♥


    How I made my card....

    First I created a background panel. I randomly stamped acorns and pumpkins on a Kraft paper in watermark stamping technique using VersaMark Watermark Ink. Then I die cut a wonky stitched circle from the Kraft paper.

    Then I made a card base. I cut two circles from a white cardstock paper and glued them together on the top.

    I glued the panel on the circle card base.

    Next up was an image. I stamped an adorable bear on a watercolor paper and colored him in watercolor technique with Distress Inks. After drying, I fussy cut the bear and traced edges with a black marker.

    I stamped another bear on a white cardstock paper, colored him with a grey marker and fussy cut him, leaving white thin border around the bear. Then I glued the watercolored bear over the grey one.

    I die cut a speech bubble form a white cardstock paper and stamped a sentiment on it.

    I love dimension on my cards. I glued 3-D foam squares (2 different thickness) on the back of the bear and the speech bubble and glued them on the card.

    As a finishing touch I drew white highlights on the bear using a white gel pen, embellished the card with two brown enamel dots and my card was finished. :o)

    I love how my card turned out. :o)


    Card measurements: d = 83 mm (3 1/4")

    List of supplies:


    Amazing fact about Bears:
    "Bears care deeply about family members. They will risk their lives and even fight to the death in order to save a cub or sibling from danger."


    Thank you for stopping by and your kind feedback. Enjoy and smile! :o)


    Milka

    Monday, September 17, 2018

    Jane's Doodles Release Blog Hop


    Hi everyone! :o)

    Welcome to a Jane's Doodles Release Blog Hop. Today we are featuring THREE new stamp sets released into the store. :o)


    Aren't they ADORABLE!! Love love LOVE!!!!! :o)

    I had so much fun playing with these sets, so I prepared four cards for today. :o)


    My first card for today is this CAS (clean and simple), Friends Card using stamps from super adorable 'Outdoors' stamp set. :o)


    With some masking, I stamped adorable critters from the set on a watercolor paper panel. I also stamped a sentiment from the set. I colored critters in watercolor technique using Distress Inks. After drying I glued the panel on a white side folded card base and my card was finished. :o)


    Second card I created for today is this CAS, Raccoon Card using 'Outdoors' and 'Patterns' stamp sets. This raccoon is so so cute!! :o)


    I stamped the raccoon on the watercolor paper and colored him in watercolor technique using Distress Inks. After drying, I fussy cut the raccoon and traced edges with a black marker. To make the image thicker, as I use thin watercolor paper, I stamped another raccoon on the white cardstock paper, fussy cut him, traced edges with black marker and glued the colored raccoon over him.

    Next up was a sentiment speech bubble. I stamped a speech bubble from another stamp set I have on the white cardstock paper with VersaMark Watermark, fussy cut the bubble and stamped the sentiment on it.

    Then I stamped stripes pattern in black directly on a white top folded card base.

    With all parts ready, I assembled the card. I glued some foam on the back of the raccoon and speech bubble and glued them on the card base. As a finishing touch, I embellished the card with two grey enamel dots. :o)


    My third card is this CAS, Wigwam Card made with stamps from beautiful 'Happy Camper' stamp set.


    First I cut out all pieces I needed: card base, window, background panel.

    I stamped Moon and stars on a watercolor paper panel. I wanted to create night sky scene. :o) I colored the scene in watercolor technique using Distress Inks. After drying, I glued the panel directly on a white top folded card base.

    Then I stamped a sentiment on a white cardstock paper panel with a cut window. I glued some foam on the panel and glued it on the card base.

    I stamped a wigwam and couple more stars on a watercolor paper and watercolored them also with Distress Inks. I fussy cut the wigwam and stars and traced their edges with black marker.

    I glued three stars on the night sky scene to add some dimension to the background.

    Then I stamped another wigwam on the white cardstock paper, fussy cut it, traced edges with black marker and glued colored wigwam over it. I did this to make the image thicker, as the watercolor paper I use is very thin.

    I added more foam on the back of the wigwam, glued it on the card and my card was finished. :o)


    Fourth and last card for today is this New Adventures Card made using stamps from 'Happy Camper' stamp set.


    On this card I decided to go with Aurora Borealis at the background, which I would LOVE to see in person. :o)

    I colored a background in watercolor technique using Distress Inks. I used thick watercolor paper for it. When I was satisfied with the color, I blended edges with Black Soot Distress Ink to get more dramatic look. Then I splattered the panel with white tempera color mixed with water. I smeared a bit of the white tempera color here and there where I wanted to get lighter parts of the Aurora Borealis. After drying, I glued the panel on a black top folded card base and drew couple shiny stars with white pigment ink.

    Next up was a tent. I stamped the tent on a watercolor paper and colored it in watercolor technique using Distress Inks. After drying, I fussy cut it and traced edges with a black marker. To make the image thicker (this paper is thinner than the paper I used for the background) I stamped another tent on the white cardstock paper, fussy cut it, traced edges with black marker and glued the colored tent over it.

    Next up was a sentiment speech bubble. I stamped a speech bubble from another stamp set I have on the black cardstock paper with VersaMark Watermark, fussy cut the bubble and heat embossed in white the sentiment on it.

    I glued some foam on the back of the tent and speech bubble, glued them on the card base and my card was finished. :o)


    These would be my cards for today. I like them a lot, hope you will too. :o)

    At the bottom of this post you can find card measurements and detailed supply lists for all my today's cards. Link to this post will be in a right sidebar (Featured Post), until the Blog Hop ends. :o)


    And now to the Blog Hop prize...

    Our generous Jane will be giving away one stamp set of winner's choice to one lucky winner. All you have to do is leave a comment on all blogs along the Hop for your chance to win.

    Here is the Blog Hop order:
    Neha
    Milka (you are here)
    Marion
    Galina
    Norine
    Kaja
    Vika
    Jane will announce the winner on Wednesday, September 19th, at Jane's Doodles Blog.

    Also, Jane is having 20% off sale on all clear stamp sets. The sale ends tomorrow, Tuesday, September 18th, 2018, 11:59 PM CEST (+2 UTC).

    Now hop over to Marion's blog and see what she created for today's hop.

    Thank you for visiting. I hope you enjoyed on my stop today and got inspired. :o) Happy hopping and good luck to all!!! :o) 


      Milka


      List of supplies Friends Card:
      • Jane's Doodles 'Outdoors' stamp set
      • white cardstock paper (card base)
      • watercolor paper (panel)
      • Ranger Archival Ink (Jet Black)
      • Tim's Holtz Distress Inks:
        • Bear: Tea Dye, Vintage Photo, Ground Espresso
        • Moose: Tea Dye, Brushed Corduroy, Walnut Stain
        • Raccoon: Hickory Smoke, Black Soot
        • ground: Hickory Smoke
      • UHU liquid glue
      • acrylic block
      • Fiskars High Precision Personal Paper Trimmer
      • bone folder
      • Marabu rounded fine paint brush no. #0
      • paper towels
      • water
      • scissors
      • post-it papers (for masks)
      Card measurements: 146 mm x 95 mm (5 3/4" x 3 3/4")
      List of supplies Raccoon Card:
      • Jane's Doodles 'Outdoors' stamp set
      • Jane's Doodles 'Patterns' stamp set
      • Create a Smile ''Perfect Tune' stamp set (speech bubble)
      • white cardstock paper
      • watercolor paper (image)
      • Ranger Archival Ink (Jet Black)
      • Tim's Holtz Distress Inks:
        • Hickory Smoke
        • Black Soot
      • Stabilo Black fibre-tip pen 68/46
      • Create a Smile 'Neat & Neutral' enamel stickers
      • UHU liquid glue
      • foam scraps 1 mm thick
      • foam scraps 2 mm thick
      • acrylic block
      • Fiskars High Precision Personal Paper Trimmer
      • bone folder
      • Marabu rounded fine paint brush no. #0
      • paper towels
      • water
      • scissors
      • crafting needle
      Card measurements: 89 mm x 120 mm (3 1/2" x 4 3/4")

      List of supplies Wigwam Card:
      • Jane's Doodles 'Happy Camper' stamp set
      • white cardstock paper
      • watercolor paper
      • Ranger Archival Ink (Jet Black)
      • Tsukineko VersaMark Watermark Stamp Pad
      • Tim's Holtz Distress Inks:
        • Wigwam: Tea Dye, Mustard Seed, Fossilized Amber, Spiced Marmalade, Twisted Citron, Cracked Pistachio, Lucky Clover
        • night sky: Mustard Seed, Fossilized Amber, Salty Ocean, Blueprint Sketch
      • Stabilo Black fibre-tip pen 68/46
      • UHU liquid glue
      • foam squares 2 mm thick
      • foam squares 3 mm thick
      • foam sheet 3 mm thick (cut to stripes)
      • acrylic block
      • Fiskars High Precision Personal Paper Trimmer
      • Sizzix Big Shot
      • My Favorite Things, Die-namics Wonky Stitched Circle STAX 
      • bone folder
      • Marabu rounded fine paint brush no. #0
      • paper towels
      • water
      • scissors
      • post-it paper
      Card measurements: 95 mm x 127 mm (3 3/4" x 5")

      List of supplies New Adventures Card:
      • Jane's Doodles 'Happy Camper' stamp set
      • Create a Smile ''Perfect Tune' stamp set (speech bubble)
      • black cardstock paper
      • SK thick watercolor paper (background)
      • watercolor paper (image)
      • Ranger Archival Ink (Jet Black)
      • Tsukineko VersaMark Watermark Stamp Pad
      • WOW! Embossing Powderer (Opaque Bright White, Regular, WL01R)
      • Tim's Holtz Distress Inks:
        • night sky & Aurora Borealis: Salty Ocean, Blueprint Sketch, Black Soot
        • Tent: Mustard Seed, Fossilized Amber, Spiced Marmalade
      • AERO tempera color (white 110)
      • Uniball Singo White Pigment Ink
      • UHU liquid glue
      • foam sheet scraps, 1 mm thick
      • foam sheet scraps, 2 mm thick
      • acrylic block
      • Fiskars High Precision Personal Paper Trimmer
      • bone folder
      • Ranger Heat It Tool
      • Ranger Mini Ink Blending Tool
      • Marabu rounded fine paint brush no. #0
      • Marabu rounded fine paint brush no. #2
      • scissors
      • powder bag
      • dry cloth
      • paper towels
      • water
      Card measurements: 95 mm x 146 mm (3 3/4" x 5 3/4")

      Thursday, June 29, 2017

      Hang in There Card (Kitty Bee Designs Spotlight)

      http://kittybeedesigns.blogspot.com/

      Hi everyone! :o)

      This is my second post today. If you missed the first one, just scroll down or follow a direct link here.


      Today is my turn to be on the spotlight over at Kitty Bee Designs and I made this Hang in There Card. :o)


      For my today's card I used an ADORABLE Kitty Bee Designs 'Hanging Around' digital image.

      I printed the image on a Kraft cardstock paper panel and left it dry couple hours to prevent ink smearing while coloring.

      I colored the image with TOZ Artist Color colored pencils and used white gel pen to color bees' wings.

      I stamped a sentiment from Gerda Steiner Designs 'Happy Fall with Squirrel' stamp set directly on the Kraft panel, glued the panel on a slightly larger dark brown cardstock paper panel, then glued them on a white top folded card base and my card was finished. :o)


      Card dimensions: 92 mm x 124 mm (3 5/8" x 4 7/8")

      List of supplies:

      I hope you'll like my KBD spotlight project for this month and get inspired. Check out more cute images at the Kitty Bee Designs Etsy Store, Kitty Bee Designs Blog and Kitty Bee Designs FB. :o)


      I'm linking my card to following challenges:
      Note: bold text and challenge badge (if any) are direct links to the current challenge and blog badge (if any) is a direct link to blog or challenge home page.

      1) Crafty Creations Challenges, #344 - Anything Goes
      This is my 1st entry to this challenge.

      2) Simon Says Wednesday Challenge, Anything Goes
      This is my 2nd entry to this challenge.

      Thank you for stopping by and your kind feedback. Stop by later this evening, I'll be sharing one more card. Enjoy and smile! :o)


      Milka

      Friday, December 11, 2015

      Happy Holidays Card (KBD Aloha Friday Challenge #62 Mid Inspiration)

      http://kittybeedesigns.blogspot.com/

      Happy Friday everyone! :o)

      Today I'm posting a mid-inspiration project for ongoing Aloha Friday Challenge at Kitty Bee Designs.

      The challenge for this fortnight is #62 - Christmas.

      Our sponsor for this challenge is Oddball Art Co, with an awesome prize for our random winner: some digital images of winner's choice.


      For this challenge I made a Happy Holidays Card, using our sponsor's lovely image Kawaii Bear on Stack of Presents.


      Image is paper pieced. I printed image and sentiment on a white cardstock paper. I printed 5 more images on designer papers and one on a scrap of white watercoloring paper. I fussy cut pieces I needed, colored edges with black marker/pen and glued all pieces together. After I glued panels on a card base, I colored dots and ribbons on the image with white pen and my card was finished. :o)

      Card dimensions are 107 mm x 149 mm (4 1/4" x 5 7/8").

      List of supplies:

      Stop by the Kitty Bee Designs blog and check out lovely projects my Design Team mates created. And don't forget to join us in this challenge. We are looking forward to see your projects. :o)


      I am entering my card to following challenges:
      Note: bold text is a direct link to the current challenge and blog badge is direct link to blog or challenge home page.

      1) Beccy's Place, December Challenge
      This is my 2nd entry to this challenge.


      2) Clear it Out Challenge Blog, Theme: Anything Goes, Stash: Anything Goes
      This is my 2nd entry to this challenge.

      3) Craft Your Passion Challenges, Challenge #291 - Always Anything Goes
      This is my 2nd entry to this challenge.
      http://craftyourpassionchallenges.blogspot.in/

      4) Glitter 'N' Sparkle Challenge Blog, Challenge #166 - Anything Goes
      This is my 2nd entry to this challenge.

      5) Lil Patch of Crafty Friends Challenge, Challenge #23 - Anything Goes
      This is my 2nd entry to this challenge.

      6) Through The Craft Room Door, TTCRD Challenge from December 8th to December to December 14th
      This is my 2nd entry to this challenge.


      Thank you for visiting and your kind feedback. Enjoy and smile! :o)


      Crafty Milka

      Friday, October 9, 2015

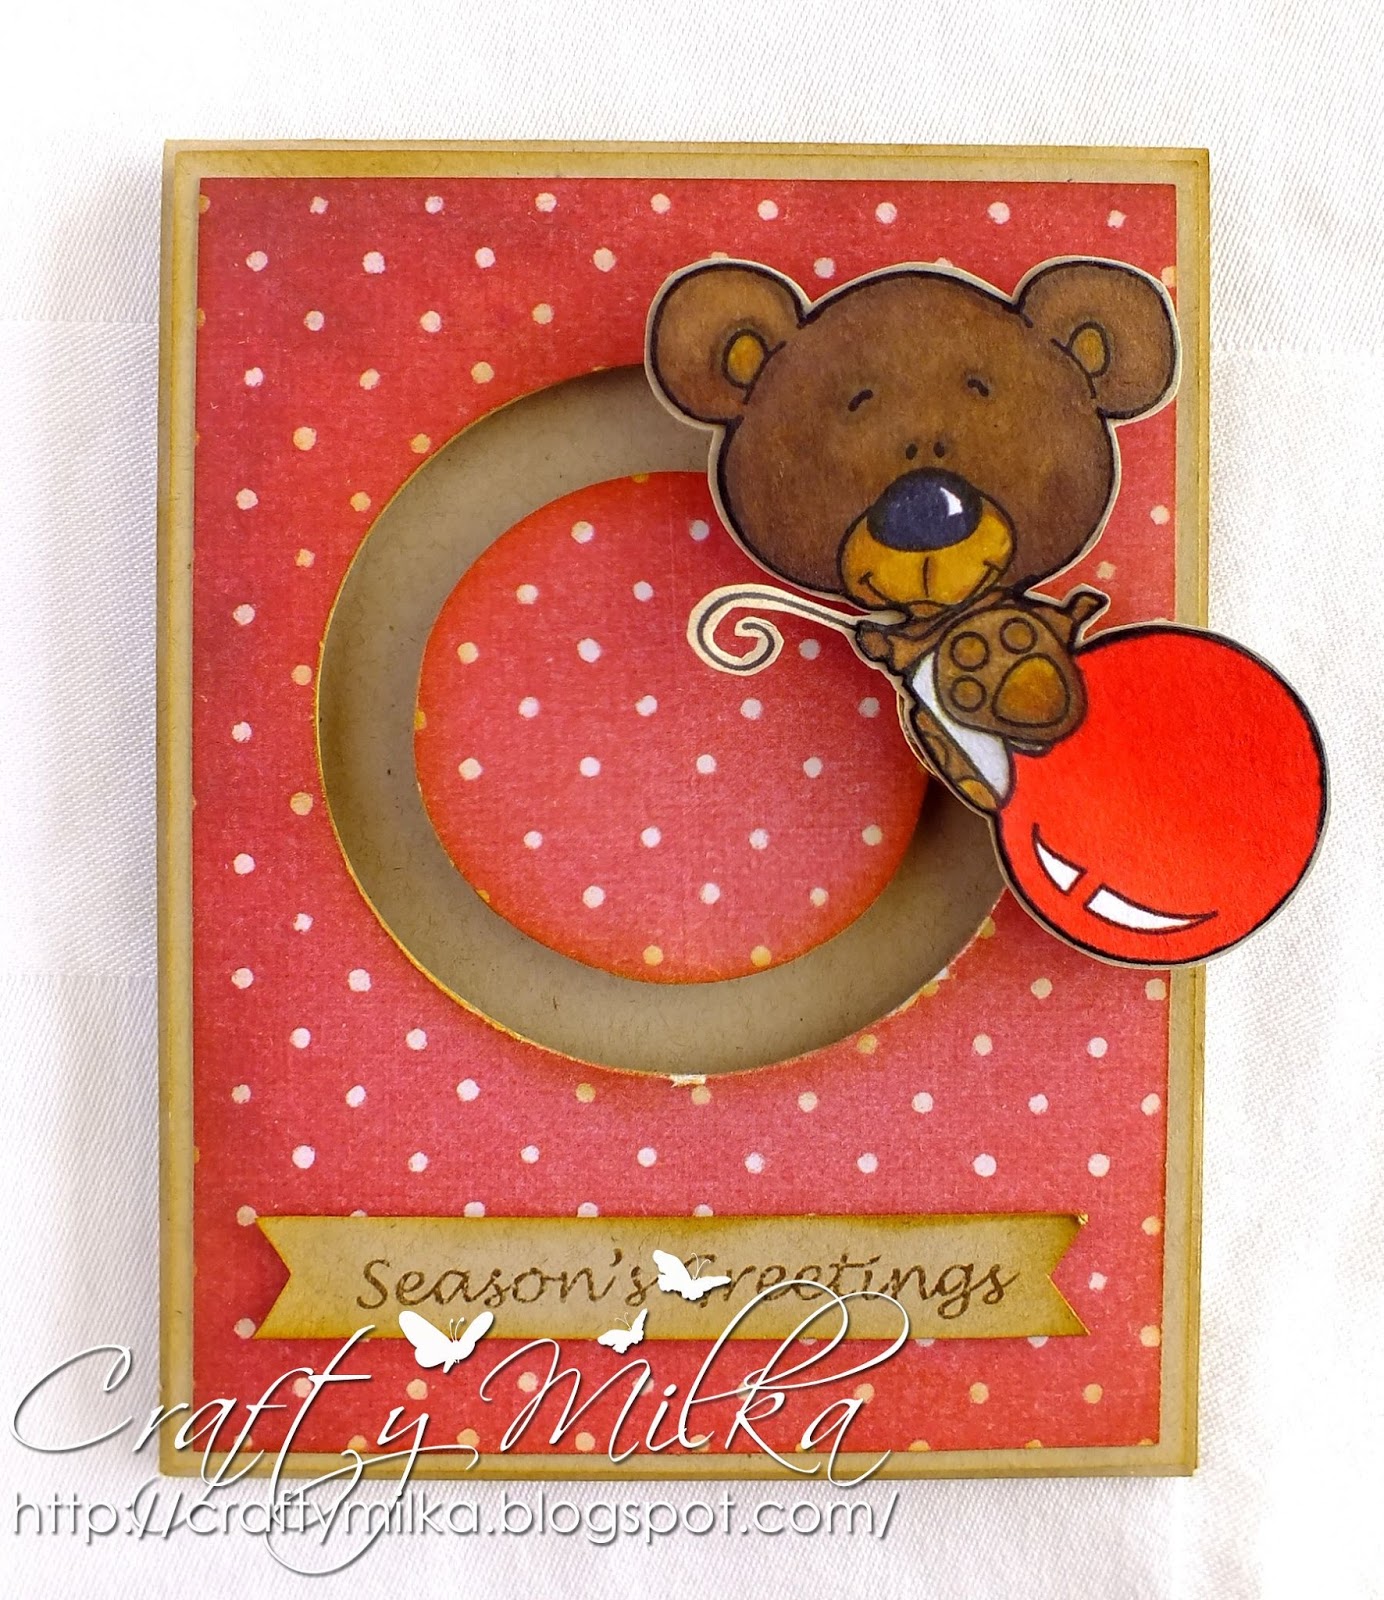
      Bear on Ornament, Circle Spinner Card (Fairy Tale Challenge #128)


      Happy Friday everyone! :o)

      It's time for a new challenge at Fairy Tale Challenge Blog.

      The theme for this fortnight is #128, Tiere im Wald / Woodland (Forest) Animals.

      A prize for one lucky winner this time is a CD-Rom with Christmas printables. :o)


      For this challenge I made an Interactive, Bear on Ornament, Circle Spinner Card. I love interactive cards! This is my first spinner card and I'm very satisfied how it turned out. :o)


      Details about my card...

      First I made card base, panel and spinning mechanism. I used Crafter's Companion Neenah Desert Storm Kraft Coloring Card and white on red polka dot paper from Crafter's Companion Bebunni Christmas Paper Pad.

      How to make Circle Spinner Card I've learned from this video tutorial on Lawn Fawn's YouTube Channel.

      I made a small difference in spinning mechanism: I used two coins and joined them together with a magnet and glued everything with UHU super glue. I did this after my mechanism started to fall apart. I made a mistake and used large heavy coin. When I glued a foam and image together with coin, everything fall. So, I didn't want to ruin my card construction and pull out coin, instead I used one more coin, small rounded magnet I had in my stash and glued everything together. This worked and it still works! :o)

      Image I used is from C.C. Designs Rubber Stamps 'Christmas With Ralphie' stamp set. I stamped a bear on ornament on white watercoloring paper, colored him in watercoloring technique using Distress Inks, water and fine brush.

      After drying I fussy cut the image and colored edges with black Stabilo pen. Then I stamped another image on a white cardstock paper, glued colored image over it and fussy cut it, but this time leaving white border around the image.

      When I placed the image on card I didn't like it, so I fussy cut whole image, removing white border, stamped another image on the Kraft cardstock paper, glued fussy cut image over it and (again) fussy cut image leaving border around it. Better repair than threw away. :o)

      Satisfied with the image, I glued 3-D foam on the outer coin and image on it.

      At the end I stamped sentiment on the piece of Kraft cardstock paper. I used part of sentiment from Jane's Doodles 'Mr. & Mrs. Claus' stamp set. I stamped it with Distress Ink Walnut Stain. I cut out banner, glued 3-D foams on it and placed it on the card.

      Here is a short video of my Circle Spinner Card. Looove this! :o)

      (incompetech.com)
      Licensed under Creative Commons: By Attribution 3.0


      Card dimensions are 107 mm x 139 mm (4 1/4" x 5 1/2").

      List of supplies: 
      • C.C. Designs Rubber Stamps 'Christmas with Ralphie' (set of two stamps)
      • Jane's Doodles 'Mr. & Mrs. Claus' stamp set (sentiment)
      • Crafter's Companion Bebunni Christmas 6" x 6" Designer Paper Pad
      • Craftter's Companion Neenah Desert Storm Kraft Coloring Card
      • white cardstock paper
      • white watercooring paper
      • two coins (10 Euro cents)
      • small magnet
      • Ranger's Archival Ink (Jet Black)
      • Tim Holtz's Distress Inks
        • Barn Door
        • Brushed Corduroy
        • Walnut Stain
        • Vintage Photo
        • Black Soot
      • Stabilo Pen Black 68/46
      • strong double sided adhesive tape
      • UHU super glue
      • Sakura Quickie Glue Pinpoint Roller
      • 3-D adhesive foams
      • acrylic block (102 mm x 102 mm)
      • scoring board
      • trimmer
      • scissors
      • tweezers
      • EK Success Circle Cutter
      • Marabu fine paint brush no. #1
      • Tim Holtz's blending tool
      • water 
      • paper towels
      • Washi tape (for masking)

      I hope you'll like my today's card. Hop over to the Fairy Tale Challenge Blog and see gorgeous projects my Design Team Mates made for this challenge. Do join us, we can´t wait to see your projects. :o)


      I am linking my card to following challenges:
      Note: bold text and challenge badge (if any) are direct links to the current challenge and blog badge is direct link to blog or challenge home page.

      1) Art Impressions Blog, Let's go for a Spin

      2) Crafting By Designs, Monthly Challenge: Anything Goes in October
      This is my 2nd entry to this challenge.

      3) Craft Your Passion Challenges, Challenge #282 - Always Anything Goes
      http://craftyourpassionchallenges.blogspot.in/

      4) Lil Patch of Crafty Friends Challenge, Challenge #19 - Anything Goes

      5) Papertake Weekly Challenge, Anything Goes

      6) Simon Says Stamp, World Card Making Day Contest
      This is my 2nd entry to this challenge.

      7) Simon Says Stamp, Work it Wednesday September 2015: Use a STAMP
      This is my 2nd entry to this challenge.

      8) Stamp and Create, October Challenge: Brown or Kraft


      Thank you for stopping by and your kind feedback. Enjoy and smile! :o)


      Crafty Milka


      P.S. Stop by later today, I'll be posting two more times.
      • Jane's Doodles, New Release Blog Hop (4 PM CEST)
      • Kitty Bee Designs, New Aloha Friday Challenge (5 PM CEST)
      Related Posts Plugin for WordPress, Blogger...