Showing posts with label Christmas Ornament. Show all posts

Friday, January 29, 2021

12 Days of Christmas - Day 10 - Ornament Shaped Reindeer Card

Happy Friday! :o)

My second post today. If you missed the first one, just scroll down, or follow a direct link here.


Welcome to 10th Day of my 12 Days of Christmas Series. I took a short break with sharing my series here with you (again). I had doctors' appointments and some tests to run and was too tired to write blog posts since Monday. 

Today I want to share with you this Ornament Shaped Reindeer Card.

 
To make this card, I was inspired with my cards that I shared on Monday here on my blog (here).


How I made the card...

First I die cut all parts from a white cardstock paper

I die cut an ornament three times. I used only frames, rest I left for other projects. I glued together frames (stacked frame die-cuts) and left them aside.

Then I die cut a reindeer three times, glued them together and left them aside.

Then I die cut a hanger two times and glued them together.

I used negative part of the die-cut ornament as a stencil. I traced the ornament shape twice on the white cardstock paper and cut them out. I used them to create a card base, but first I ink blended Distress Inks directly on one ornament shape panel. When I was satisfied with the color, I splattered the panel with a water, dabbed the surface with a paper towel and left the panel to dry on air. Then I mixed a white tempera color with a bit of water, splattered the panel and again left it dry on air.

After drying, all parts for my card were ready. I assembled the card. I glued two ornament shapes on the top and got the card base. Then I glued the frame on the card base, glued the stacked reindeer in the center of ornament shape glued the stacked hanger on the top of the ornament and my card was finished. I really like how my card turned out. :o)


List of supplies:
  • Wiler Creativity Cutting Dies, reindeer die cut (gift from a dear friend Alice of Scrap & C... THANK YOU ALICE!!! ♥)
  • Create a Smile 'Frosty Fun' kit (ornament die)
  • Sizzix Big Shot
  • white cardstock paper
  • Tim Holtz Distress Inks:
    • Broken China
    • Peacock Feathers
  • UHU liquid glue
  • Sakura Quickie Glue Pen
  • Fiskars High Precision Personal Paper Trimmer
  • bone folder
  • scissors
  • Ranger Mini Ink Blending Tools
  • Koh-i-noor tempera color, white
  • Marabu fine rounded paint brush no. #0
  • Marabu fine rounded paint brush no. 3/0
  • water
  • paper towels


Thank you for stopping by and your kind feedback. Enjoy and smile! :o)


Milka

Friday, December 18, 2020

Jane's Birthday Party Blog Hop


Happy Friday!! :o)

Welcome to a special, Jane's Birthday Party Blog Hop. :o) 

Our Jane turned 46 today and is celebrating with this blog hop, two giveaways, one here and one on Instagram, as well with 46% off 24 hours sale. :o)

Happy birthday, Jane!!! ♥


Jane gave us, the Design Team, a simple "task" for today: to showcase our favorite Jane's Doodles stamp set. :o)

Although I love all Jane's Doodles stamp sets that I have, 122 of them, I didn't think too much which stamp set to use. I immediately knew I want to use 'Merry Gnomes' stamp set. The cutest Gnomes in stamping world. LOVEEEEE!!!! ♥


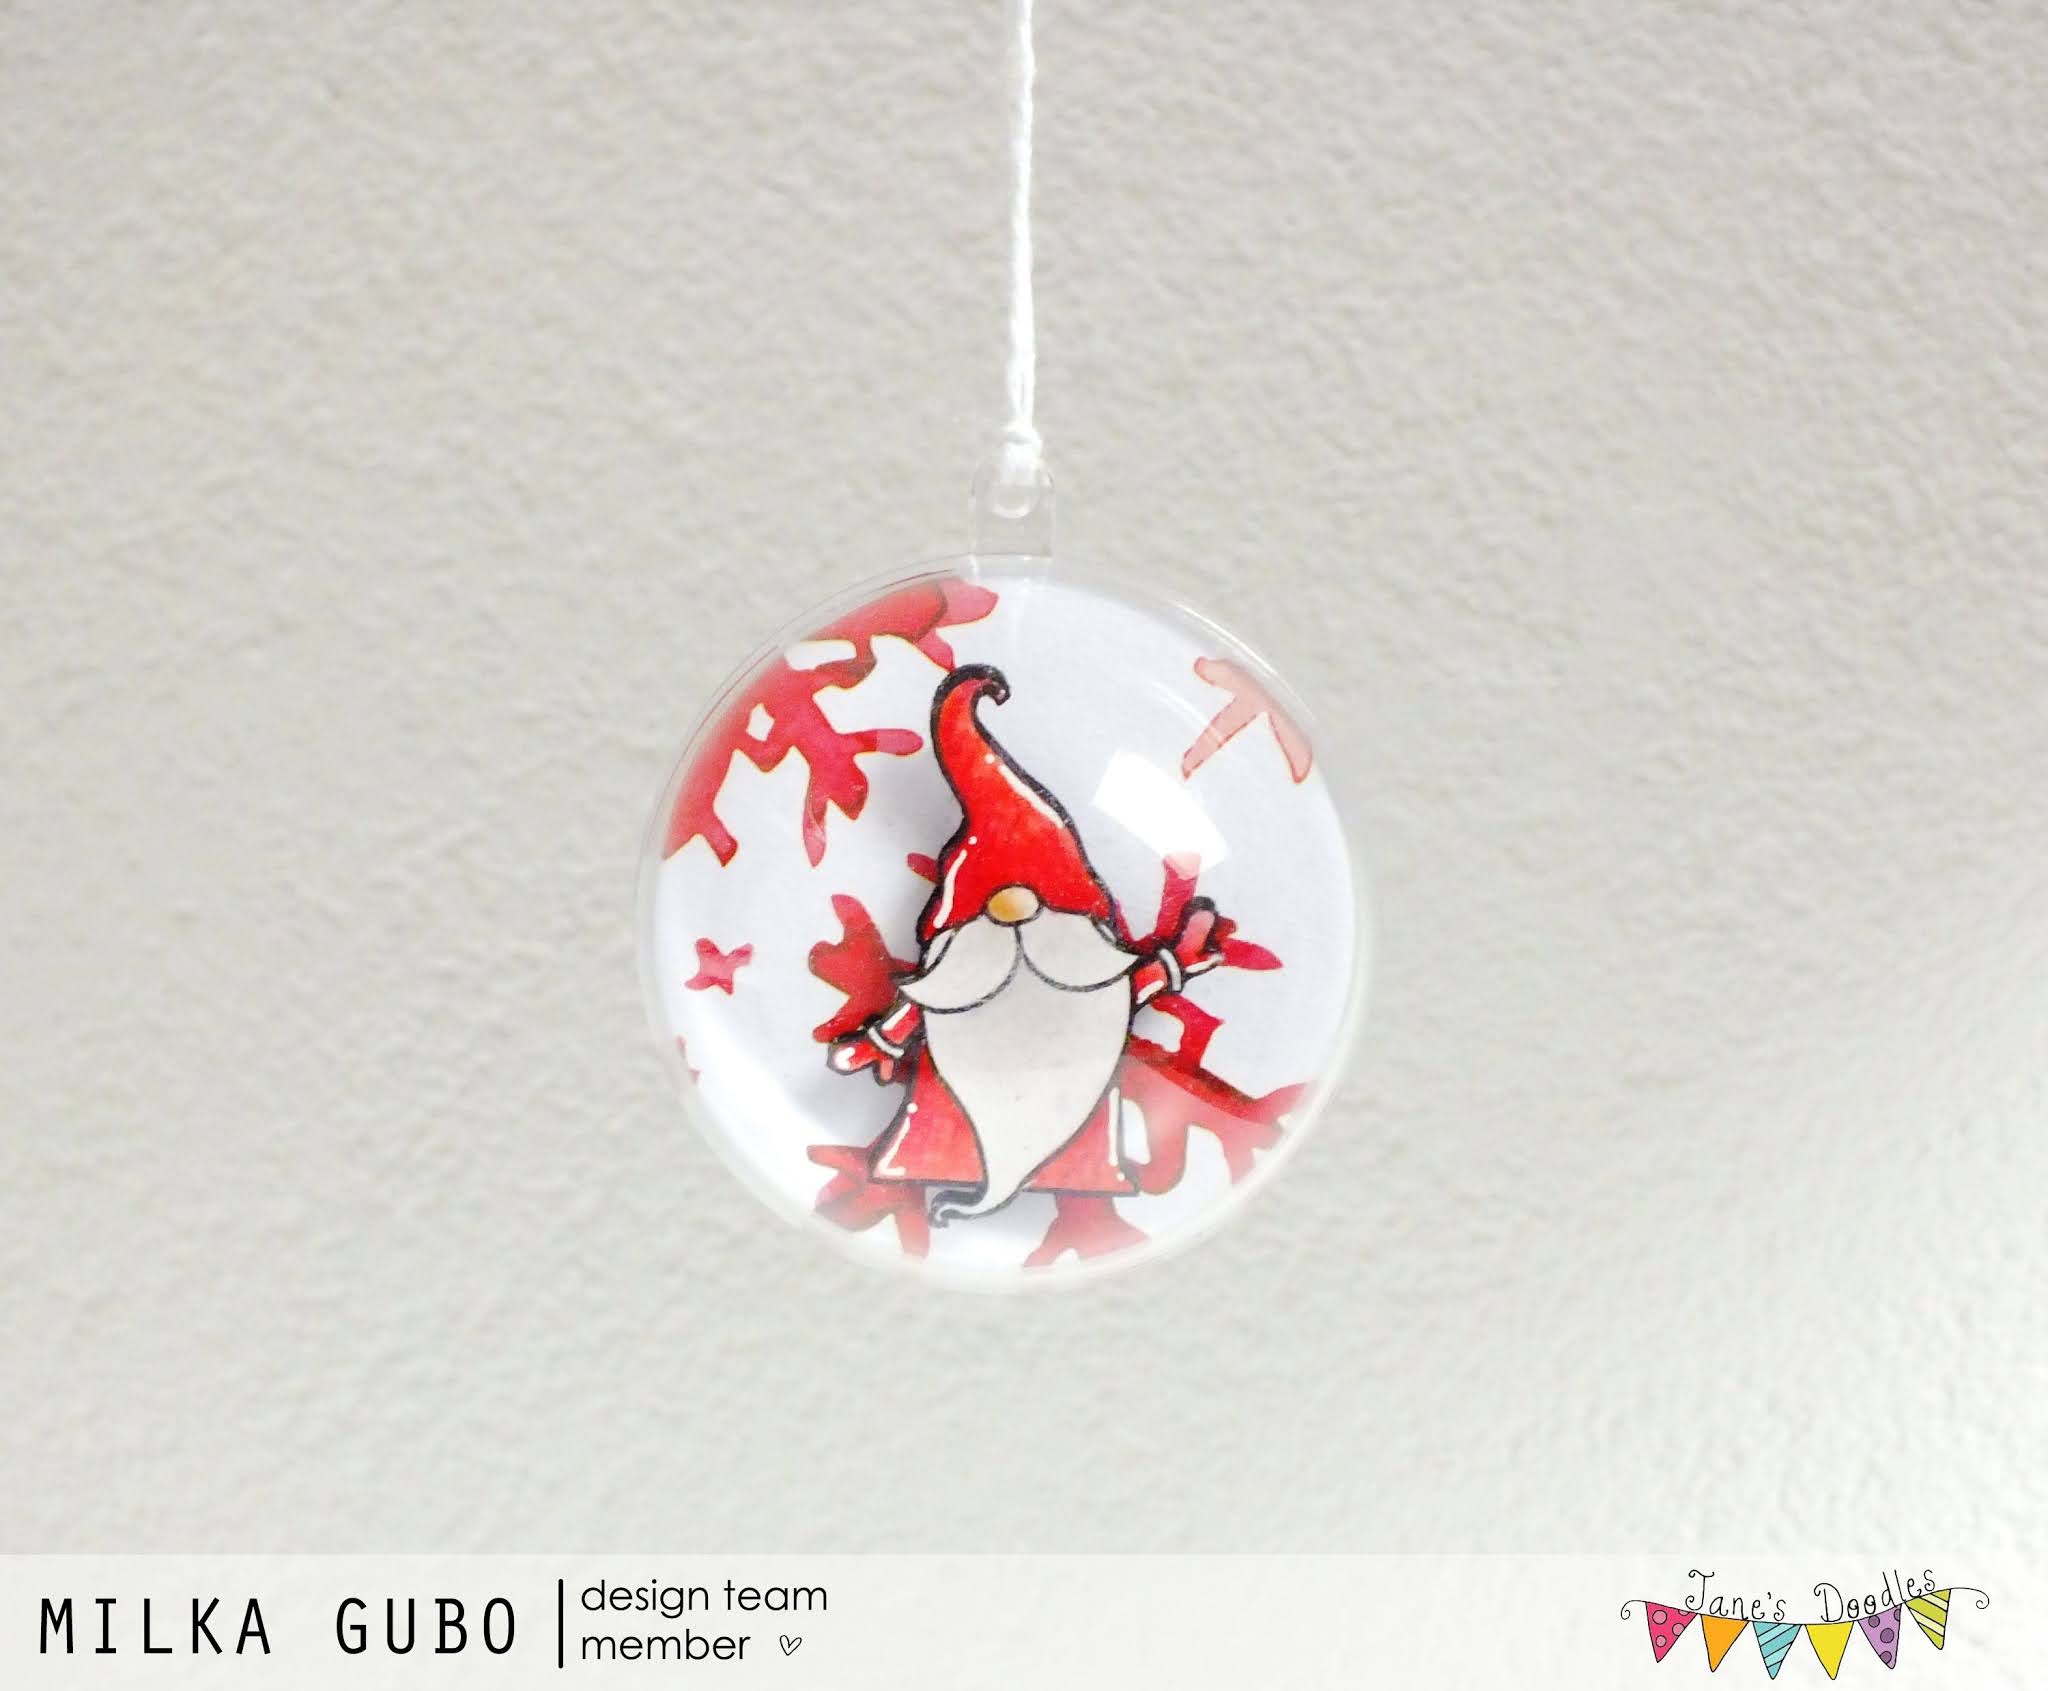
And here is what I prepared for today: Red and White Gnome Christmas Ornament. :o)


I made this one to decorate my Christmas tree. Red&white color combination is the combination I want this year. :o)


How I created my ornament...

I stamped a gnome on a watercolor paper and colored him in watercolor technique, using Distress Inks and colored pencils. After drying, I fussy cut the gnome, traced edges with a black marker and left him aside. 

I cut a circle from a beautiful patterned paper Jane sent me last month. I cut another circle from a white cardstock paper and glued two circles together just to make it a bit thicker.

Then I stamped the gnome on the circle and colored him with the black marker. I stamped another gnome on the white cardstock paper, fussy cut him out, traced edges with the black marker and glued the watercolored gnome over him. I did this to make the image thicker. 

I glued 3-D foam squares on the back of the gnome and glued him on the circle over the gnome colored with black marker, which adds extra shade.

I drew white highlights on the gnome's outfit with a white pigment ink pen.

Lastly, I placed circle in a clear acrylic fillable ornament ball, closed the ball, tied a white twine on the top and my ornament was finished. :o)


I love how my ornament turned out!! :o)

At the bottom of this post you can find detailed supply lists of my today's project. Link to this post will be in a right sidebar until the Blog Hop ends. :o)


And now to the Blog Hop prize...

With each Blog Hop three is a giveaway too. Our generous Jane is giving away 4 Pucker Up! stamp sets. Find all the details about blog hop prizes over at Jane's Doodles blog.

Here is the Blog Hop order:

Kaja Vezenšek
Milka Gubo (you are here)
Katerina Vorsobina (on Jane's Doodles blog)


Jane will announce winners on Monday, December 21st, 2020, at Jane's Doodles Blog.

Don't forget, Jane is having 46% off sale today. Ends midnight CET. No code needed. :o) 

There is one more giveaway on Jane's Doodles Instagram account. :o)

Now hop over to Neha's blog and see what she created for today's hop.


Thank you for visiting. I hope you enjoyed on my stop today and got inspired. :o) 

Happy hopping and good luck to all!!! :o)


    Milka


    List of supplies:
    • Jane's Doodles 'Merry Gnomes' stamp set
    • white cardstock paper
    • watercolor paper
    • patterned paper
    • Ranger's Archival Ink (Jet Black)
    • Tim's Holtz Distress Inks:
      • Tea Dye
      • Hickory Smoke
    • Caran D'Ache Prismalo Aquarelle colored pencils (two red shades)
    • Stabilo Fibre Tip Pen (Marker), Black 68/46
    • Uniball Signo White pigment ink pen
    • UHU liquid glue
    • Sakura Quickie Glue pen
    • clear acrylic fillable ball ornament (d = 60 mm)
    • white twine
    • 3-D square foams, 5 x 5 x 2 mm
    • round acrylic block
    • Marabu fine rounded paint brush no. 3/0
    • Marabu fine rounded paint brush no. 5/0
    • scissors
    • paper towels
    • water
    • pencil

    Ornament measurements: d = 60 mm 


    Thursday, November 14, 2019

    Happy Holidays Card (Jane's Doodles DT Spotlight)


    Hi everyone! :o)

    Yesterday was my turn to be on the spotlight over at Jane's Doodles, but I was too tired to write a post and share it here with you. For my spotlight I made this Happy Holidays Card. :o)


    On my card I went with same color scheme like on my last week's Jane's Doodles spotlight card (here). I love it!!! :o)

    To make this card I used stamps from six GORGEOUS Jane's Doodles Christmas/Winter themed stamp sets: an ornament form 'Deck the Halls', a sentiment from 'Winter Words' and a background stamps, a holly from 'Winter Icons', a small snowflake from 'Snow Globe', a medium snowflake from 'Winter Fun' and a large snowflake from 'Driving Home for Christmas'.


    How I made my card....

    I stamped the holly and snowflakes on a Kraft paper panel in watermark stamping technique using VersaMark Watermark Ink.

    I mixed a white acrylic paint with a bit of water and, using a paint brush, splattered the panel and left it dry on air.

    Then I stamped ornaments on a white watercolor paper and colored them in watercolor technique using only one color: Distress Ink Ground Espresso. After drying, I fussy cut ornaments, traced their edges with a black marker and softened them with a stylus ball on a soft working mat. This curled a bit each ornament. I did this to add just a bit dimension to my card.

    After the panel was completely dry, I stamped three ornaments directly on the panel and colored them with a black marker. I stamped bows on each ornament and drew lines with a black fine liner. I glued the panel on a white top folded card base, slightly longer than the panel and glued watercolored ornaments over black ones.

    As splatters on the panel were pale, I highlighted some of them with a white pigment ink pen.

    I heat embossed in white the sentiment on a black cardstock paper and cut the sentiment to stripe of desirable size. To make the sentiment pop a bit on the card, without 3-D foam, I glued the stripe on a same size black stripe, just to make it a bit thicker. Then I glued it directly on the card.

    As a finishing touch, I drew white highlights on ornaments and my card was finished. :o)

    I love how my card turned out!! :o)


    Card measurements: 82 mm x 121 mm (3 1/4" x 4 3/4")


    List of supplies:


      I'm linking my card to following challenges:
      Note: bold text and challenge badge (if any) are direct links to the current challenge and blog badge (if any) is a direct link to blog or challenge home page.

      1) Addicted to Stamps and More, Challenge #367 - Make Your Mark
      This is my 1st entry to this challenge.

      2) Country View Challenges, November 2019 - Hand Stamped
      This is my 4th entry to this challenge.

      3) Love To Craft Challenge, LTCCB #40 - November Anything Goes
      This is my 2nd entry to this challenge.

      4) Love to Scrap Challenge, LTSCB #127 - Anything Goes
      This is my 2nd entry to this challenge.


      5) The Cat's Pajamas, TCP Tuesday Challenge #363 - Holiday
      This is my 2nd entry to this challenge.

      6) Your Next Stamp, Fun Friday Challenge #126 - Holiday Wishes
      This is my 2nd entry to this challenge.


      Thank you for stopping by and your kind feedback. Enjoy and smile! :o)


      Milka

      Thursday, November 22, 2018

      HO HO HO Shaker Tag

      Hi everyone! :o)

      Today I want to share with you this HO HO HO Shaker Tag. :o)


      To make this tag I was inspired with couple of my own projects from the past (here, here, here and here). :o)

      To make this type of shaker I learned from Jennifer's McGuire video: Shaker Stamped Cards. Thank you Jennifer!!

      I used various supplies from Create a Smile 'Frosty Fun' kit and Create a Smile 'Snow Dance' kit and snowflake stamps from Jane's Doodles 'Driving Home for Christmas' stamp set.


      How I made this tag...

      First I worked on an image. From all Santa images I have in my stash, I like this tiny one the most. :o)

      Image is paper pieced. I stamped Santa 4 times: 1 on a watercolor paper, 1 on a paper scrap, 1 on a designer paper and 1 on a white cardstock paper. I colored Santa's face and beard in watercolor technique using Distress Inks and fussy cut all pieces I needed. I traced edges with a black marker and softened watercolored piece with a stylus ball on a soft working mat.

      I stamped another Santa on the white cardstock paper, colored him in black, fussy cut him, leaving thin white border around him and glued all pieces over him.

      Then I glued a clear thread on the Santa's back and glued another image over it to secure the thread.

      As a finishing touch, I drew highlights and details using a black fine liner and a white pigment ink pen.


      Next up was a tag shape.

      I die cut an ornament in a Kraft cardstock paper 11 times. I used only frames (rest I left for other projects).

      I used negative part of a die-cut ornament as a stencil. I traced ornament shape twice on the Kraft cardstock paper and cut them out. I used them as a tag base. I traced ornament shape on an acetate sheer and cut it out. I used it as a window to close up my shaker.

      I cut two tiny hills from the white cardstock paper and die cut ornament top in the patterned paper.

      Then I heat embossed in white snowflakes on one ornament shaped base. I glued white hills on the base and drew white dots.

      With all parts ready, I started assembling the tag. I didn't want to put any shaker elements beside Santa in my tag, as it seemed it would look way too busy with more elements when I was putting the tag together.

      Here is how I stacked my tag:

      • ornament shaped tag base with snowflakes and hills
      • 4 frames glued together
      • paper pieced snowman with a clear thread
      • 5 frames glued together
      • acetate sheet ornament shape
      • 2 frames glued together

      I hope this makes sense. :o)

      I pierced the stacked tag with large needle and pierced the second ornament tag shape, and connected them together with a long fastener. I added a brown string and glue the ornament top on it's place.


      Lastly I worked on a sentiment.

      I heat embossed the sentiment in white on a black cardstock paper, cut out the sentiment into 3 pieces, glued a foam square on each sentiment piece and glued everything on the tag.

      As a finishing touch, I embellished the tag with a stacked die cut snowflake (3 pieces glued together). :o)


      List of supplies: 
      • Create a Smile 'Snow Dance' kit (Santa stamp, sentiment stamp, designer paper, snowflake die)
      • Create a Smile 'Frosty Fun' kit (ornament die)
      • Jane's Doodles 'Driving Home For Christmas' stamp set  (background snowflakes)
      • Crafter's Companion Neenah Desert Storm Kraft Coloring Card
      • white cardstock paper
      • black cardstock paper
      • watercolor paper
      • Tim Holtz Idea-ology Long Fastener
      • Docrafts 'Home for Christmas' Brown String
      • clear thread
      • acetate sheet
      • Ranger Archival Ink (Jet Black)
      • Tsukineko VersaMark Watermark Stamp Pad
      • WOW! Embossing Powder (Opaque Bright White, Regular, WL01R)
      • Tim's Holtz Distress Inks:
        • Tea Dye 
        • Iced Spruce
      • Stabilo Fiber Tip Pen (Marker) 68/46, Black
      • Mitshubishi Fine Liner 0.2
      • Unibal Signo White Pigment Ink
      • UHU glue roller
      • UHU liquid glue
      • 3-D foam squares (5 x 5 x 2 mm)
      • Sizzix Big Shot
      • bone folder
      • acrylic block (102 mm x 102 mm)
      • scissors
      • tweezers
      • crafting needle
      • Ranger Heat It Craft Tool
      • Marabu fine rounded paint brush no. #0
      • stylus ball
      • soft working mat
      • paper towels
      • water
      • pencil
      • eraser


      Here is a short video. :o)


      With this tag I played in a super fun Create a Smile's Instagram Event: Create a Smile Winter Bash. (shared on Instagram yesterday, Wednesday, November 21st, 2018: photos, video)


      I'm also linking my card to following challenges:
      Note: bold text and challenge badge (if any) are direct links to the current challenge and blog badge (if any) is a direct link to blog or challenge home page.

      1) Crafting By Designs, Anything Goes November Edition
      This is my 3rd entry to this challenge.

      2) Happy Little Stampers Anything Goes with Dies Challenge, November 2018
      This is my 2nd entry to this challenge.


      Thank you for stopping by and your kind feedback. Enjoy and smile! :o)


      Milka

      Tuesday, January 16, 2018

      Ornament Shaped Winter Shaker Card (Fairy Tale Challenge #185)


      Hello everyone! :o)


      It's time for a new challenge over at Fairy Tale Challenge Blog.

      Our theme for this fortnight is #185, Photo Inspiration. Create anything inspired by a photo below.


      I was inspired by a beautiful winter frozen scene and created this Ornament Shaped Winter Shaker Card.


      To make this card I used gorgeous dies from Create a Smile 'Frosty Fun' kit.

      I die cut an ornament in a white cardstock paper. I blended sky with Distress Inks and after drying coated it with Clear Wink of Stella. I did same with a hanger.

      I used negative part of a die-cut ornament as a stencil. I traced ornament shape twice on the white cardstock paper and cut them out. I used them as a card base.

      I glued all parts of the ornament die-cut on the ornament shaped base.

      I didn't want to use foam for my shaker card, so I die cut 10 more ornaments in the white cardstock paper and used only frames (rest I left for other projects). I glued 9 frames together and glued them on the ornament. I glued acrylic sheet on a last frame to get a window, filled the card with shaker elements and glued the window on the ornament.

      As shaker elements I used snowflake die-cuts and tinny die cut leftovers from my previous projects. :o)


      Lastly, I connected the ornament shaker and the ornament shape together with a long fastener and glued the hanger on the top of the ornament. Clear Wink of Stella over the hanger and my shaker card was finished.


      List of supplies:
      • Create a Smile die from 'Frosty Fun' kit
      • white cardstock paper
      • Tim's Holtz Distress Inks
        • Mermaid Lagoon
        • Blueprint Sketch
      • Tim Holtz Idea-ology Long Fastener
      • ZIG Wink of Stella Brush (Gl. clear 999)
      • UHU universal glue
      • Sizzix Big Shot
      • Ranger Mini Ink Blending Tool
      • scissors 
      • crafting needle
      • pencil
      • eraser

      I hope you'll like my card for today and get inspired. For more inspiration, challenge and prize details stop by the Fairy Tale Challenge Blog. Do join us, we can't wait to see your projects. :o)


      I'm linking my card to following challenges:
      Note: bold text and challenge badge (if any) are direct links to the current challenge and blog badge (if any) is a direct link to blog or challenge home page.

      1) Happy Little Stampers Christmas Challenge,January: Anything Goes
      This is my 1st entry to this challenge.

      This is my 1st entry to this challenge.

      3) Noor! Design U.K., January Challenge: Anything Goes


      Thank you for stopping by and your kind feedback. Enjoy and smile! :o)


      Milka
      Related Posts Plugin for WordPress, Blogger...