Hi everyone! :o)
How I made this notebook...
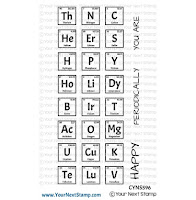
To make this notebook I used stamps from two Your Next Stamp stamp sets: 'Perfect Chemistry' and 'Periodically Nerdy'. :o)
I colored a professor during Kathy's Racoosin 13th 30 day coloring challenge (a preview of all my coloring here).
I stamped the professor on a watercolor paper and colored him in a watercolor technique using Distress Inks. First I colored his tongue in pink, but I didn't like it, so I recolored it with a Tea Dye Distress Ink, same color I used for the skin. After drying, I fussy cut the professor and traced edges with black marker.
I left the image aside until I got a clear idea on how the notebook will look like (ehmmm, two months).
I made notebook covers using a white cardstock paper and a blue cardstock paper. When covers were completely dry, I punched holes on the cover spine and glued magnets on covers.
I selected letters from Periodic Table of Elements which form word 'Notebook', stamped them on a printed patterned paper, fussy cut letters and glued them directly on the notebook front cover.
Then I stamped the professor again, this time on the white cardstock paper, fussy cut him, colored with a grey marker, traced edges with the black marker and glued watercolored professor over him. I did this to make the image thicker. Then I glued the professor on the front cover.
Next up was a pocket. I managed to smear a glue inside of covers and I needed something to cover that up and not to start all over again. I made a simple pocket and glued it inside of the notebook, over the ugly glue stain. :o)
Lastly, I placed binding rings into punched holes on the cover spine, filled the notebook with grid papers and the notebook was finished.
Covers measurements:
length: 6 3/4" + 3/4" + 6 3/4" + 5/8" + 2"
height: 3 1/2"
length: 6 3/4" + 3/4" + 6 3/4" + 5/8" + 2"
height: 3 1/2"
List of supplies:
- Your Next Stamp 'Perfect Chemistry' stamp set
- Your Next Stamp 'Periodically Nerdy' stamp set
- white cardstock paper
- blue cardstock paper
- watercolor paper
- grid paper
- printed patterned paper
- Ranger's Archival Ink (Jet Black)
- Tim's Holtz Distress Inks:
- Stabilo Fibre Tip Pen (Marker), Black 68/46
- Stabilo Fibre Tip Pen (Marker), Light Grey 68/94
- magnet
- two steel binding rings
- UHU liquid glue
- hole puncher, medium size
- hammer
- Xcut self healing working mat
- Fiskars High Precision Personal Paper Trimmer
- bone folder
- Sizzix Big Shot
- the largest circle die from Sizzix Big Shot starter kit
- acrylic block (102 mm x 102 mm)
- Marabu fine rounded paint brush no. #0
- water
- paper towels
- scissors
- ruler
- pencil
- eraser

Although the binding didn't turned out as I planed and pages are not flipping very well, I love how the notebook turned out. My friends also loved it, which made me very happy. :o) Here is a short video....
(incompetech.com)
Licensed under Creative Commons: By Attribution 3.0
http://creativecommons.org/licenses/by/3.0/
Licensed under Creative Commons: By Attribution 3.0
http://creativecommons.org/licenses/by/3.0/
I'm linking my notebook to following challenges:
Note: bold text and challenge badge (if any) are direct links to the current challenge and blog badge (if any) is a direct link to blog or challenge home page.
1) Addicted to Stamps and More, Challenge #357 - Make Your Mark
This is my 1st entry to this challenge.


